Game Programming Genesis
Part VIII : Basic Tile Engines
Introduction
Whew... it's taken seven articles to get this far, but by now, we've all got a good idea of how to fight the beast known as Windows, and how DirectDraw works. We're ready to start putting a game together! In this article I'll show you how to construct a basic tile engine with DirectDraw. We'll go over the different ways to design such an engine, and then take a look at how to implement scrolling and tile animations. I'll be focusing on RPGs as we go along in the series, but you can certainly use a tile engine for other things as well, like strategy or puzzle games.
If you're reading this, I assume that you have a working knowledge of basic Windows programming and DirectDraw, using the C or C++ programming language. Just about everything I went through in the previous seven articles will be coming together today, so make sure you're up to speed, fire up Visual C++, and let's get going!
The Design
Before you jump in and start coding, you have to have some idea of what it is you're trying to create. There are any number of variables you have to consider when designing a tile engine, like tile size and shape, tile animations, number of layers, map sizes, and so on. As I pointed out more than once last time, you don't want to just start writing code without having all this stuff planned out. So before we get into the actual development of the engine, let's briefly consider a few of these variables.
Tile size and shape: Here you have a few options. There are three common choices for tiles: squares, hexagons, and diamonds. Square tiles are good for RPGs since the arrow keys or directional buttons on a gamepad normally provide four major directions of movement. Conversely, hexagons are generally not good for the type of game where the player will be actively controlling the character's movement... unless you've got some kind of strange keyboard with six arrow keys on it. Hexagons are usually a good choice for games where most of the movement will be done with some sort of pathfinding, as in many realtime strategy games. The diamond-shaped tiles make for a game that looks like it's using square tiles, but with the viewpoint rotated 45 degrees. It all depends on what kind of game you're going for. Normally when someone brings up tile-based games, I tend to think of the good old days of the Genesis and Super Nintendo, of games like Final Fantasy VI. So for the example in this article, we'll go that route and use square tiles.
Tile size is something you want to choose based on how much of the world around the character you want to be able to see, and what resolution you'll be using. For a resolution of 640x480, I've found that making square tiles at 32x32 works well. So that's what we'll do.
Tile animations: The next thing to consider is if you want to support animated tiles, and if so, what kind of restrictions you want to place on the animations so that they look nice, but don't become too tough for you to handle. The answer to the first question is, of course we want animations! Who wants to have water that doesn't flow, fire that doesn't burn, or fountains that have little water droplets somehow magically suspended in the air above them?
Don't get worried about this; animating tiles is actually very easy to do, and I'll take you through it step by step. What we'll do is to create a system that substitutes one tile for another at given intervals of time. Since the screen will be getting redrawn during every frame, swapping the tiles around like this will give the effect of animation. It will be flexible enough to support animations with any number of frames, moving at varying speeds, but simple enough that all you need to know is how to use a linked list. Incidentally, if you don't know how to use a linked list, I'm sure GameDev.Net has an article or two that will show you how.
There's one more thing to consider for tile animations, and that's realtime effects. Imagine this: what if instead of making a torch burn by drawing the frames of animation, you actually applied an algorithm to the fire during each frame to make it look like it's burning? Realtime effects can be very cool, but they're just a little too advanced for what I'll be showing you here. Perhaps I'll cover how to do it in a later article, or maybe you can figure it out on your own!
Layers: First let me clear up the question a little bit: by layers I mean layers of graphics on the screen. The simplest maps have only one layer: the whole map is drawn in one pass, with one tile in each map position. Complicated maps might have separate layers for backgrounds, background objects, items that can be picked up, foreground objects, foreground effects... I've seen some engines where I could just swear the person who wrote it was just trying to come up with as many layers as possible. :)
I recommend using at least two layers: one for background, and one for foreground. This will let the character walk "behind" certain objects, and add some depth to your maps. In Terran, I use three layers. The first is for background, the second is for objects that can appear on multiple backgrounds (like grass, dirt, etc.), and the third is foreground. Let me show you an example of this to make it a little clearer. This is a small section of a map from the game, drawn one layer at a time so you can see exactly what's going on.
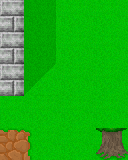 Layer 1: Here you see only the tiles from layer 1, which constitute the background for the map. None of these tiles will ever have anything behind them, which is why they are in layer 1.
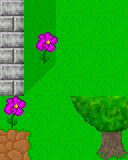 Layer 2: Now layer 2 is added. Color keys are used for layers 2 and up, so that the tiles don't have to be square objects. Notice how the flower can appear on different backgrounds because it is above layer 1. The second row of the tree is also in layer 2, so that trees can grow near different backgrounds such as grass, coastlines, or other trees.
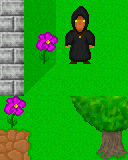 Characters: Characters are drawn next, so that they appear in front of the first two layers, but behind the third. An important thing to remember here is that characters must be drawn in order from top to bottom so that they occlude each other properly. Hence before drawing characters, Terran sorts all the visible characters by their y-values.
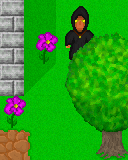 Layer 3: Drawing this layer completes the image. Since the characters have already been drawn, notice how the top of the tree occludes the character to give a sense of depth. Other things that can go in layer 3 are the tops of mountains or houses, the arch above a doorway, etc. So depth is actually relatively easy to implement!
Map size: Finally, you should consider what sizes you will be using for your maps. It goes without saying that not all of your maps will be of the same size, so the better question would be to consider what the maximum map size will be. My thoughts are, why limit the map size at all? If you want to make a ridiculously huge map that takes an hour to cross, you should be able to! The only thing to keep in mind is how much memory this will take. If you have fewer than 256 tiles in a given tileset, then you can represent each tile by a single byte. If you use three layers, and set the maximum map size to 300x300, you get 300*300*3 = 270K bytes. That's certainly not an unreasonable amount of memory to use for maps. And if you want to create larger maps, you can always implement a system that works by loading the map one 300x300 section at a time, for whichever part of the map the player happens to be at. For this example, though, we'll say 300x300 is the maximum size.
We're now starting to get an idea for what sorts of things we will include in our tile engine. Before moving on, we need to take a closer look at maps for a moment, to figure out how we will store them.
Map Files
Before you decide on a file format, you need to decide exactly what game data will be stored in the map files. There are all kinds of things you could stuff in there if you wanted to. For instance:
- The tiles themselves
- Items that can be picked up
- Other characters (NPCs)
- Enemies
- Scripts
The tiles themselves make up the map, so obviously those must be included. The others are all optional. Items can be included if you want to have items lying around the map for the player to pick up. Characters can be included if you will always (or usually) have the same NPCs on the map every time you load it. Enemies are also an option, in a few different ways. For a game in which enemies will be encountered on the actual map screen, you can include actual enemy data about where enemies are located. For a game in which encounters are random, you can include the types of enemies which can be encountered in given regions. Finally, scripts are always a good choice, because this allows you to link scripts to a map. For instance, suppose the player is approaching the throne room of a castle, and you've got a great story scene all lined up. If you include a script index associated with the tile that the player will step on as he enters the throne room, you can write your game such that the script will automatically load and run at that time, launching the game into your story scene. I know that sounds a bit vague since we haven't covered scripting, so just keep in the back of your mind for now. :)
Once you've answered the previous question about what to include in your map files, it's pretty easy to come up with a file format you can use for them. An example might be something like the basic format below. My format for Terran is very similar, only with the sections for items and NPCs removed.
--HEADER--
- File identifier (flags this file as a game map file)
- Dimensions of map in tiles
- Number of layers in map
- Number of scripts linked to map
- Number of enemy regions on map
- Number of items on map
- Number of NPCs on map

--DATA--
- Tile data
- Script data
- Region data
- Item data
- NPC data
All there is to it is to write the relevant data to a file in the correct order. If you're not totally comfortable with file I/O and that sounds a little sketchy, never fear... writing and reading map files will be demonstrated in the sample code that comes with this article. When you want to actually create large map files, you'll need to write yourself a map editor. That might sound daunting... but if you can write a tile engine, you can write a map editor. They're actually quite similar. Getting into that would make this article way too long, so again, perhaps I will cover this in the future. Try a few things and see what you can come up with!
Data Structures
All right, now it's time to figure out how we will represent our world. In our case, this will mean creating two data structures: one to represent a map, and one to represent an individual tile. Let's do the map structure first. You are going to want to keep track of all the sorts of data that is stored in a map file, plus one more very important thing: the camera. The camera keeps track of where on the map the player currently is. We'll see exactly how it works in just a minute. For now, let's have a look at a sample map structure:
typedef struct MAPDATA_type
{
  int xMax, yMax;              // map size in tiles
  int xCamera, yCamera;        // camera location in pixels
  int xMaxCamera, yMaxCamera;  // max camera coordinates
  int nNPCCount;               // number of NPCs
  int nScriptCount;            // number of linked scripts
  LPNPC lpnpc;                 // linked NPCs
  LPSCRIPT lpscr;              // linked scripts
} MAPDATA, FAR* LPMAPDATA;
And now we declare a variable of this type, along with an array of BYTEs to hold the actual tile indices:
BYTE byMap[300][300][2];       // the actual tiles
MAPDATA mapdata;               // the other map data
Depending on what kinds of things you'll be adding to the map, you might also want to include entries for items, enemies, or enemy areas. For the actual example code that I'll include with this article, I won't even be including the scripts and NPC members, since I don't want to introduce too much at once. I've included it here so you can see an example of how it might be included once you expand your engine into something you can build a game on. Now, let's take a closer look at the members of this structure.
int xMax, yMax: These are the actual map dimensions. They are stored in the map file.
int xCamera, yCamera: These are the current coordinates of the "camera," and so they are changing constantly. The initial values are set by whatever script loaded the map. Each frame, the map is drawn with the upper-left hand corner of the screen at the camera coordinates. Thus, the minimum camera coordinates are (0, 0).
int xMaxCamera, yMaxCamera: These are the maximum camera coordinates, and are calculated based on the size of the map. Each tile in Terran is 32x32, so the width of the map in pixels is 32 * xMax, and the height is 32 * yMax. But the camera is located at the upper-left corner of the screen, so we have to subtract the screen dimensions. The maximum camera coordinates are thus calculated in this way:
mapdata.xMaxCamera = (mapdata.xMax - 19) * 32;
if (mapdata.xMaxCamera < 0)
  mapdata.xMaxCamera = 0;

mapdata.yMaxCamera = (mapdata.yMax - 14) * 32;
if (mapdata.yMaxCamera < 0)
  mapdata.yMaxCamera = 0;
The 19 and 14 are subtracted from the map dimensions because the screen resolution is 640x480, and thus a full screen is 20 tiles across by 15 tiles down. This accounts for the fact that the camera is positioned in the upper-left corner of the screen. If a map is ever encountered that is smaller than the screen, the maximum camera coordinates are set to (0, 0) so we don't get negative values.
int nNPCCount, nScriptCount: These are the number of NPCs and scripts currently on the map, respectively. The latter is included in the map file; the former is not. The number of NPCs will be set by the same script that is loading the map.
LPNPC lpnpc: This pointer will be an array of NPC structures, each of which describes the location and behavior of a single character. I won't get into the NPC structure here.
LPSCRIPT lpscr: This will be an array of SCRIPT structures, which simply hold the index of each script (used for locating the correct script file), and the tile it is linked to.
So that's not so bad. Now let's consider how to hold information about our tiles. What do we need to know about tiles? For starters, we need to know where on the DirectDraw surface each tile is located. There will probably be a pattern here that you can use just as easily, but I prefer to actually include a RECT for each tile, because then if you ever want to use tiles of variable sizes, the ability to do so is there. You also need to know whether or not that tile can be walked on. This will define where a player can go on the map. That's the bare minimum you need. So let's take a look at what Terran is using:
typedef struct TILE_type
{
  RECT rcLocation;    // location on DirectDraw surface
  int bWalkOK;        // can the tile be walked on?
  int nAnimSpeed;     // animation speed in frames
  DWORD dwFlags;      // approach flags
  TILE_type *lpNext;  // next tile in animation
} TILE, FAR* LPTILE;
Some of this stuff is pretty simple to figure out, but more of it needs explanation, so here's the member list:
RECT rcLocation: This is the location on the surface, which we already talked about.
int bWalkOK: This simply tells whether or not the tile can be walked on. My variable name suggests a Boolean value, but you can do other things with this as well. For instance, if you were creating a real-time strategy game, you might want to use this field to not only say whether or not a unit can move on this tile, but how quickly or efficiently as well.
int nAnimSpeed: This is used for tile animations. If the tile is not animated, this member is 0. If the tile is animated, such as water or fire, then this member is the number of frames to delay before displaying the next tile in the animation.
DWORD dwFlags: You can stuff just about anything you want in a parameter like this, but I'm using it for approach information. That is, when the character is walking on this tile, how does his location change? For instance, if you're walking left onto a tile depicting a staircase, you don't just walk straight onto it... you walk up the stairs! The dwFlags member is used to specify if and how a character's location changes when traversing this tile.
TILE_type *lpNext: If the tile is animated, this is a pointer to the TILE structure representing the next tile in the animation. So basically, in addition to having a TILE structure for each tile, you can also string the structures together in linked lists to account for animation.
To keep track of my tilesets, each of which have a maximum of 256 tiles, I have an array of 256 TILEs to keep track of the tile data itself, and an array of 256 LPTILEs that point to the corresponding structures. Then, when an animation needs to be advanced to the next frame, I can simply do this:
lptile[x] = lptile[x]->lpNext;
And the animation advances by one frame for every instance of that tile on the map, without even having to touch the map data itself! Is that easy or what? :)
Finally, we need to have information about the player. For the purposes of showing a map on the screen and being able to wander around on it, we really don't need anything except the player's location. My player structure has all sorts of information about stats, spellbooks, inventory, etc. that is irrelevant as far as the tile engine is concerned, and actually, I think this will end up being long enough without getting into animating the player on the map, so let's not worry about that right now. Our goal is simply to get an animated map on the screen, and to be able to scroll it around with the arrow keys. For this demo, then, all we need to keep track of location are the camera coordinates, and those are already included in the map data structure. All right, ready to code this thing? Me too. :)
Writing the Code
First things first: let's see what this is going to look like. The structure of this demo will be very similar to the other Windows programs we've written so far in this series, only it will be a lot more exciting, because you'll be able to interact with it and expand upon it later. Take a look:
- Create a window.
- Initialize DirectX:
- Set up DirectDraw.
- Create three surfaces: primary, back buffer, and tileset.
- Create a clipper and attach it to the back buffer.
- Load tileset and map.
- Main loop:
- Handle the Windows message queue.
- Exit loop if WM_QUIT message found.
- Check for user input.
- Render the map to the back buffer:
- Find the horizontal and vertical ranges of tiles that need to be drawn.
- Update tile pointers to account for animations.
- Blit the first layer without color keying, so it overwrites the previous frame completely.
- Blit the second layer with color keying.
- Flip the frame to the primary surface.
- Lock to a constant frame rate.
- Shut down DirectX.
- Return to Windows.
It's a long list of tasks compared to some of the things we've done in the past, but you already know how to do most of this. You can do all the initialization and shutdown functions, and you can handle the message queue and the user input. When the user is pressing the arrow keys -- which you can check for using the GetAsyncKeyState() function -- you simply update the camera coordinates accordingly, and the part of the code that draws the map will handle the rest. The only thing that remains to be demystified is that map-rendering process, so that's what we'll do next.
One last thing before we get into the actual map drawing. Notice that I said we will "flip" the frame to the primary surface, instead of blitting it. That means that we'll be using a technique called page-flipping, instead of the double buffering we used in article #6. It's my fault for forgetting to cover it -- sorry! Anyway, it's not hard. All you need to do is create your primary surface using DDSCAPS_FLIP and DDSCAPS_COMPLEX, with one back buffer attached. Remember, we saw an example of doing this near the end of article #4. At least, I think it was #4. :) Anyway, once you've got a back buffer chained to the primary surface, you simply copy the latter to the former by calling IDirectDrawSurface7::Flip(), which looks like this:
HRESULT Flip(
  LPDIRECTDRAWSURFACE3 lpDDSurfaceTargetOverride,
  DWORD dwFlags
);
The first parameter is the surface in the flipping chain to flip the image to. If you pass NULL, the image cycles through the buffers in the order in which they are attached to one another, which is what we want. The second parameter should just be set to DDFLIP_WAIT, to specify that the call should not return until the flip is complete. The nice thing about page flipping is that the image isn't really getting copied! What happens is that DirectDraw switches the pointers to the two surfaces in memory, so that in essence, the back buffer becomes the primary surface, and vice versa. Nice and fast, nice and easy. Anyway, an example of all this is in the code, so let's move on.
Drawing the Map
Now we're getting somewhere! The first thing to do when we draw the map is to determine the range of tiles which are currently in the player's view, so we don't waste time trying to blit a whole bunch of tiles that are way off the screen somewhere. I already said that our standard tile size is 32x32, and the screen size is 640x480, so a full screen is 20 tiles across by 15 tiles down. However, this assumes that the boundaries of the tiles line up perfectly with the boundaries of the screen. For example, suppose the leftmost tile is only halfway on the screen. Then there's going to be another tile halfway on the screen at the extreme right side of the screen, making for 21 tiles altogether. Similarly, there may be 16 rows of tiles vertically rather than 15, if the upper row is only halfway on the screen. How do we account for this? It's simple. If the camera's x-coordinate is divisible by 32, the tile boundaries line up with the screen boundaries horizontally, and there will be 20 tiles across. Otherwise, there will be 21 tiles across. Similarly, if the camera's y-coordinate is divisible by 32, there will be 15 tiles down; otherwise, 16.
Now, how about finding the index of the tile to use to start with? Consider this: if the camera's x-coordinate is anywhere between 0 and 31, then the first column of tiles (column 0) is going to be at least partially visible. As soon as the camera's x-coordinate becomes 32, that first column of tiles is completely off the screen, and we use column 1 instead. Look at that for awhile and you'll realize pretty quickly that the first column of visible tiles is given by the camera's x-coordinate, divided by 32, where we truncate the decimal rather than rounding. The same goes for the rows of tiles: the first row that is visible will be given by the camera's y-coordinate, divided by 32.
The last thing we need to do, just in case we have a map smaller than the screen size, is to make sure that the ending values for our tile ranges do not exceed the maximums that are stored in our map. Have a look at the code that does all this:
// set original destination RECT for first tile -- aligned with the
// upper-left corner of the screen
RECT rcDest = {0, 0, 32, 32};

// find default tile range -- divide camera coordinates by 32 and
// use the default of 21 tiles across and 16 tiles down
int xStart = mapdata.xCamera >> 5;
int yStart = mapdata.yCamera >> 5;
int xEnd = xStart + 20;
int yEnd = yStart + 15;
int x, y;

// now check if the camera coordinates are divisible by 32
x = mapdata.xCamera & 0x0000001F;
y = mapdata.yCamera & 0x0000001F;

if (!x)
{
  // if xCamera is divisible by 32, use only 20 tiles across
  xEnd--;
}
else
{
  // otherwise move destination RECT to the left to clip the first column of tiles
  rcDest.left-=x;
  rcDest.right-=x;
}

if (!y)
{
  // if yCamera is divisible by 32, use only 15 tiles down
  yEnd--;
}
else
{
  // otherwise move destination RECT up to clip the first row of tiles
  rcDest.top-=y;
  rcDest.bottom-=y;
}

// finally make sure we're not exceeding map limits
if (xEnd > mapdata.xMax)
  xEnd = mapdata.xMax;
if (yEnd > mapdata.yMax)
  yEnd = mapdata.yMax;
All right, now we've got the starting and ending indices for the tiles we need to blit, and the RECT for the first tile's destination on the screen. I already showed you the one-line method for updating animations. All you need to add is something to make sure it only happens according to the animation speed set by the nAnimSpeed member of the TILE structure. There are two ways to do this. You can keep a running frame count for each tile, and then when that frame counter reaches the value of nAnimSpeed, then advance the animation and reset the counter. The other way is to simply use an array of counters, say nCounters[10], and update them each frame like this:
for (x=2; x<10; x++)
{
  if (++nCounters[x] == x)
    nCounters[x] = 0;
}
That way, the counter in position x in the array is equal to 0 once every x frames. So when you're updating animations, just check to see if the appropriate counter is equal to 0, and if it is, advance the animation. Remember that if a TILE's nAnimSpeed is equal to 0, you don't need to do this because it's not an animated tile. This method takes a little less memory, and possibly less time to update, depending on how many animations you have. The downside is that you don't want to create too many of these counters, or you'll be using too much time to update them. For example, if you wanted to have an inn sign that blows in the wind every once in awhile, you might only want to run the animation once every 100 frames, and so a counter for each tile would be appropriate.
All right, now we're ready to start drawing! All we need are two nested for loops, one to draw the columns and one to draw the rows. In the inner loop, we update the destination RECT, and blit the tile. That's it. The code is very straightforward:
BYTE byTile;

// store original rcDest RECT
RECT rcTemp;
rcTemp = rcDest;

// plot the first layer
for (x=xStart; x<=xEnd; x++)
{
  for (y=yStart; y<=yEnd; y++)
  {
    // blit the tile
    byTile = byMap[x][y][0];
    lpddsBack->Blt(&rcDest, lpddsTileset, &tile_ptrs[byTile]->rcLocation, DDBLT_WAIT, NULL);

    // advance rcDest RECT
    rcDest.bottom += 32;
    rcDest.top += 32;
  }

  // reset rcDest RECT to top of next column
  rcDest.left += 32;
  rcDest.right += 32;
  rcDest.bottom -= ((yEnd - yStart + 1) << 5);
  rcDest.top -= ((yEnd - yStart + 1) << 5);
}
That's all you need. This code draws the entire first layer, advancing the destination RECT as it goes without having to re-calculate the whole thing each time. Notice that at the end of the outer loop, we can't just decrease the y-values of the RECT by 480 because we might be dealing with a map that is smaller than the screen size. I won't even bother showing the code for the second layer, because it's nearly identical to this, and so it would just be redundant. These are the only differences:
- Before drawing the second layer, make sure you reset the destination RECT by setting it equal to rcTemp.
- Obviously, use byMap[x][y][1] for the second layer instead of byMap[x][y][0]. :)
- Add the DDBLT_KEYSRC flag to the blitter call for the second layer.
- For the second layer, since the previous frame has already been overwritten, you only need to draw the tile if its index is greater than 0, since I leave tile 0 blank in all my tilesets (usually a good idea).
With that, you can easily draw the whole map. And it may not seem like it, but you now have all you need to know to create the tile-scrolling demo on your own! It's going to be a simple demo, but it is our first program that allows considerable customization and user interaction. There are all sorts of things you can add to this demo, and so it would be a great exercise to try and implement a few things on your own, like adding a third layer, or adding the ability to move from one map to another. If you're really feeling ambitious, you could even take a shot at a map editor!
Closing
That's it for today's installment... but we covered a lot! In one day, we've gone from simple knowledge of DirectDraw to being able to implement a scrolling, animated, multi-layer tile engine. Are you starting to see how powerful the DirectX API is? We actually haven't covered a whole lot of interfaces and functions, but we already have the tools to put a pretty good-looking game together. For now we've just got a blank world, but next time around, I'll be showing you how to add characters it, to make it come alive.
The sample code for this article has a lot of stuff in it that you should take note of. For one thing, it draws on the material from just about every article in the series up to this point, so if you understand what's going on here, you're doing great! It demonstrates how to read and write a basic map file as well, which is something I've seen people ask about quite a bit. There are two programs included in the .ZIP file. One is a very simple example of writing a map. This is a Win32 Console Application, so keep that in mind if you decide to compile it. The other program is the actual tile engine. It has one source file, two headers file, and one resource script -- be sure to include them all when you compile. Also, remember to link ddraw.lib and dxguid.lib to the project. Finally, the bitmap needs to be in the same directory as the source files, and you should be OK. I've included the executable as well, just in case you have problems compiling the code. I wanted to keep the tileset small, and I spent about two minutes on the tiles that are in there, so forgive me for the abysmal quality of the graphics. :) As always, I'm open to questions on any of this stuff:
E-mail: ironblayde@aeon-software.com
ICQ: UIN #53210499
Have fun experimenting with this stuff, and I'll see you in a few weeks.
Copyright © 2000 by Joseph D. Farrell. All rights reserved.
Discuss this article in the forums
Date this article was posted to GameDev.net: 2/12/2001
(Note that this date does not necessarily correspond to the date the article was written)
See Also:
General
© 1999-2011 Gamedev.net. All rights reserved. Terms of Use Privacy Policy
Comments? Questions? Feedback? Click here!