Advanced Image Panning
Overview
Panning images have always been a welcome addition to many computer games, most notably side-scrollers. But as side-scrollers become outdated, a more versatile form of their panning engine lives on – one that is now used more for visual effects than for engine cores. A free-directional version with wrap-around has been implemented in many of the latest titles today in less obvious ways, such as a fast text scrolling engine or even to scroll banners in a 3D universe, which ultimately adds a professional edge to the product.
Designing the Class
This effect can be performed using any graphics library that has a way to blit a rectangular section of a source image to a destination. The class can be easily self-contained and adapted to any environment. Example code has been included with this article for further clarification that can be inserted into any gaming project.
First, what variables are necessary to track a pan? Obviously, pointers are required to both the destination and source surfaces. Also, assuming that we wish only to blit to an area on the destination as compared to the entire surface, the class also requires a RECT structure of the area. The (x, y) coordinates of our current box on the source image are needed as well as the speed in the x and y direction. Furthermore, to reduce real-time computations, the width and height of the destination area and a special effects flag (which includes transparency) are needed.
As for member functions, our panning class will have Create(src, dest, destrect, xspeed, yspeed, fx), and an automated Pan(void).
class CPan  {
private:
  CSurface *src;
  CSurface *dest;

  RECT     panarea;
  int      xspeed, yspeed;
  DWORD    destwidth, destheight;
  DWORD    colorfx;

  UINT     x, y;

public: ...
};
Possible Cases
When panning with wrap-around, there are four possible cases when copying pieces of the source image to the destination (see Figure). In fact, this process brings us back to the days of VGA and VESA page breaks, but luckily this isn’t quite as bad.
First, the box may be fully contained within the source image, meaning that no wrap-around is required, just one simple blit.
In the second case, the image is being panned horizontally and a break is parallel to the y-axis. A break occurs only when the image is being wrapped because part of the image displayed on the destination is from one side of the source while the other part is from the other side. In this case, two blits must be made – one from the left side of the image, and one from of the right.
The third case is similar, except this time the image is being panned vertically, and, thus, a break is parallel to the x-axis.
The fourth case, however, is rather tricky. This time the image is being panned diagonally and it has two break lines, one on the x-axis and one on the y-axis, which means that four blits must be performed. Luckily, most of these can be generalized using instances from the previous cases because the source image is broken by the wrap-around both horizontally and vertically.
Panning
To begin, let’s define some temporary variables that will aid us in determining the RECT coordinates to blit from the source image. We need a flag to set if a break has been found to determine if the first case is necessary. Variables are also needed to calculate the distance from the source box’s upper-left corner to where breaks occur. So:
xbreak = destwidth – x;
ybreak = destheight – y;
xbreak is the x-coordinate of a vertical break; similarly, ybreak is the y-coordinate of a horizontal break. At the beginning of our pan subroutine, we must increment the (x, y) coordinates of the box on the source so that it can move across the source image. Note that the destination box is always the same because this is the region that is displaying the scrolled image in the same area every frame.
x -= xspeed;
y -= yspeed;

if(x <= 0)              x += src->Width();
if(x >= src->Width())   x -= src->Width();
if(y <= 0)              y += src->Height();
if(y >= src->Height())  y -= src->Height();
Initially, the subtraction of xspeed and yspeed may seem as if our logic is reversed (if xspeed is positive, the image will scroll left), but this allows for the images to be blitted to the destination in a logical order later in the code. Note that if you do not want the image to wrap, do not reset the x- and y-coordinates of the box in the last four lines of code; instead, keep them set on one value.
Case I: No Wrap
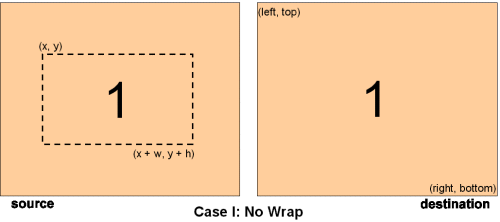
This is the easiest case of all. If a break has not been found, then we just blit the RECT from (x, y) to (x + destwidth, y + destheight) to the destination!
if(panbreak == FALSE) {
  RECT src1  = {x, y, x + destwidth, y + destheight};
  dest->BlitX(src, &panarea, &src1, colorfx);
}
Case II & III: Vertical Break or Horizontal Break
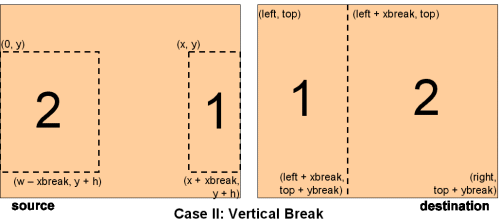
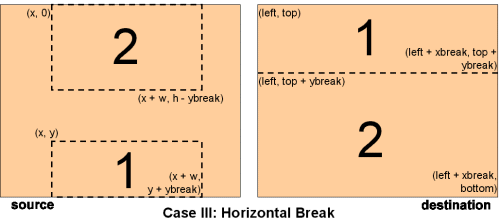
Now, for the vertical and horizontal breaks, we must begin by making two blits, one on each side of the break. Although we are taking two different pieces of the source image, when the two are fitted together correctly on the destination, it will look normal. The coordinates are listed in the Figure for reference. Note that the left side of the source image is blitted to the right side of the destination and vice versa. In the Figure, each image area on the source is denoted by a number, and the area it will be blitted to on the destination contains the same number.
So if xbreak is less than destwidth, then it is vertically split. Similarly, if ybreak is less than destheight, then it is horizontally split. In addition, note that the destination view is not of the entire screen, but only of the area the pan will be performed in (eg (left, top) to (right, bottom)). On the Figure, w and h stand for destwidth and destheight, respectively.
// a vertical overlap
if(xbreak != destwidth)  {
  RECT src1  = {x, y, x + xbreak, y + ybreak};
  RECT src2  = {0, y, destwidth - xbreak, y + ybreak};

  RECT dest1 = {panarea.left, panarea.top, panarea.left + xbreak, panarea.top + ybreak};
  RECT dest2 = {panarea.left + xbreak, panarea.top, panarea.right, panarea.top + ybreak};

  dest->BlitX(src, &dest1, &src1, colorfx);
  dest->BlitX(src, &dest2, &src2, colorfx);

  panbreak = TRUE;
}
Case IV: Vertical and Horizontal Break

As we approach the fourth and final case, notice that we are already blitting four rectangles to the screen if cases II and III are followed in succession. This is a fact that we can use to our advantage. First notice that the coordinates in the Figure are often relative to the upper left corner even though some points could have been easier defined relative to the bottom-right corner; for example, the right edge of the destination in the second case is labeled as (right, top + xbreak) instead of the easier (right, bottom) – this is an important generalization in this final case.
After applying the logic above, notice that many of the rectangles in the fourth case have the same coordinates as some of the rectangles in the second and third cases! For example, referring to the Figure, the second rectangle’s coordinates in case four are identical to the second rectangle’s coordinates in case two. So if we replace xbreak and ybreak with destwidth and destheight when a break is not present, those two rectangles will automatically be blitted from the correct source to the correct destination, provided that xbreak equals destwidth and ybreak equals destheight.
Unfortunately, one rectangle will still have to be coded for this unique case because it does not exist in any of the previous cases – the fourth rectangle, from (0, 0) to (destwidth – xbreak, destheight - ybreak). See the accompanying source for further implementation details.
Well, that’s a wrap!
Discuss this article in the forums
Date this article was posted to GameDev.net: 2/26/2001
(Note that this date does not necessarily correspond to the date the article was written)
See Also:
General
© 1999-2011 Gamedev.net. All rights reserved. Terms of Use Privacy Policy
Comments? Questions? Feedback? Click here!