Isometric Tricks
In this tutorial I'll explain how to make animations (walk, shoot, die, etc.) for units in isometric games (such as Starcraft, Diablo, Fallout, and so on). I'm not going to focus on how to capture the exact isometric angle because it's well explained here.
Setting up viewing angles
When you animate a unit for an isometric game, remember that you need to have it be viewed from (usually) 16 angles, though some games may require more or less. Therefore, after you do the actual animating of the unit you'll need to catch it from 16 angles. Here are examples of a walking animation from 2 different views for a unit I made long ago.
 |  |
If you ever used a viewer for an isometric game (such as Starcraft) you might notice this kinda looks like those animations you'll find in the game.
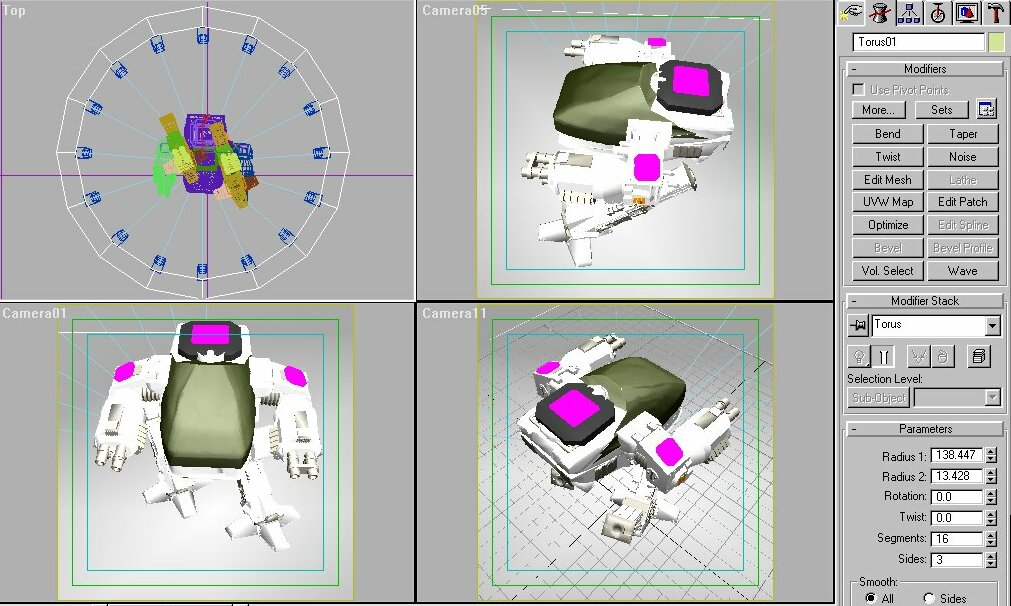 So, you've animated the unit, now how do you catch it from 16 angles? Well you can simply rotate it equally 16 times and render everytime or do some kind of other time-consuming solution, but my solution is the easiest and simplest (and most automatic). Now, wherever your camera target will be, that's the center of the unit so keep that in mind. create a torus (in the top viewport) with the center exactly on the camera's target and the radius will be "the camera's path" so keep that in mind. After you've set up the camera target, make it have 16 segments (because in this case we want 16 angles) and then start cloning the cameras and position them exactly on each segment. After that you can hide/delete the torus.
Automating
 Well that's it. Most of the work is done. Now all you have to do is render it from every camera to seperate files. Well... that could end up taking a lot of time. (I know from experience.) But don't worry I have a solution for that too. Simply go to video post and put all the cameras and output events (remember to make a different name for each angle) in the right order (click the thumbnail to see an example of what it should look like in the video post). Okay, now that's it! Now you can sit back and watch it all get done automatically while all you have to do is simply animate the unit once and it will all get rendered for you. I think this video post trick is really usefull and probably (not sure) unique for Max which is one of the things that makes it so great for games.
More useful tips
Other things you might wanna know: Since I used a 100% black backround in my scenes in the RTS game I was working on, I couldn't have shadows for my units which really pissed me off. The solution was to use a shadow material on the ground (make sure you put ground at your unit's feet) and to change the shadow color to about 90 % black (as shown in the previous screenshot in the material editor). Another note - as you know, in games like Starcraft you need a color changer effect (the color says who the unit belongs to) so always look for good areas to put that "color symbol" on your unit (take my unit for example - the purple part is changeable in the game's engine). Remember to give it 100% self ilumination.
Discuss this article in the forums
Date this article was posted to GameDev.net: 4/20/2003
(Note that this date does not necessarily correspond to the date the article was written)
See Also:
Sprites and Tiles
© 1999-2011 Gamedev.net. All rights reserved. Terms of Use Privacy Policy
Comments? Questions? Feedback? Click here!