Spinning Cube
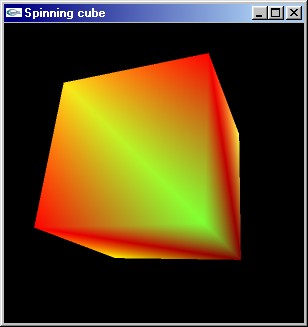 In this tutorial I'll expand on the previous tutorial's code to show you the basics of animation and models using OpenGL and GLUT. By the end you should know how to create a spinning cube.
While we could use the GLUT function glutSolidCube() to create our cube, that wouldn't teach much about storing and drawing 3D objects (and it wouldn't leave much for me to write) so we're going to do it the hard way using glBegin() and glEnd().
A Note On Coordinates
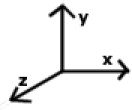
As we're going to be dealing a lot with coordinates in this tutorial, I feel it would be a good idea to explain a bit about them. As you probably know, a point in 3D space is specified by an X, Y and Z value, each value showing how far the point is along a particular axis. If you're new to 3D programming, you may not be familiar with the direction of the axes. Well, in the right-handed coordinate system OpenGL uses, the X axis points right, the Y axis up, and the Z axis points backwards.
The Code
We're going to build on the code for the previous tutorial, so load it up. The main function should look like this:
int main(int argc, char **argv)
{
  glutInit(&argc,argv);
  glutInitDisplayMode(GLUT_RGB | GLUT_DOUBLE | GLUT_DEPTH);
  glutCreateWindow("My first GLUT program");

  glutDisplayFunc(redraw);

  glMatrixMode(GL_PROJECTION); //hello
  gluPerspective(45, //view angle
                 1.0, //aspect ratio
                 10.0, //near clip
                 200.0);//far clip
  glMatrixMode(GL_MODELVIEW);

  glutMainLoop();

  return 0;
}
The first thing we're going to do is change our title, so we'll change the glutCreateWindow call to this:
glutCreateWindow("Spinning cube");
Next we want to enable backface culling so that only the outside faces of our cube will be drawn (there's not much point in drawing the inside faces, as we won't see them). Backface culling works by drawing polygons whose vertices are ordered anti-clockwise on the screen, ignoring those whose vertices are ordered clockwise, meaning a polygon is only visible from one side, and effectively meaning that OpenGL need only draw (on average) half the number of polygons.
Because we're using backface culling we have to be careful about the order of the vertices when we draw our polygons, but we'll come to that later. For now, we'll just add following line just above the call to glutMainLoop().
glEnable(GL_CULL_FACE);
We're going to need to store the data for the cube somewhere, so we'll create a global struct, called, imaginatively enough, "cube". Inside this cube struct we'll need an array of 8 ver structs, each containing position and colour data for a vertex. We'll also need data for each face of the cube. To keep things simple we're going to be using quads instead of triangles, which means we only need specify 6 of them. An array of quad structs will hold their data. Within the quad struct, the ver[ ] array will hold the vertex numbers for each of the quad's vertices.
struct
{
  struct
  {
    float pos[3];
    float col[3];
  }ver[8];

  struct
  {
    unsigned int ver[4];
  } quad[6];
}cube;
The next thing we need to do is actually set up the vertex and quad data for the cube so we can draw it, so we need to write a function to do that. We'll insert the following call under our call to glEnable(GL_CULL_FACE) in the main() function:
initCube();
We'll add the following declaration in the global scope:
void initCube(void);
Then we'll need to start writing initCube(). The arrangement of the vertices is not particularly important, as long we don't decide to change them later, but I've decided to arrange them like this. Note the positions in X, Y and Z for each of the points.

The first thing we'll to do is lay out the positions of all our vertices of our cube in the local array vertexPosDat[ vertex ][ dimension (x/y/z) ].
void initCube(void)
{
  //defines the position of each vertex
  float  vertexPosDat[8][3]=
  {
    {-10, 10, 10},  //left,top,front
    {10, 10, 10},   //right,top,front
    {10, 10,-10},   //right,top,back
    {-10, 10,-10},  //left, top,back
    {-10,-10, 10},  //left,bottom,front
    {10, -10, 10},  //right,bottom,front
    {10, -10,-10},  //right,bottom,back
    {-10,-10,-10}   //left,bottom,back
  };
Next, we'll define the colours for each of the vertices with vertexColDat[ vertex ][ colour element (r/g/b) ]. Feel free to be creative at this point. I decided to do them like this:
  //defines the colour of each vertex
  float   vertexColDat[8][3]=
  {
    {0.5, 0 ,0},   //dark red
    {1, 1, 0.3},   //yellow
    {1, 0, 0},     //red
    {0.5, 1, 0.2}, //dull yellow??
    {1, 1, 0},     //yellow
    {0.9, 0.5, 0}, //orange
    {1, 0.9, 0.1}, //yellow
    {1, 0, 0},     //red
  };
All that's left to define now is the vertex numbers of the 4 points of each of the 6 quads on our cube. We'll use the array quadVerDat[quad number][point] to hold them.
  //defines the vertexes of each quad in anti-clockwise order
  unsigned int quadVerDat[6][4]=
  {
    {0,1,2,3},  //top
    {0,3,7,4},  //left
    {3,2,6,7},  //back
    {2,1,5,6},  //right
    {0,4,5,1},  //front
    {4,7,6,5},  //bottom
  };
Now we just have to put the above data into our cube struct and we're done in cubeInit(). The code below simply loops through every vertex and sets the colours and position to the values we specified above, then loops through every quad and sets the vertex numbers.
  int a,b;

  //put the vertex data into the cube.ver[] struct
  for (a=0;a<8;++a)
  {
    for (b=0;b<3;++b)
    {
      cube.ver[a].pos[b]=vertexPosDat[a][b];
      cube.ver[a].col[b]=vertexColDat[a][b];
    }
  }

  //put the quad data into the cube.quad[] struct
  for (a=0;a<6;++a)
  {
    for (b=0;b<4;++b)
    {
      cube.quad[a].ver[b]=quadVerDat[a][b];
    }
  }
} //end of cubeInit()
Now we need to rewrite our redraw() function to draw and rotate our cube. We'll use a static float, rotateBy, which will control the angle of rotation of our cube. Every frame we'll increment rotateBy by 0.1 to make the cube rotate. We'll need an int, currentVer, to hold the current point we're rendering for when we draw the cube.
static void redraw(void)
{
  static float rotateBy=0;
  int a,b;
  unsigned int currentVer;

  rotateBy+=0.1;
  glClear(GL_COLOR_BUFFER_BIT | GL_DEPTH_BUFFER_BIT);
Once we've cleared the depth and colour buffers we're ready to start drawing. The first thing we do is save the current modelview matrix by copying it onto the top of the stack with glPushMatrix(). We can then start translating and rotating the matrix, which has the effect of translating or rotating anything we draw subsequently. So we'll translate by (0,0,-50), moving our or our cube forwards (or our camera back) by 50.
  glPushMatrix();
  glTranslatef(0,0,-50);
Next we'll rotate the matrix about the vector (1,1,0) by the angle rotateBy using glRotate(). This will cause the cube to rotate (or the camera to orbit the cube).
glRotatef(rotateBy,1,1,0); //rotate by rotateBy degrees about the vector (1,1,0)
Next we draw the actual cube. We're going to be using quads, so we'll call glBegin(GL_QUADS). The program then loops through the 6 quads in our cube, and for each point of each quad it gets the current vertex from cube.quad[a].ver[b] which holds the vertex number for that particular point of that quad. Then, armed with the number of the current vertex, it changes the current colour to the colour of the current vertex using glColor3fv() and draws a vertex at the position of the current vertex using glVertex3fv().
  glBegin(GL_QUADS);
  for (a=0;a<6;++a)                           //quads loop
  {
    for (b=0;b<4;++b)                         //points loop
    {
      currentVer=cube.quad[a].ver[b];            //sets the current vertex to this point's vertex

      glColor3fv(cube.ver[ currentVer ].col);    //changes the colour to the current vertex's colour
      glVertex3fv(cube.ver[ currentVer ].pos);   //draws a vertex at the current vertex's position
    }
  }
Note: The 'v' on the end of glColor3fv() and glVertex3fv() means we can pass an array to them, which is more efficient than specifying each parameter seperately. The '3' means there are 3 parameters (or array elements in this case) and the 'f' means the data should be of type float.
Finally we call glEnd(), restore the old modelview matrix with glPopMatrix(), swap the buffers and call glutPostRedisplay() to tell GLUT to redraw the frame during the next cycle of the GLUT framework (not doing this would result in the frame only being redrawn when the window is opened or resized).
  glEnd();
  glPopMatrix();

  glutSwapBuffers();
  glutPostRedisplay();
}
And there you have it. A rotating cube. Hopefully you've learned something from this tutorial. If you have any questions or would like to offer feedback, please email me.
This tutorial is Copyright © 2001 Ben Woodhouse
Discuss this article in the forums
Date this article was posted to GameDev.net: 1/29/2002
(Note that this date does not necessarily correspond to the date the article was written)
See Also:
GLUT Library
Sweet Snippets
© 1999-2011 Gamedev.net. All rights reserved. Terms of Use Privacy Policy
Comments? Questions? Feedback? Click here!