Synchronizing Walking Animations
|
|
ADVERTISEMENT |
The problem
A very common problem I've encountered in countless game development projects is that even when the artists have given the programmer the character art to be animated (i.e. all separate frames, each in a different tile), the programmers can't figure out how to set them with the correct coordinates. For example, when you have 5 frames of your character walking, and you want to set them correctly, you will have to answer the question: "How many pixels should there be in between 2 frames?"
If you set this number very small, then you'll finish with your character rapping a Beastie Boys tune. However, if you set this number too big, you'll see your character jumping in every step.

Figure 1. The character walks with longer steps than it should.

Figure 2. The character walks with shorter steps than it should.

Figure 3. The character's walking is correctly animated.
The theory
Unfortunately, the truth is that there isn't, in most cases, just one number that will work correctly for all the frames in the animation. The cause is simple: when the artists created the animation, they didn't think that we would need fixed distance in-between frames. Now that we understand the problem, the solution could be one of the following:
1. Ask the artists to make animations that fit in our constant-length steps, or
2. Make our steps variable!
Rather than limiting the creativity of our artists, we'll take the second solution and solve the problem with code.
Now, if you think about it for a second, you might come to the conclusion that making one step variable for each frame is a little annoying. But if you are clever and ask the artist to work in a certain way, you can fix the problem of having to enter each step-length for every animation.
The solution
Suppose our walking animation has a width of 100 pixels and that it will be continuously repeated, and suppose that all of the animation frames (say 4) are in different files: char1.pcx ... char4.pcx (just as you had it before). The difference is the following: instead of saving your files in width x, height y resolution, as required for every individual file (what you used to do), use the same width and height for all files; use the max height you'll be using for height, and 100 pixels for width.


Figure 4. The frames of our animations are saved with a shift value per frame.
Then, in every frame, you can look for the first column with a non-transparent pixel (or black or whatever background you are using), which gives you the real animation offset.

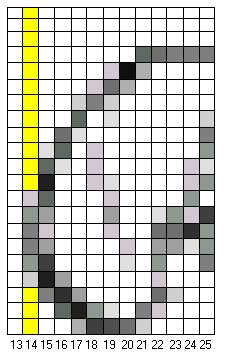
Figure 5. Analysis of the first frame of the animation. Looking for the first pixel drawn.


Figure 5b. Analysis of the second frame of the animation. Looking for the first pixel drawn.
Take a look at Figure 5. When you want to know the animation offset, you can see that the first filled pixel is in column 14, hence this will be this frame's offset. In Figure 5.b, the second frame, we can see that the first filled pixel is in column 28; consequently, this will be the offset for frame 2. You continue doing this until you get all your frames' offsets. You might also want to set the first frame's offset to 0, and count from there. Thus the second should be 14 (28 - 14) and so on.
I think of this as a process in which you wish to trim those files' redundant information. Previously, we set the pictures to the width of the original picture to avoid saving more pixels than we really need in order to draw the sprite. Now, you can trim the sections that are not needed and leave your graphic exactly as you want it. Once it it processed, and the offsets are saved, you can save the file into another file with smaller dimensions, adjusting them to the border as needed.
The cool part of this process is that you don't have to calculate the step length or anything, just write a program that calculates the picture's offset and saves it in a desired file. In this way, when you draw it on the screen, you know exactly where it has to be drawn. You may update your character's position using the offset of the frame he is in at the moment and just draw it at that position.
Cycling the animation
A final minor detail is how to handle cycling animations. We have the four frames required for the animation, but you'll of course want the character to continue advancing for the fifth frame. In this case, you can add a last frame to your animation, which contains the first frame's drawing with the offset that you would like to have when the animation is cycling. Since in most of the cases the first frame will have offset 0, you can overwrite this value and set it to the last frame's offset (but you'll have to treat the first frame as a special case). Remember not to save the last frame of the animation because it is the same as frame 0 and you'll end up saving redundant information.
Generalizing the solution
Even though this article is named "Synchronizing walking animations", this solution may be applied to any animation which requires a position update per frame, such as running, crawling, swimming, or whatever you'd like. Perhaps jumping would be a little trickier because there isn't always a fixed distance between frame and frame, and it may depend on other variables. You might want to save the Y offset as well in this type of animation.
The 3D alternative
For all of you who think that I am talking about very old technologies, there's news for you. This technique works perfectly in 3D animations. I have already seen some professional games which use this technique. The difference is that you can't search for a desired pixel in a 3D animation because 3D animations just don't work that way. On the other hand, the things that move around are the vertices, so you can have a vertex that refers to your center of movement, and have the displacement done around this vertex. Take your time to think about it, but it is basicly the same idea.
Conclusion
2D games are still being made. I've seen a lot of 3D articles lately but not much on 2D. A lot of people think that they are completely different things (and in a way they are), but you must remember that the logic behind both of them is very similar, and both have the same objective: To entertain the player!
Well, I hope this works as well for you as it did for me. This is my first article so I am eager to receive mail with questions to answer and discuss the technique. Criticism is welcome too :)
Thanks to Carlos Cabrera for the graphics, and Javier Otaegui and George Taylor for helping me with the information.
Discuss this article in the forums
Date this article was posted to GameDev.net: 4/5/2005
(Note that this date does not necessarily correspond to the date the article was written)
See Also:
General
Sweet Snippets
© 1999-2011 Gamedev.net. All rights reserved. Terms of Use Privacy Policy
Comments? Questions? Feedback? Click here!