First Steps To Animation
Preface
You may recall that in the first tutorial "The Basics", we determined that all samples which are built with the Direct3D Framework in the DirectX SDK are created by providing overloaded versions of the CD3DApplication methods:
...
ConfirmDevice()
OneTimeSceneInit()
InitDeviceObjects()
FrameMove()
Render()
DeleteDeviceObjects()
FinalCleanup()
...
We also learned the task of every method in the framework class.
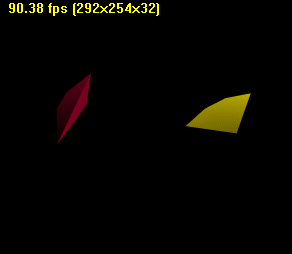
In this tutorial we will start to write our first animated app. It will show a red and a yellow object, which can be rotated around its x and y axis. The application uses a Z-Buffer and the simplest keyboard interface I can think of. You can move and rotate the camera with the up, down, left, right, c and the x keys. The input is handled via DirectInput. The movement of the camera feels a little bit like the first X-Wing games. Only a space scanner is missing :-).
This is in response to a lot of e-mails I received. Readers of the first version of this tutorial wanted to know how to rotate and move more than one object in a scene independently.
As always, you can switch between the fullscreen and windowed mode with ALT-F4. F1 will show you the about box. F2 will give you a selection of useable drivers and ESC will shutdown the app.
To compile the source, take a look at The Basics Tutorial. Be sure to also link dinput.lib into the project.
One of the best ways to learn how to use world transformations with Direct3D is the Boids sample from the DirectX 7 SDK. I've found a good tutorial on camera orientation with Direct3DX at Mr. Gamemaker. Other interesting documents on camera orientation are at flipCode, CrystalSpace, Dave's Math Tables and the pages on Geometry from Paul Bourke. In addition, the pages of Mayhem on Matrices and of course the book from John de Goes on Direct3D 3D Game Programming with C++ are useful. For the DirectInput part, I've found André LaMothe's Tricks of the Windows Game Programming Gurus very useful.
The Third Dimension
You need a good familiarity with 3-D geometric principles to program Direct3D applications. The first step in understanding these principles is understanding the transformation pipeline as part of the rendering pipeline:
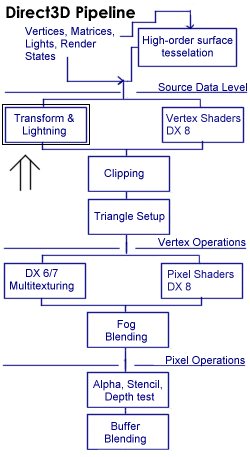
The figure shows the Direct3D pipeline.
The vertex shader unit will be introduced in one of the first tutorials after DirectX 8 is released. In the case of the Geforce2 Graphics Processing Unit, it's a programmable SIMD engine with storage of 192 quadwords of data and 128 app-downloadable instructions, which specify the tasks executed on each vertex. It can do standard transformations, clipping, vertex blending, morphing, animation, skinning, elevation fog, mesh warping, procedural texture coordinate generation such as reflection maps and lighting.
I focus here on the marked T & L Pipeline: You can think of the process of texturing and lighting as an assembly line in a factory, in which untransformed and unlit vertices enter one end, and then several sequential operations are performed on them. At the end of the assembly line, transformed and lit vertices exit. A lot of programmers have implemented their own transformation and lighting algorithms. They can disable parts of this pipeline and send the vertices that are already transformed and lit to Direct3D.
The pixel shader is a compact but powerful programmable pixel processor that runs, in the case of the Geforce 2, as a nine-instruction program on each pixel. It consists of eight register combiners cascaded together, with each taking inputs from up to four textures (which themselves may have been cascaded together), constants, interpolated values and scratch registers.
But in most cases it will be best to use the Direct3D T&L pipeline, because it's really fast, especially with the new T&L graphics drivers, which are provided with the Geforce and Savage 2000 chipsets.
These graphic processors have gained an important role in the last couple of years. Most tasks in the rendering pipeline are now computed by the graphics processing unit:
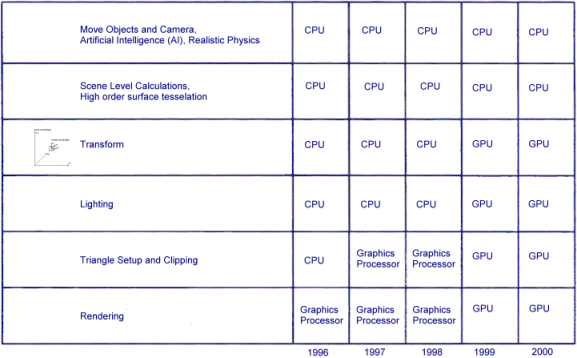
In the old days, transform and lighting functions of the 3D pipeline have been performed by the CPU of the PC. Since 1999, affordable graphic cards with dedicated hardware T&L acceleration have been available. With these cards higher graphics performance is possible, because they can process graphic functions up to four times the speed of the leading CPUs. On the other side, the CPU can now be better utilized for functions such as sophisticated artificial intelligence (AI), realistic physics and more complex game elements. So the new generation of cards will provide a lot of horsepower for the new game generation. It's a great time for game programmers :-)
Transformation Pipeline
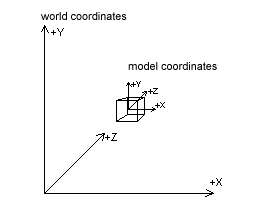
It's a complex task to describe and display 3D graphics objects and environments. Describing the 3D data according to different frames of reference or different coodinate systems reduce the complexity. These different frames of reference are called "spaces" such as model space, world space, view space, projection space. Because these spaces use different coordinate systems, 3D data must be converted or "transformed" from one space to another.

The transformation pipeline transforms each vertex of the object from an abstract, floating-point coordinate space into pixel-based screen space, taking into account the properties of the virtual camera used to render the scene. This transform is done with three transformation matrices: the world-, view- and projection-matrix. The use of world-, view- and projection- transformations ensures that Direct3D only has to deal with one coordinate system per step. Between those steps, the objects are oriented in a uniform manner.
The world transformation stage transforms an object from model or object to world space. Model space is the coordinate space in which an object is defined, independant of other objects and the world itself. In model space, the points of the model or object are rotated, scaled and translated to animate it. For example, think of a Quake 3 model, which rotates his torso and holds his weapon in your direction. With model space it's easier and faster to move an object by simply redefining the transformation from model space to world space than it would be to manually change all the coordinates of the object in world space. For example, to rotate a sphere or cube around its center looks more natural and is much easier when the origin is at the center of the object, regardless of where in world space the object is positioned. Worldspace is the abolute frame of reference for a 3-D world; all object locations and orientations are with respect to worldspace. It provides a coordinate space that all objects share, instead of requiring a unique coordinate system for each object.
To transform the objects from model to world space each object will be rotated about the x-axis, y-axis, or z-axis, scaled (enlarging or shrinking the object) and translated, by moving the object along the x-axis, y-axis, or z-axis to its final orientation, position and size.
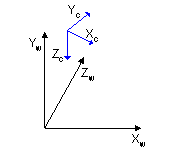
Direct3D uses a left-handed coordinate system, in which every positive axis (x, y or z) is pointing away from the viewer:
The view transformation stage transforms the objects from world space into camera space or view space. This transformation puts the camera at the origin and points it directly down the positive z-axis. The geometry has to be translated in suitable 2D shapes. It's also useful for lighting and backface culling. The light coordinates, which are specified in world space, are transformed into camera space at this stage and the effect of light is calculated and applied to the vertices.
Backface culling happens here. It would be a waste of CPU time to draw the backface of the cube, when it's not visible. To omit drawing the backface is called backface culling. To cull the backface, we need a way to determine the visibility. One of the simplest ways is the following: a front face is one in which vertices are defined in clockwise order. So Direct3D only draws the faces with vertices in clockwise order by default. To modify backface culling, use
// no backface culling
m_pd3dDevice->SetRenderState(D3DRENDERSTATE_CULLMODE, D3DCULL_NONE);When lighting is enabled, as Direct3D rasterizes a scene in the final stage of rendering, it determines the color of each rendered pixel based on a combination of the current material color (and the texels in an associated texture map), the diffuse and specular colors of the vertex, if specified, as well as the color and intensity of light produced by light sources in the scene or the scene's ambient light level.
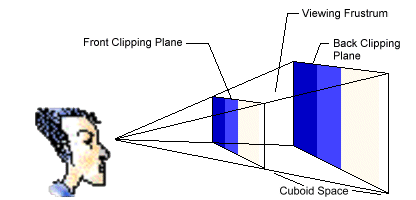
The projection transformation takes into consideration the camera's horizontal and vertical fields of view, so it applies perspective to the scene. Objects which are close to the front of the frustrum are expanded and objects close to the end are shrunk. It warps the geometry of the frustrum of the camera into a cube shape by setting the passed in 4x4 matrix to a perspective projection matrix built from the field-of-view or viewing frustrum, aspect ratio, near plane or front clipping plane, and far plane or back clipping plane. This makes it easy to clip geometry that lies both inside and outside of the viewing frustrum. You can think of the projection transformation as controlling the camera's internals; it is analogous to choosing a lens for the camera.
Clipping: the geometry is clipped to the cube shape and the resulting clipped geometry is then transformed into 2D by dropping the z-coordinate and scaling the points to screen coordinates.
Transformation Math
Let's give our old math teachers a smile :-) . I learned math from the beginning-seventies to the mid-eighties at school (yes ... we've got another education system here in Germany). At that time, I never thought that there would be such an interesting use (i.e. game-programming) for it. I wonder if math teachers today talk about the use of math in computer games.
Any impressive game requires correct transformations: Consider the following example. An airplane, let's say an F22, is oriented such that its nose is pointing in the positive z direction, its right wing is pointing in the positive x direction and its cockpit is pointing in the positive y direction. So the F22's local x, y and z axes are aligned with the world x, y and z axes. If this airplane is to be rotated 90 degrees about its y axis, its nose would be pointing toward the world -x axis, its right wing toward the world z axis and its cockpit will remain in the world +y direction. From this new position, rotate the F22 about its z axis. If your transformations are correct, the airplane will rotate about its own z-axis. If your transformations are incorrect, the F22 will rotate about the world z axis. In Direct3D you can guarantee the correct transformation by using 4x4 matrices.
Matrices are rectangular arrays of numbers. A 4x4 world matrix contains 4 vectors, which represent the world space coordinates of the x, y and z unit axis vectors, and the world space coordinate which is the origin of these axis vectors:
x x x 0
y y y 0
z z z 0
x y z 1
Vectors are one of the most important concepts in 3D games. They are mathematical entities that describe a direction and a magnitude (which can, for example, be used for speed). A general purpose vector consists of two coordinates. You can see the direction of these vectors by drawing a line between the two coordinates. Magnitude is the distance between the points.

The first coordinate is called the inital point and the second is the final point. Three dimensional games often use a specific kind of vector - the free vector. Its inital point is assumed to be the origin, and only the final point is specified.
Vectors are usually denoted by a bold face letter of the alphabet, i.e. a. So, we could say the vector v = (1,2,3). The first column is units in the x direction, the second column is units in the y direction, the third column, units in z.
The first column contains the world space coordinates of the local x axis. The second column contains the local y axis and the third column the world space coordinates of the local z axis. The vectors are unit vectors whose magnitude are 1. Basically unit vectors are used to define directions, when magnitude is not really important. The last row contains the world space coordinates of the object's origin, which translates the object.
A special matrix is the identity matrix:
1 0 0 0
0 1 0 0
0 0 1 0
0 0 0 1
The identity matrix represents a set of object axes that are aligned with the world axes. The world x coordinate of the local x axis is 1, the world y and z coordinates of the local x axis are 0 and the origin vector is (0, 0, 0). So the local model x axis lies directly on the world x axis. The same is true for the local x and y axes. So it's a "set back to the roots" matrix.
This matrix could be accessed by
D3DMATRIX mat;
mat._11 = 1.0f; mat._12 = 0.0f; mat._13 = 0.0f; mat._14 = 0.0f;
mat._21 = 0.0f; mat._22 = 1.0f; mat._23 = 0.0f; mat._24 = 0.0f;
mat._31 = 0.0f; mat._32 = 0.0f; mat._33 = 1.0f; mat._34 = 0.0f;
mat._41 = 0.0f; mat._42 = 0.0f; mat._43 = 0.0f; mat._44 = 1.0f;
If an object's position in model space corresponds to its position in world space, simply set the world transformation matrix to the identity matrix.
A typical transformation operation is a 4x4 matrix multiply operation. A transformation engine multiplies a vector representing 3D data, typically a vertex or a normal vector, by a 4x4 matrix. The result is the transformed vector. This is done with standard linear algebra:
Transform   Original  Transformed
 Matrix      Vector     Vector

a b c d      x         ax + by + cy + dw          x'
e f g h   x  y    =    ex + fy + gz + hw    =     y'
i j k l      z         ix + jy + kz + lw          z'
m n o p      w         mx + ny + oz + pw          w'
Before a vector can be transformed, a transform matrix must be constructed. This matrix holds the data to convert vector data to the new coordinate system. Such an interim matrix must be created for each action (scaling, rotation and transformation) that should be performed on the vector. Those matrices are multiplied together to create a single matrix that represents the combined effects of all of those actions (matrix concatenation). This single matrix, called the transform matrix, could be used to transform one vector or one million vectors. The time to set it up amortizes by the ability to re-use it.
One of the pros of using matrix multiplication is that scaling, rotation and translation all take the same amount of time to perform. So the performance of a dedicated transform engine is predictable and consistent. This allows software developers to make informed decisions regarding performance and quality.
The World Matrix
Usually the world matrix is a combination of translation, rotation and scaling the matrices of the objects. Code for a translate and rotate world matrix could look like this:
struct Object
{
  D3DVECTOR   vLocation;
  FLOAT       fYaw, fPitch, fRoll;
  ...

  D3DMATRIX   matLocal;
};


class CMyD3DApplication : public CD3DApplication
{
  ...
  Object       m_pObjects[NUM_OBJECTS];
  ...
};


// in FrameMove()
for (WORD i = 0; i < dwnumberofobjects; i++)
{
  D3DUtil_SetTranslateMatrix( matWorld, m_pObject[i].vLocation );

  D3DMATRIX matTemp, matRotateX, matRotateY, matRotateZ;
  D3DUtil_SetRotateYMatrix( matRotateY, m_pObject[i].fYaw );
  D3DUtil_SetRotateXMatrix( matRotateX, m_pObject[i].fPitch );
  D3DUtil_SetRotateZMatrix( matRotateZ, m_pObject[i].fRoll );
  D3DMath_MatrixMultiply( matTemp, matRotateX, matRotateY );
  D3DMath_MatrixMultiply( matTemp, matRotateZ, matTemp );
  D3DMath_MatrixMultiply( matWorld, matTemp, matWorld );

  m_pObject[i].matLocal = matWorld;
}

// in Render()
for (WORD i = 0; i < dwnumberofobjects; i++)
{
  ...
  m_pd3dDevice->SetTransform(D3DTRANSFORMSTATE_WORLD, &m_pObject[i].matLocal );
  ...
}
You can make life easy for yourself by storing matrices which contain axis information in each object structure. We're only storing the world matrix here, because the object itself isn't animated, so a model matrix isn't used. A very important thing to remember is that matrix multiplication is not cummutative. That means [a] * [b] != [b] * [a]. The formula for transformation is
|W| = |M| * |T| * |X| * |Y| * |Z|
where M is the model's matrix, T is the translation matrix and X, Y and Z are the rotation matrices.
The above piece of code translates the object into its place with D3DUtil_SetTranslateMatrix(). Translation can best be described as a linear change in position. This change can be represented by a delta vector [tx, ty, tz], where tx (often called dx) represents the change in the object's x position, ty (or dy) represents the change in its y position, and tz (or dz) the change in its z position. You can find D3DUtil_SetTranslateMatrix() in d3dutil.h.
inline VOID D3DUtil_SetTranslateMatrix( D3DMATRIX& m, FLOAT tx, FLOAT ty, FLOAT tz )
{
  D3DUtil_SetIdentityMatrix( m );
  m._41 = tx; m._42 = ty; m._43 = tz;
}

=

1  0  0  0
0  1  0  0
0  0  1  0
tx ty tz 1
Using our F22 sample from above, if the nose of the airplane is oriented along the object's local z axis, then translating this airplane in the +z direction by using tz will make the airplane move forward in the direction its nose is pointing.
The next operation that is performed by our code piece is rotation. Rotation can be described as circular motion about some axis. The incremental angles used to rotate the object here represent rotation from the current orientation. That means, by rotating 1 degree about the z axis, you tell your object to rotate 1 degree about its z axis regardless of its current orientation and regardless on how you got the orientation. This is how the real world operates.
D3DUtil_SetRotateYMatrix() rotates the objects about the y-axis, where fRads equals the amount you want to rotate about this axis. You can find it, like all the other rotation matrices, in d3dutil.h.
VOID D3DUtil_SetRotateYMatrix( D3DMATRIX& mat, FLOAT fRads )
{
  D3DUtil_SetIdentityMatrix( mat );
  mat._11 =  cosf( fRads );
  mat._13 = -sinf( fRads );
  mat._31 =  sinf( fRads );
  mat._33 =  cosf( fRads );
}

=

cosf fRads  0  -sinf fRads  0
    0       0       0       0
sinf fRads  0  cosf fRads   0
    0       0       0       0
D3DUtil_SetRotateXMatrix() rotates the objects about the x-axis, where fRads equals the amount you want to rotate about this axis:
VOID D3DUtil_SetRotateXMatrix( D3DMATRIX& mat, FLOAT fRads )
{
  D3DUtil_SetIdentityMatrix( mat );
  mat._22 =  cosf( fRads );
  mat._23 =  sinf( fRads );
  mat._32 = -sinf( fRads );
  mat._33 =  cosf( fRads );
}

=

1       0       0       0
0  cos fRads  sin fRads 0
0 -sin fRads  cos fRads 0
0       0       0       0
D3DUtil_SetRotateZMatrix() rotates the objects about the z-axis, where fRads equals the amount you want to rotate about this axis:
VOID D3DUtil_SetRotateZMatrix( D3DMATRIX& mat, FLOAT fRads )
{
  D3DUtil_SetIdentityMatrix( mat );
  mat._11  =  cosf( fRads );
  mat._12  =  sinf( fRads );
  mat._21  = -sinf( fRads );
  mat._22  =  cosf( fRads );
}

=

cosf fRads    sinf fRads    0      0
-sinf fRads   cos fRads     0      0
0     0     0      0
0     0     0      0
The prototype of D3DMath_MatrixMultiply() prototype looks like VOID D3DMath_MatrixMultiply (D3DMATRIX& q, D3DMATRIX& a, D3DMATRIX& b). In other words: q=a*b. Matrix multiplication is the operation by which one matrix is transformed by another. A matrix multiplication stores the results of the sum of the products of matrix rows and columns.
a b c d    A B C D
e f g h  * E F G H  =
i j k l    I J K L
m n o p    M N O P

a*A+b*E+c*I+d*M  a*B+b*F+c*J+d*N  a*C+b*G+c*K+d*O a*D+b*H+c*L+d*P
e*A+f*E+g*I+h*M  e*B+f*F+g*J+h*N etc.
A slow but more understandable matrix multiplication routine could look like this:
VOID D3DMath_MatrixMultiply( D3DMATRIX& q, D3DMATRIX& a, D3DMATRIX& b )
{
  FLOAT* pA = (FLOAT*)&a;
  FLOAT* pB = (FLOAT*)&b;
  FLOAT  pM[16];

  ZeroMemory( pM, sizeof(D3DMATRIX) );

  for (WORD i=0; i< 4; i++)
    for (WORD j=0; j< 4; j++)
      pM [i][j]= pA[i][0] * pB[0][j]
       + pA[i][1] * pB[1][j]
       + pA[i][2] * pB[2][j]
       + pA[i][3] * pB[3][j];

  memcpy( &q, pM, sizeof(D3DMATRIX) );
}
A faster version is implemented in d3dutil.h:
VOID D3DMath_MatrixMultiply( D3DMATRIX& q, D3DMATRIX& a, D3DMATRIX& b )
{
  FLOAT* pA = (FLOAT*)&a;
  FLOAT* pB = (FLOAT*)&b;
  FLOAT  pM[16];

  ZeroMemory( pM, sizeof(D3DMATRIX) );

  for( WORD i=0; i<4; i++ )
    for( WORD j=0; j<4; j++ )
      for( WORD k=0; k<4; k++ )
        pM[4*i+j] +=  pA[4*i+k] * pB[4*k+j];

  memcpy( &q, pM, sizeof(D3DMATRIX) );
}
Once you've built the world transformation matrix, you need to call the SetTransform() method in the public interface method Render() of the Direct3D Framework. Set the world transformation matrix, specifying the D3DTRANSFORMSTATE_WORLD flag in the first parameter.
The View Matrix
The view matrix describes the position and the orientation of a viewer in a scene. This is normally the position and orientation of you, looking through the glass of your monitor into the scene. This thinking model is abstracted by a lot of authors by talking about a camera through which you are looking into the scene.
To rotate and translate the viewer or camera in the scene, three vectors are needed. These could be called the LOOK, UP and RIGHT vectors.

They define a local set of axes for the camera and will be set at the start of the application in the InitDeviceObjects() or in the FrameMove() method of the framework.
static D3DVECTOR vLook=D3DVECTOR(0.0f,0.0f,-1.0);
static D3DVECTOR vUp=D3DVECTOR(0.0f,1.0f,0.0f);
static D3DVECTOR vRight=D3DVECTOR(1.0f,0.0f,0.0f);
The LOOK vector is a vector that describes which way the camera is facing. It's the camera's local z axis. To set the camera's look direction so that it is facing into the screen, we would have to set the LOOK vector to D3DVECTOR (0, 0, 1). The LOOK vector isn't enough to descibe the orientation of the camera. The camera could stand upside down and the LOOK vector won't reflect this change in orientation. The UP vector helps here; it points vertically up relative to the direction the camera points. It's like the camera's y axis. So the UP vector is defined as D3DVECTOR (0, 1, 0). If you turn the camera upside down, the UP vector will be D3DVECTOR (0, -1, 0). We can generate a RIGHT vector from the LOOK and UP vectors by using the cross product of the two vectors.
Taking the cross product of any two vectors forms a third vector perpendicular to the plane formed by the first two. The cross product is used to determine which way polygons are facing. It uses two of the polygon's edges to generate a normal. Thus, it can be used to generate a normal to any surface for which you have two vectors that lie within the surface. Unlike the dot product, the cross product is not commutative. a x b = - (b x a). The magnitude of the cross product of a and b, ||axb|| is given by ||a||*||b||*sin(@). The direction of the resultant vector is orthogonal to both a and b.
Furthermore, the cross product is used to derive the plane equation for a plane determined by two intersecting vectors.

Now imagine, the player is sitting in the cockpit of an F22 instead of looking at it from outside. If the player pushes his foot pedals in his F22 to the left or right, the LOOK and the RIGHT vector has to be rotated about the UP vector (YAW effect) or y axis. If he pushes his flightstick to the right or left, the UP and RIGHT vectors have to be rotated around the LOOK vector (ROLL effect) or z axis. If he pushes the flightstick forward and backward, we have to rotate the LOOK and UP vectors around the RIGHT vector (PITCH effect) or x axis.
There's one problem: when computers handle floating point numbers, little accumulation errors happen whilst doing all this rotation math. After a few rotations these rounding errors make the three vectors un-perpendicular to each other. It's obiously important for the three vectors to stay at right angles from each other. The solution is Base Vector Regeneration. It must be performed before the vectors are rotated around one another. We'll use the following code to handle base vector regeneration:
vLook = Normalize(vLook);
vRight  = CrossProduct( vUp, vLook); // Cross Product of the UP and LOOK vector
vRight = Normalize (vRight);
vUp = CrossProduct (vLook, vRight); // Cross Product of the RIGHT and LOOK vector
vUp = Normalize(vUp);
First, we normalize the LOOK vector, so its length is 1. Vectors with a length of one are called unit or normalized vectors. To calculate a unit vector, divide the vector through its magnitude or length. You can calculate the magnitude of vectors by using the Pythagorean theorem:
x²+y²+z² = m²
The length of the vector is retrieved by
||A|| = sqrt (x² + y² + z²)
It's the squareroot of the Pythagorean theorem. The magnitude of a vector has a special symbol in mathematics. It's a capital letter designated with two vertical bars ||A||.
To normalize a vector, the following inline functions in d3dvec.inl are defined:
inline _D3DVECTOR
Normalize (const _D3DVECTOR& v)
{
  return v / Magnitude(v);
}

inline D3DVALUE
Magnitude (const _D3DVECTOR& v)
{
  return (D3DVALUE) sqrt(SquareMagnitude(v));
}

inline D3DVALUE
SquareMagnitude (const _D3DVECTOR& v)
{
  return v.x*v.x + v.y*v.y + v.z*v.z;
}
The Normalize() method divides the vector through its magnitude, which is retrieved by the squareroot of the Pythagorean theorem.
sqrt() is a mathematical function from the math library of Visual C/C++ provided by Microsoft™. Other compilers should have a similar function.
After normalizing the LOOK vector, we create the RIGHT vector by assigning it the cross product of UP and LOOK vector and normalize it. The UP vector is created out of the cross product of the LOOK and RIGHT vector and a normalization thereafter.
After that, we build the pitch, yaw and roll matrices out of these vectors:
// Matrices for pitch, yaw and roll

// This creates a rotation matrix around the viewers RIGHT vector.
D3DMATRIX matPitch, matYaw, matRoll;
D3DUtil_SetRotationMatrix(matPitch, vRight, fPitch);

// Creates a rotation matrix around the viewers UP vector.
D3DUtil_SetRotationMatrix(matYaw, vUp, fYaw );

// Creates a rotation matrix around the viewers LOOK vector.
D3DUtil_SetRotationMatrix(matRoll, vLook, fRoll);
By multiplying, for example, the matYaw matrix with the LOOK and RIGHT vectors, we can rotate two vectors around the other vector.

// now multiply these vectors with the matrices we've just created.
// First we rotate the LOOK & RIGHT Vectors about the UP Vector
D3DMath_VectorMatrixMultiply(vLook , vLook, matYaw);
D3DMath_VectorMatrixMultiply(vRight, vRight,matYaw);

// And then we rotate the LOOK & UP Vectors about the RIGHT Vector
D3DMath_VectorMatrixMultiply(vLook , vLook, matPitch);
D3DMath_VectorMatrixMultiply(vUp, vUp, matPitch);

// now rotate the RIGHT & UP Vectors about the LOOK Vector
D3DMath_VectorMatrixMultiply(vRight, vRight, matRoll);
D3DMath_VectorMatrixMultiply(vUp, vUp, matRoll);
Now that we set the view matrix:
D3DMATRIX view=matWorld;
D3DUtil_SetIdentityMatrix( view );// defined in d3dutil.h and d3dutil.cpp
view._11 = vRight.x; view._12 = vUp.x; view._13 = vLook.x;
view._21 = vRight.y; view._22 = vUp.y; view._23 = vLook.y;
view._31 = vRight.z; view._32 = vUp.z; view._33 = vLook.z;
view._41 = - DotProduct( vPos, vRight ); // dot product defined in d3dtypes.h
view._42 = - DotProduct( vPos, vUp );
view._43 = - DotProduct( vPos, vLook );

m_pd3dDevice->SetTransform(D3DTRANSFORMSTATE_VIEW,&view)

=

   vx       ux       nx      0
   vy       uy       ny      0
   vz       uz       nz      0
-(u * c) -(v * c) -(n * c)   1
In this matrix u, n and v are the UP, RIGHT and LOOK-direction vectors, and c is the camera's world space position. This matrix contains all the elements needed to translate and rotate vertices from world space to camera space.
The x, y and z translation factors are computed by taking the negative of the dot product between the camera position and the u, v, and n vectors. They are negated because the camera works the opposite to objects in the 3D world.
To rotate the vectors two about another, we change fPitch, fYaw and fRoll variables like this:
fPitch=-0.3f * m_fTimeElapsed;
...
fPitch=+0.3f * m_fTimeElapsed;
...
fYaw=-0.3f * m_fTimeElapsed;
...
fYaw=+0.3f * m_fTimeElapsed;
...
fRoll=-0.3f * m_fTimeElapsed;
...
fRoll=+0.3f * m_fTimeElapsed;
...
To synchronize the different number of frame rates with the behaviour of the objects, we have to use a variable with the elapsed time since the last frame. To move the camera forward and backward use the position variable:
vPos.x+=fspeed*vLook.x;
vPos.y+=fspeed*vLook.y;
vPos.z+=fspeed*vLook.z;

vPos.x-=fspeed*vLook.x;
vPos.y-=fspeed*vLook.y;
vPos.z-=fspeed*vLook.z;
The Projection Matrix
An interesting transform is the perspective projection, which is used in Direct3D. It converts the camera's viewing frustrum (the pyramid-like shape that defines what the camera can see) into a cube space, as seen above (with a cube shaped geometry, clipping is much easier). Objects close to the camera are enlarged greatly, while objects farther away are enlarged less. Here, parallel lines are generally not parallel after projection. This transformation applies perspective to a 3D scene. It projects 3D geometry into a form that can be viewed on a 2D display.
The projection matrix is set with D3DUtil_SetProjectionMatrix() in d3dutil.cpp.
HRESULT D3DUtil_SetProjectionMatrix( D3DMATRIX& mat, FLOAT fFOV, FLOAT fAspect,
     FLOAT fNearPlane, FLOAT fFarPlane )
{
  if( fabs(fFarPlane-fNearPlane) < 0.01f )
    return E_INVALIDARG;
  if( fabs(sin(fFOV/2)) < 0.01f )
    return E_INVALIDARG;

  FLOAT w = fAspect * ( cosf(fFOV/2)/sinf(fFOV/2) );
  FLOAT h =   1.0f  * ( cosf(fFOV/2)/sinf(fFOV/2) );
  FLOAT Q = fFarPlane / ( fFarPlane - fNearPlane );

  ZeroMemory( &mat, sizeof(D3DMATRIX) );
  mat._11 = w;
  mat._22 = h;
  mat._33 = Q;
  mat._34 = 1.0f;
  mat._43 = -Q*fNearPlane;

  return S_OK;
}

=

w   0   0   0
0   h   0   0
0   0   Q   1
0   0 -QZN  0
This code sets up a projection matrix, taking the aspect ratio, front (-Q*Zn) or near plane and back or far clipping planes and the field of view with fFOV in radians. Note that the projection matrix is normalized for element [3][4] to be 1.0. This is performed so that w-based range fog will work correctly.
After this last transform, the geometry must be clipped to the cube space and converted from homogenous coordinates to screen coordinates by dividing the x-, y- and z-coordinates of each point by w. Direct3D performs these steps internally.
Homogenous coordinates: Just think of a 3x3 matrix. As you've learned above, in a 4x4 matrix, the first three elements, let's say i,j and k, in the fourth row are needed to translate the object. With 3x3 matrices an object cannot be translated without changing its orientation. If you add some vector (representing translation) to the i, j and k vectors, their orientation will also change. So we need fourth dimension with the so called homogenous coordinates.
In this 4D space, every point has a fourth component that measures distance along an imaginary fourth-dimensional axis called w. To convert a 4D point into a 3D point, you have to divide each component x, y, z and w by w. So every multiplication of a point whose w component is equal to 1 represent that same point. For example (4, 2, 8, 2) represents the same point as (2, 1, 4, 1).
To describe distance on the w-axis, we need another vector l. It points in the positive direction of the w-axis and its neutral magnitude is 1, like the other vectors.
In Direct3D, the points remain homogenous, even after being sent through the geometry pipeline. Only after clipping, when the geometry is ready to be displayed, are these points converted into Cartesian coordinates by dividing each component by w.
Before doing the transformation stuff, normally the viewport is set by the Direct3D IM Framework. It defines how the horizontal, vertical and depth components of a polygon's coordinates in cube space will be scaled before the polygon is displayed.
Down to the Code
The sample uses (as usual in this series) the Direct3D Framework. The application class in animated objects.cpp looks like:
class CMyD3DApplication : public CD3DApplication
{
  D3DVERTEX  m_pvObjectVertices[16];
  WORD  m_pwObjectIndices[30];
  Object   m_pObjects[2];

  FLOAT m_fStartTimeKey,     // Time reference for calculations
        m_fTimeElapsed;

  static HRESULT ConfirmDevice( DDCAPS* pddDriverCaps,
  D3DDEVICEDESC7* pd3dDeviceDesc );

protected:
  HRESULT OneTimeSceneInit();
  HRESULT InitDeviceObjects();
  HRESULT FrameMove( FLOAT fTimeKey );
  HRESULT Render();
  HRESULT DeleteDeviceObjects();
  HRESULT FinalCleanup();

public:
  CMyD3DApplication();
};
The objects are described by vertices in m_pvObjectVertices[16] and by indices in m_pwObjectIndices[30]. There's an object structure called object. The fps-independant movement is guaranteed by the two time variables, which holds the start and the elapsed time between two frames. As usual ConfirmDevice() is called as the first framework method, but it's not used here, because we won't need any special capabilities of the graphics card. The other framework methods are called top - down and will be mentioned in this order in the following paragraphs.
OneTimeSceneInit()
The OneTimeSceneInit() function performs basically any one-time resource allocation and is invoked once per application execution cycle. Here it contains the code to construct the two objects:
HRESULT CMyD3DApplication::OneTimeSceneInit()
{
  // Points and normals which make up a object geometry
  D3DVECTOR p1 = D3DVECTOR( 0.00f, 0.00f, 0.50f );
  D3DVECTOR p2 = D3DVECTOR( 0.50f, 0.00f,-0.50f );
  D3DVECTOR p3 = D3DVECTOR( 0.15f, 0.15f,-0.35f );
  D3DVECTOR p4 = D3DVECTOR(-0.15f, 0.15f,-0.35f );
  D3DVECTOR p5 = D3DVECTOR( 0.15f,-0.15f,-0.35f );
  D3DVECTOR p6 = D3DVECTOR(-0.15f,-0.15f,-0.35f );
  D3DVECTOR p7 = D3DVECTOR(-0.50f, 0.00f,-0.50f );
  D3DVECTOR n1 = Normalize( D3DVECTOR( 0.2f, 1.0f, 0.0f ) );
  D3DVECTOR n2 = Normalize( D3DVECTOR( 0.1f, 1.0f, 0.0f ) );
  D3DVECTOR n3 = Normalize( D3DVECTOR( 0.0f, 1.0f, 0.0f ) );
  D3DVECTOR n4 = Normalize( D3DVECTOR(-0.1f, 1.0f, 0.0f ) );
  D3DVECTOR n5 = Normalize( D3DVECTOR(-0.2f, 1.0f, 0.0f ) );
  D3DVECTOR n6 = Normalize( D3DVECTOR(-0.4f, 0.0f, -1.0f ) );
  D3DVECTOR n7 = Normalize( D3DVECTOR(-0.2f, 0.0f, -1.0f ) );
  D3DVECTOR n8 = Normalize( D3DVECTOR( 0.2f, 0.0f, -1.0f ) );
  D3DVECTOR n9 = Normalize( D3DVECTOR( 0.4f, 0.0f, -1.0f ) );

  // Vertices for the top
  m_pvObjectVertices[ 0] = D3DVERTEX( p1, n1, 0.000f, 0.500f );
  m_pvObjectVertices[ 1] = D3DVERTEX( p2, n2, 0.500f, 1.000f );
  m_pvObjectVertices[ 2] = D3DVERTEX( p3, n3, 0.425f, 0.575f );
  m_pvObjectVertices[ 3] = D3DVERTEX( p4, n4, 0.425f, 0.425f );
  m_pvObjectVertices[ 4] = D3DVERTEX( p7, n5, 0.500f, 0.000f );

  // Vertices for the bottom
  ...
  // Vertices for the  rear
  ...
The sample project shows a simple object. Well... a cube would bore you. The wireframe model shows the polygons and points of the object.

Point #1 is m_pvObjectVertices[0] and m_pvObjectVertices[5], point #2 is m_pvObjectVertices[1] and m_pvObjectVertices[6], point #3 is m_pvObjectVertices[3] and m_pvObjectVertices[11], etc.
Every point is declared as a vector with D3DVECTOR. For every face of the object a normal is defined, so that there are nine normals.

The normal vector is used in Gouraud shading mode, to control lighting and do some texturing effects. Direct3D applications do not need to specify face normals; the system calculates them automatically when they are needed.
The normal vectors are normalized with a call to
D3DVECTOR n1 = Normalize( D3DVECTOR( 0.2f, 1.0f, 0.0f ) );
The Normalize() method divides the vector through its magnitude, which is retrieved by the square root of the Pythagorean theorem.
The last two variables of D3DVERTEX are the texture coordinates. Most textures, like bitmaps, are a two dimensional array of color values. The individual color values are called texture elements, or texels. Each texel has a unique address in the texture: its texel coordinate. Direct3D programs specify texel coordinates in terms of u,v values, much like 2-D Cartesian coordinates are specified in terms of x,y coordinates. The address can be thought of as a column and row number. However, in order to map texels onto primitives, Direct3D requires a uniform address range for all texels in all textures. Therefore, it uses a generic addressing scheme in which all texel addresses are in the range of 0.0 to 1.0 inclusive.
Direct3D maps texels in texture space directly to pixels in screen space. The screen space is a frame of reference in which coordinates are related directly to 2-D locations in the frame buffer, to be displayed on a monitor or other viewing device. Projection space coordinates are converted to screen space coordinates, using a transformation matrix created from the viewport parameters. This sampling process is called texture filtering. There are four texture filtering methods supported by Direct3D: Nearest Point Sampling, Linear Texture Filtering, Anisotropic Texture Filtering, Texture Filtering With Mipmaps.
We're not using a texture here, so more on texture mapping in Tutorial #3 "Multitexturing".
Now on to the next part of the OneTimeSceneInit() method:
// Vertex indices for the object
m_pwObjectIndices[ 0] = 0; m_pwObjectIndices[ 1] = 1; m_pwObjectIndices[2] = 2;
m_pwObjectIndices[ 3] = 0; m_pwObjectIndices[ 4] = 2; m_pwObjectIndices[5] = 3;
m_pwObjectIndices[ 6] = 0; m_pwObjectIndices[ 7] = 3; m_pwObjectIndices[8] = 4;
m_pwObjectIndices[ 9] = 5; m_pwObjectIndices[10] = 7; m_pwObjectIndices[11] = 6;
m_pwObjectIndices[12] = 5; m_pwObjectIndices[13] = 8; m_pwObjectIndices[14] = 7;
m_pwObjectIndices[15] = 5; m_pwObjectIndices[16] = 9; m_pwObjectIndices[17] = 8;
m_pwObjectIndices[18] = 10; m_pwObjectIndices[19] = 15; m_pwObjectIndices[20] = 11;
m_pwObjectIndices[21] = 11; m_pwObjectIndices[22] = 15; m_pwObjectIndices[23] = 12;
m_pwObjectIndices[24] = 12; m_pwObjectIndices[25] = 15; m_pwObjectIndices[26] = 14;
m_pwObjectIndices[27] = 12; m_pwObjectIndices[28] = 14; m_pwObjectIndices[29] = 13;
This piece of code generates the indices for the D3DPT_TRIANGLELIST call in DrawIndexedPrimitive(). Direct3D allows you to define your polygons on one of two ways: By defining their vertices or by defining indices into a list of vertices. The latter approach is usually faster and more flexible, because it allows objects with multiple polygons to share vertex data. The object consists of only seven points, which are used by 15 vertices.
There are two ways of grouping the vertices that define a primitive: using non-indexed primitives and using indexed primitves. To create a nonindexed primitive, you fill an array with an ordered list of vertices. Ordered means that the order of the vertices in the array indicates how to build the triangles. The first triangle consists of the first three vertices, the second triangle consists of the next three vertices and so on. If you have two triangles that are connected, you'll have to specify the same vertices multiple times. To create an indexed primitive, you fill an array with an unordered list of vertices and specify the order with a second array (index array). This means that vertices can be shared by multiple triangles, simply by having multiple entries in the index array refer to the same vertex. Most 3D models share a number of vertices. Therefore, you can save bandwith and CPU time sharing these vertices among multiple triangles.
Defining indices into a list of vertices has one disadvantage: the cost of memory. There could be problems with sharing vertices of a cube. Lighting a cube is done by using its face normals, which is perpendicular to the face's plane. If the vertices of a cube are shared, there's only one shared vertex for two triangles. This shared vertex has only one normal to calculate the face normal, so the lighting effect wouldn't be what you want.
In OneTimeSceneInit() the two objects are defined with the help of the m_pObjects structure.
...
  // yellow object
  m_pObjects[0].vLoc   = D3DVECTOR(-1.0f, 0.0f, 0.0f);
  m_pObjects[0].fYaw   = 0.0f;
  m_pObjects[0].fPitch = 0.0f;
  m_pObjects[0].fRoll  = 0.0f;
  m_pObjects[0].r      = 1.0f;
  m_pObjects[0].g      = 0.92f;
  m_pObjects[0].b      = 0.0f;
  // red object
  m_pObjects[1].vLoc   = D3DVECTOR(1.0f, 0.0f, 0.0f);
  m_pObjects[1].fYaw   = 0.0f;
  m_pObjects[1].fPitch = 0.0f;
  m_pObjects[1].fRoll  = 0.0f;
  m_pObjects[1].r      = 1.0f;
  m_pObjects[1].g      = 0.0f;
  m_pObjects[1].b      = 0.27f;

  return S_OK;
}
To position the first object on the screen, a location has to be chosen. The yellow object should be located on the left and the red one on the right side. The colors for the material properties are chosen in the r, g and b variables. They are set later in the framework function Render() with a call to
// yellow object
// Set the color for the object
D3DUtil_InitMaterial( mtrl, m_pObjects[0].r, m_pObjects[0].g, m_pObjects[0].b );
m_pd3dDevice->SetMaterial( &mtrl );
InitDeviceObjects()
The InitDeviceObjects() is used to initialize per-device objects such as loading texture bits onto a device surface, setting matrices and populating vertex buffers. First, we'll use it here to set a material. When lighting is enabled, as Direct3D rasterizes a scene in the final stage of rendering, it determines the color of each rendered pixel based on a combination of the current material color (and the texels in an associated texture map), the diffuse and specular colors at the vertex, if specified, as well as the color and intensity of light produced by light sources in the scene or the scene's ambient light level.
You must use materials to render a scene if you are letting Direct3D handle lighting.
HRESULT CMyD3DApplication::InitDeviceObjects()
{
  D3DMATERIAL7 mtrl;
  D3DUtil_InitMaterial( mtrl, 1.0f, 1.0f, 1.0f );
  m_pd3dDevice->SetMaterial( &mtrl );
...
By default, no material is selected. When no material is selected, the Direct3D lighting engine is disabled.
D3DUtil_InitMaterial() sets the RGBA values of the material. Color values of materials represent how much of a given light component is reflected by a surface that is rendered with that material. A material's properties include diffuse reflection, ambient reflection, light emission and specular hightlighting:
- Diffuse reflection: Defines how the polygon reflects diffuse lighting (any light that does not come from ambient light). This is described in terms of a color, which represents the color best reflected by the polygon. Other colors are reflected less in proportion to how different they are from the diffuse color.
- Ambient reflection: Defines how the polygon reflects ambient lighting. This is described in terms of a color, which, as with diffuse reflection, represents the color best reflected by the polygon.
- Light emission: Makes the polygon appear to emit a certain color of light (this does not actually light up the world; it only changes the appearance of the polygon).
- Specular highlighting: Describes how shiny the polygon is.
A material whose color components are R: 1.0, G: 1.0, B: 1.0, A: 1.0 will reflect all the light that comes its way. Likewise, a material with R: 0.0, G: 1.0, B: 0.0, A: 1.0 will reflect all of the green light that is directed at it. SetMaterial() sets the material properties for the device.
After setting the material, we can setup the light. Color values for light sources represent the amount of a particular light component it emits. Lights don't use an alpha component, so you only need to think about the red, green, and blue components of the color. You can visualize the three components as the red, green, and blue lenses on a projection television. Each lens might be off (a 0.0 value in the appropriate member), it might be as bright as possible (a 1.0 value), or some level in between. The colors coming from each lens combine to make the light's final color. A combination like R: 1.0, G: 1.0, B: 1.0 creates a white light, where R: 0.0, G: 0.0, B: 0.0 results in a light that doesn't emit light at all. You can make a light that emits only one component, resulting in a purely red, green, or blue light, or the light could use combinations to emit colors like yellow or purple. You can even set negative color component values to create a "dark light" that actually removes light from a scene. Or, you might set the components to some value larger than 1.0 to create an extremely bright light. Direct3D employs three types of lights: point lights, spotlights, and directional lights.
You choose the type of light you want when you create a set of light properties. The illumination properties and the resulting computational overhead varies with each type of light source. The following types of light sources are supported by Direct3D 7:
- Point lights
- Spotlights
- Directional lights
DirectX 7.0 does not use the parallel-point light type offered in previous releases of DirectX. Tip: You should avoid spotlights, because there are more realistic ways of creating spotlights than the default method supplied by Direct3D: Such as texture blending: see the "Multitexturing" tutorials.
The sample sets up an ambient light and, if the graphic card supports it, two directional lights.
...
  // Set up the lights
  m_pd3dDevice->SetRenderState( D3DRENDERSTATE_AMBIENT, 0x0b0b0b0b);

  if( m_pDeviceInfo->ddDeviceDesc.dwVertexProcessingCaps &
        D3DVTXPCAPS_DIRECTIONALLIGHTS )
  {
    D3DLIGHT7 light;

    if( m_pDeviceInfo->ddDeviceDesc.dwMaxActiveLights > 0 )
    {
      D3DUtil_InitLight( light, D3DLIGHT_DIRECTIONAL, 0.5f, -1.0f, 0.3f );
      m_pd3dDevice->SetLight( 0, &light );
      m_pd3dDevice->LightEnable( 0, TRUE );
    }

  if( m_pDeviceInfo->ddDeviceDesc.dwMaxActiveLights > 1 )
  {
    D3DUtil_InitLight( light, D3DLIGHT_DIRECTIONAL, 0.5f, 1.0f, 1.0f );
    light.dcvDiffuse.r = 0.5f;
    light.dcvDiffuse.g = 0.5f;
    light.dcvDiffuse.b = 0.5f;
    m_pd3dDevice->SetLight( 1, &light );
    m_pd3dDevice->LightEnable( 1, TRUE );
  }

  m_pd3dDevice->SetRenderState( D3DRENDERSTATE_LIGHTING, TRUE );
}
...
An ambient light is effectively everywhere in a scene. It's a general level of light that fills an entire scene, regardless of the objects and their locations within that scene. Ambient light is everywhere and has no direction or position. There's only color and intensity. SetRenderState() sets the ambient light by specifying D3DRENDERSTATE_AMBIENT as the dwRenderStateType parameter, and the desired RGBA color as the dwRenderState parameter. Keep in mind that the color values of the material represent how much of a given light component is reflected by a surface. So the light properties are not the only properties which are responsible for the color of the object you will see.
Additionally there are up to two directional lights used by the sample. Although we use directional lights and an ambient light to illuminate the objects in the scene, they are independent of one another. Directional light always has direction and color, and it is a factor for shading algorithms, such as Gouraud shading. It is equivalent to use a point light source at an infinite distance.
The sample first checks the capabilities of the graphics device. If it supports directional light, the light will be set by a call to the SetLight() method, which uses the D3DLIGHT7 structure.
typedef struct _D3DLIGHT7 {
  D3DLIGHTTYPE    dltType;
  D3DCOLORVALUE   dcvDiffuse;
  D3DCOLORVALUE   dcvSpecular;
  D3DCOLORVALUE   dcvAmbient;
  D3DVECTOR       dvPosition;
  D3DVECTOR       dvDirection;
  D3DVALUE        dvRange;
  D3DVALUE        dvFalloff;
  D3DVALUE        dvAttenuation0;
  D3DVALUE        dvAttenuation1;
  D3DVALUE        dvAttenuation2;
  D3DVALUE        dvTheta;
  D3DVALUE        dvPhi;
} D3DLIGHT7, *LPD3DLIGHT7;
The position, range, and attenuation properties are used to define a light's location in world space, and how the light behaves over distance. The D3DUtil_InitLight() method in d3dutil.cpp sets a few default values.
VOID D3DUtil_InitLight( D3DLIGHT7& light, D3DLIGHTTYPE ltType,
        FLOAT x, FLOAT y, FLOAT z )
{
  ZeroMemory( &light, sizeof(D3DLIGHT7) );
  light.dltType= ltType;
  light.dcvDiffuse.r   = 1.0f;
  light.dcvDiffuse.g   = 1.0f;
  light.dcvDiffuse.b   = 1.0f;
  light.dcvSpecular    = light.dcvDiffuse;
  light.dvPosition.x   = light.dvDirection.x = x;
  light.dvPosition.y   = light.dvDirection.y = y;
  light.dvPosition.z   = light.dvDirection.z = z;
  light.dvAttenuation0 = 1.0f;
  light.dvRange        = D3DLIGHT_RANGE_MAX;
}
Only the light position is set explicitly for the first light. The light position is described using a D3DVECTOR with the x-, y- and z-coordinates in world space. The first light is located under the objects and the second light is located above these. The second light is only set if the graphics device supports it. It's a bit darker.
Directional lights don't use range and attentuation variables. A light's range property determines the distance, in world space, at which meshes in a scene no longer receive light. So the dvRange floating point value represents the light's maximum range. The attentuation variables controls how a light's intensity decreases toward the maximum distance, specified by the range property. There are three attentuation values, controlling a light's constant, linear and quadratic attentuation with floating point variables. Many applications set the dvAttentuation1 member to 1.0f and the others to 0.0f.
Beneath the material and lights, the InitDeviceObjects() method sets the projection matrix and aspect ratio of the viewport.
FrameMove()
The FrameMove() method handles most of the keyboard input and the matrix stuff. All the rotations and translations for the objects and the camera are set in this method.
At first you need a small DirectInput primer to understand all the input stuff presented in this method.
With DirectInput, which is the input component of DirectX, you can access keyboard, mouse, joystick and all other forms of input devices in a uniform manner. Although DirectInput can be extremely complex if you use all its functionality, it can be quite manageable at the lowest level of functionality, which we will use here.
DirectInput consists of run-time DLLs and two compile-time files: dinput.lib and dinput.h. They import the library and the header. Using DirectInput is straightforward:
Setup DirectInput:
- Create a main DirectInput object with DirectInputCreateEx()
- Create one or more input devices with CreateDeviceEx()
- Set the data format of each device with SetDataFormat()
- Set the cooperative level for each device with SetCooperativeLevel()
Getting Input:
- Acquire each input device with Acquire()
- Receive Input with GetDeviceState()
- Special Joysticks: call Poll() if it's needed
DirectInput can send you immediate mode state information or buffer input, time-stamped in a message format. We'll only use the immediate mode of data acquisition here (see the DirectX SDK documentation for information on buffered mode).
We call DirectInputCreateEx() in the CreateDInput() method.
HRESULT CMyD3DApplication::CreateDInput( HWND hWnd )
{
  // keyboard
  if( FAILED(DirectInputCreateEx( (HINSTANCE)GetWindowLong( hWnd, GWL_HINSTANCE ),
                                  DIRECTINPUT_VERSION,
                                  IID_IDirectInput7,
                                  (LPVOID*) &g_Keyboard_pDI, NULL) ) )
    return 0;

  return S_OK;
}
It's called in WinMain() with
// Create the DInput object
if( FAILED(d3dApp.CreateDInput( d3dApp.Get_hWnd() ) ) )
  return 0;
To retrieve the instance of the sample, we use GetWindowLong( hWnd, GWL_HINSTANCE ). The constant DIRECTINPUT_VERSION determines which version of DirectInput your code is designed for. The next parameter is the desired DirectInput Interface, which should be used by the sample. Acceptable values are IID_IDirectInput, IID_IDirectInput2 and IID_IDirectInput7. For backward compatibility you can define an older verison of DirectInput there. This is useful, for example, for WinNT which supports only DirectX 3. The last parameter holds the DirectInput interface pointer.
To create one input device - the keyboard - we use CreateDeviceEx() in CreateInputDevice()
HRESULT CMyD3DApplication::CreateInputDevice( HWND                 hWnd,
                                              LPDIRECTINPUT7       pDI,
                                              LPDIRECTINPUTDEVICE2 pDIdDevice,
                                              GUID                 guidDevice,
                                              const DIDATAFORMAT*  pdidDataFormat,
                                              DWORD                dwFlags )
{
  // Get an interface to the input device
  if( FAILED( pDI->CreateDeviceEx( guidDevice,
 IID_IDirectInputDevice2,
      (VOID**)&pDIdDevice, NULL ) ) )
    return 0;

  // Set the device data format
  if( FAILED( pDIdDevice->SetDataFormat( pdidDataFormat ) ) )
    return 0;

  // Set the cooperativity level
  if( FAILED( pDIdDevice->SetCooperativeLevel( hWnd, dwFlags ) ) )
    return 0;

  if(guidDevice == GUID_SysKeyboard)
    g_Keyboard_pdidDevice2 = pDIdDevice;

  return S_OK;
}
It's called in WinMain() with
// Create a keyboard device
if( FAILED(d3dApp.CreateInputDevice( d3dApp.Get_hWnd(),
                                     d3dApp.g_Keyboard_pDI,
                                     d3dApp.g_Keyboard_pdidDevice2,
                                     GUID_SysKeyboard,
                                     &c_dfDIKeyboard,
                                     DISCL_NONEXCLUSIVE | DISCL_FOREGROUND)))
Besides creating the input device it sets the data format of the keyboard with SetDataFormat() and the cooperative level with SetCooperativeLevel(). The first parameter of CreateDeviceEx() is the GUID (Globally Unique Indentifier), that identifies the device you want to create.
You have to enumerate devices with EnumDevices() to get the GUIDs for any weird stuff like joysticks, flightsticks, virtual reality helms and suits.
You won't need to perform an enumeration process for the keyboard, because all computers are required to have one and won't boot without it. So the GUID for keyboards is predefined by DirectInput. The next parameter is for the desired interface. Accepted values are currently IID_DirectInputDevice, IID_DirectInputDevice2 and IID_DirectInputDevice7. CreateDeviceEx() returns the interface pointer pDIdDevice which will be stored later in g_Keyboard_pdidDevice2.
By setting the Data format with SetDataFormat(), you tell DirectInput how you want the data from the device to be formatted and represented. You can define your own DIDATAFORMAT structure, or you can use one of the predefined global constants: c_dfDIKeyboard is the constant for the keyboard. Generally you won't need to define a custom structure, because the predefined ones will allow your application to use most of the off-the-shelf devices.
The next step you need to perform before you can access the DirectInput device (in this case the keyboard) is to use the method SetCooperativeLevel() to set the device's behaviour. It determines how the input from the device is shared with other applications. For a keyboard you have to use the DISCL_NONEXCLUSIVE flag, because DirectInput doesn't support exclusive access to keyboard devices.
Even Ctrl+Alt+Esc wouldn't work with an exclusive keyboard.
DISCL_FOREGROUND restricts the use of DirectInput on the foreground. The device is automatically unaquired when the associated window moves to the background. Whereas DISCL_BACKGROUND gives your app the possiblity to use a DirectInputDevice in fore- and background.
In addition, this method needs the handle of the window, to set the exclusivity.
To get the keyboard input, we call, in the FrameMove() method, the following functions:
BYTE diks[256]; // DInput keyboard state buffer
ZeroMemory( diks, sizeof(diks) );

if (FAILED(g_Keyboard_pdidDevice2->GetDeviceState( sizeof(diks), &diks )))
{
  g_Keyboard_pdidDevice2->Acquire();
  if (FAILED(g_Keyboard_pdidDevice2->GetDeviceState( sizeof(diks), &diks )))
    return 0;
}
The array disks[256] holds the keyboard states. To get access to the DirectInput Device, you have to acquire it. You retrieve the keyboard states with GetDeviceState(). The values are used with
// yellow object
if (diks[DIK_J] &&0x80) // j key
  m_pObjects[0].fRoll -= 1.0f * m_fTimeElapsed;
To test if any key is down, you must test the 0x80 bit in the 8-bit byte of the key in question; in other words the uppermost bit.
At the end of the sample, the DirectInput device is released with a call to
VOID CMyD3DApplication::DestroyInputDevice()
{
  // keyboard
  if(g_Keyboard_pdidDevice2)
  {
    g_Keyboard_pdidDevice2->Unacquire();
    g_Keyboard_pdidDevice2->Release();
    g_Keyboard_pdidDevice2 = NULL;
  }
}
That's all with DirectInput. Now back to graphics programming.
FrameMove() uses a timing code to ensure that all the objects and the camera move/rotate in the same speed at every possible fps.
// timing code:
// the object should move/rotate in the same speed
// at every possible fps
const cTimeScale = 5;

// calculate elapsed time
m_fTimeElapsed=(fTimeKey-m_fStartTimeKey)* cTimeScale;

// store last time
m_fStartTimeKey=fTimeKey;
To calculate the elapsed time, you have to subtract m_fStartTimeKey from fTimeKey.
To rotate the yellow object about its x- and z- axis, we have to change the variables fRoll and fPitch in the m_pObject structure.
// yellow object
if (diks[DIK_J] &&0x80) // j key
  m_pObjects[0].fRoll -= 1.0f * m_fTimeElapsed;

if (diks[DIK_L] &&0x80) // l key
    m_pObjects[0].fRoll += 1.0f * m_fTimeElapsed;

if (diks[DIK_I] &&0x80) // i key
    m_pObjects[0].fPitch -= 1.0f * m_fTimeElapsed;

if (diks[DIK_K] &&0x80) // k key
    m_pObjects[0].fPitch += 1.0f * m_fTimeElapsed;
They are used in the following translate and rotate matrix methods.
D3DMATRIX matWorld;

// object matrix for yellow object
D3DUtil_SetTranslateMatrix( matWorld, m_pObjects[0].vLoc );

D3DMATRIX matTemp, matRotateX, matRotateY, matRotateZ;
D3DUtil_SetRotateYMatrix( matRotateY, -m_pObjects[0].fYaw );
D3DUtil_SetRotateXMatrix( matRotateX, -m_pObjects[0].fPitch );
D3DUtil_SetRotateZMatrix( matRotateZ, -m_pObjects[0].fRoll );
D3DMath_MatrixMultiply( matTemp, matRotateX, matRotateY );
D3DMath_MatrixMultiply( matTemp, matRotateZ, matTemp );
D3DMath_MatrixMultiply( matWorld, matTemp, matWorld );

m_pObjects[0].matLocal = matWorld;
As described above, the method D3DUtil_SetTranslateMatrix() would translate the yellow object into its place and D3DUtil_SetRotateXMatrix() and D3DUtil_SetRotateZMatrix() would rotate it around the x-axis and z-axis. We won't use D3DUtil_SetRotateYMatrix() here. They are useful for the upcoming tutorials. At last, the position of the yellow object in the world matrix will be stored in the m_pObjects structure.
The same functionality lies behind the code for the red object.
// red object
if (diks[DIK_D] &&0x80)   // Key d
  m_pObjects[1].fRoll -= 1.0f * m_fTimeElapsed;

if (diks[DIK_A] &&0x80)   // Key a
  m_pObjects[1].fRoll += 1.0f * m_fTimeElapsed;

if (diks[DIK_S] &&0x80)   // Key s
  m_pObjects[1].fPitch -= 1.0f * m_fTimeElapsed;

if (diks[DIK_W] &&0x80)   // Key w
  m_pObjects[1].fPitch += 1.0f * m_fTimeElapsed;

// object matrix for red object
D3DUtil_SetTranslateMatrix( matWorld, m_pObjects[1].vLoc );

D3DUtil_SetRotateYMatrix( matRotateY, -m_pObjects[1].fYaw );
D3DUtil_SetRotateXMatrix( matRotateX, -m_pObjects[1].fPitch );
D3DUtil_SetRotateZMatrix( matRotateZ, -m_pObjects[1].fRoll );
D3DMath_MatrixMultiply( matTemp, matRotateX, matRotateY );
D3DMath_MatrixMultiply( matTemp, matRotateZ, matTemp );
D3DMath_MatrixMultiply( matWorld, matTemp, matWorld );

m_pObjects[1].matLocal = matWorld;
The only differences are the use of other keys and the storage of the variables in another object struture.
After translating the objects, the camera has to be placed and pointed in the right direction. The vLook, vUp, vRight and vPos vectors are holding the position and the LOOK, UP and RIGHT vectors of the camera.
//************************************************************
// camera stuff
//************************************************************
static D3DVECTOR vLook=D3DVECTOR(0.0f,0.0f,1.0);
static D3DVECTOR vUp=D3DVECTOR(0.0f,1.0f,0.0f);
static D3DVECTOR vRight=D3DVECTOR(1.0f,0.0f,0.0f);
static D3DVECTOR vPos=D3DVECTOR(0.0f,0.0f,-5.0f);
FLOAT fPitch,fYaw,fRoll;
fPitch = fYaw = fRoll = 0.0f;

FLOAT fspeed= 1.0f * m_fTimeElapsed;
The LOOK vector points in the direction of the positive z-axis. The UP vector points into the direction of the positive y-axis and the RIGHT vector points in the direction of the positive x-axis. The variables fPitch, fYaw and fRoll are responsible for the orientation of the camera. The camera is moved back and forward with vPos, whereas speed holds the back and forward speed of it.
// fPitch
if (diks[DIK_UP] && 0x80)
  fPitch=-0.3f * m_fTimeElapsed;

if (diks[DIK_DOWN] && 0x80)
  fPitch=+0.3f * m_fTimeElapsed;

// fYaw
if (diks[DIK_C] && 0x80) // c key
  fYaw=-0.3f * m_fTimeElapsed;

if (diks[DIK_X] && 0x80) // x key
  fYaw=+0.3f * m_fTimeElapsed;

// fRoll
if (diks[DIK_LEFT] && 0x80)
  fRoll=-0.3f * m_fTimeElapsed;

if (diks[DIK_RIGHT] && 0x80)
  fRoll=+0.3f * m_fTimeElapsed;

// camera forward
if (diks[DIK_HOME] && 0x80 )   // Key HOME
{
  vPos.x+=fspeed*vLook.x;
  vPos.y+=fspeed*vLook.y;
  vPos.z+=fspeed*vLook.z;
}

// camera back
if (diks[DIK_END] &&0x80 )   // Key END
{
  vPos.x-=fspeed*vLook.x;
  vPos.y-=fspeed*vLook.y;
  vPos.z-=fspeed*vLook.z;
}
The three orientation vectors are normalized with Base Vector Regeneration, by normalizing the LOOK vector, building a perpendicular vector out of the UP and LOOK vector, normalizing the RIGHT vector and building the perpendicular vector of the LOOK and RIGHT vector, the UP vector. Then the UP vector is normalized.
Normalization produces a vector with a magnitude of 1. The cross product method produces a vector, which is perpendicular to the two vectors provided as variables.
vLook = Normalize(vLook);
vRight = CrossProduct( vUp, vLook); // Cross Produkt of the UP and LOOK Vector
vRight = Normalize (vRight);
vUp = CrossProduct (vLook, vRight); // Cross Produkt of the RIGHT and LOOK Vector
vUp = Normalize(vUp);
The rotation matrices are built with D3DUtil_SetRotationMatrix() and executed with D3DUtil_MatrixMultiply().
// Matrices for pitch, yaw and roll
// This creates a rotation matrix around the viewers RIGHT vector.
D3DMATRIX matPitch, matYaw, matRoll;
D3DUtil_SetRotationMatrix(matPitch, vRight, fPitch);

// Creates a rotation matrix around the viewers UP vector.
D3DUtil_SetRotationMatrix(matYaw, vUp, fYaw );

// Creates a rotation matrix around the viewers LOOK vector.
D3DUtil_SetRotationMatrix(matRoll, vLook, fRoll);

// now multiply these vectors with the matrices we've just created.
// First we rotate the LOOK & RIGHT Vectors about the UP Vector
D3DMath_VectorMatrixMultiply(vLook , vLook, matYaw);
D3DMath_VectorMatrixMultiply(vRight, vRight,matYaw);

// And then we rotate the LOOK & UP Vectors about the RIGHT Vector
D3DMath_VectorMatrixMultiply(vLook , vLook, matPitch);
D3DMath_VectorMatrixMultiply(vUp, vUp, matPitch);

// now rotate the RIGHT & UP Vectors about the LOOK Vector
D3DMath_VectorMatrixMultiply(vRight, vRight, matRoll);
D3DMath_VectorMatrixMultiply(vUp, vUp, matRoll);

D3DMATRIX view=matWorld;
D3DUtil_SetIdentityMatrix( view );// defined in d3dutil.h and d3dutil.cpp
view._11 = vRight.x; view._12 = vUp.x; view._13 = vLook.x;
view._21 = vRight.y; view._22 = vUp.y; view._23 = vLook.y;
view._31 = vRight.z; view._32 = vUp.z; view._33 = vLook.z;
view._41 = - DotProduct( vPos, vRight ); // dot product defined in d3dtypes.h
view._42 = - DotProduct( vPos, vUp );
view._43 = - DotProduct( vPos, vLook );

m_pd3dDevice->SetTransform(D3DTRANSFORMSTATE_VIEW, &view);
Render()
The Render() method is called once per frame and is the entry point for 3d rendering. It clears the viewport, and renders the two objects with proper material.
HRESULT CMyD3DApplication::Render()
{
  D3DMATERIAL7 mtrl;

  // Clear the viewport
  m_pd3dDevice->Clear( 0, NULL, D3DCLEAR_TARGET | D3DCLEAR_ZBUFFER,
    0x00000000, 1.0f, 0L );
  // Begin the scene
  if( FAILED( m_pd3dDevice->BeginScene() ) )
     return S_OK; // Don't return a "fatal" error

  // yellow object
  // Set the color for the object
  D3DUtil_InitMaterial( mtrl, m_pObjects[0].r, m_pObjects[0].g, m_pObjects[0].b );
  m_pd3dDevice->SetMaterial( &mtrl );

  // Apply the object's local matrix
  m_pd3dDevice->SetTransform(D3DTRANSFORMSTATE_WORLD, &m_pObjects[0].matLocal );

  // Draw the object
  m_pd3dDevice->DrawIndexedPrimitive( D3DPT_TRIANGLELIST, D3DFVF_VERTEX,
                                      m_pvObjectVertices, 16,
                                      m_pwObjectIndices, 30, 0 );
We are using a Z-Buffer here by calling
m_pd3dDevice->SetRenderState( D3DRENDERSTATE_ZENABLE, TRUE );
in InitDeviceObjects() and clearing the z-buffer with Clear() shown above. That's not a big thing ... is it? But z-buffers play an important role in task of visible surface determination. Switch it off and you'll see what I mean. Polygons closer to the camera must obscure polygons which are farther away. There are a number of solutions for this task, for example drawing all the polygons back to front, which is slow and not supported by most hardware, Binary Space Partition trees, Octrees and so on. Direct3D supports the creation of a DirectDraw surface that stores depth information for every pixel on the display. Before displaying your virtual world, Direct3D clears every pixel on this depth buffer to the farthest possible depth value. Then when rasterizing, Direct3D determines the depth of each pixel on the polygon. Is a pixel closer to the camera than the one previously stored in the depth buffer, the pixel is displayed and the new depth value is stored in the depth buffer. This process will continue until all pixels are drawn.
There's not only a z-buffer, but there's also a w-buffer. Think of the w-buffer as a higher quality z-buffer, which isn't supported in hardware as often as z-buffers. It reduces problems exhibited in z-buffers with objects at a distance and has a constant performance for both near and far objects. You only have to replace TRUE in the SetRenderState() call through D3DZB_USEW to use it.
As usual the Render() method uses the BeginScene()/EndScene() pair. The first function is called before performing rendering, the second after that. BeginScene causes the system to check its internal data structures, the availability and validity of rendering surfaces, and sets an internal flag to signal that a scene is in progress. Attempts to call rendering methods when a scene is not in progress fail, returning D3DERR_SCENE_NOT_IN_SCENE. Once your rendering is complete, you need to call EndScene(). It clears the internal flag that indicates that a scene is in progress, flushes the cached data and makes sure the rendering surfaces are OK.
The second parameter of DrawIndexedPrimitive(), D3DFVF_VERTEX, describes the vertex format used for this set of primitives. The d3dtypes.h header file declares these flags to explicitly describe a vertex format and provides helper macros that act as common combinations of such flags.
#define D3DFVF_VERTEX ( D3DFVF_XYZ | D3DFVF_NORMAL | D3DFVF_TEX1 )
Each of the rendering methods of IDirect3Ddevice7 accepts a combination of these flags, and uses them to determine how to render primitives. Basically, these flags tell the system which vertex components—position, normal, colors, and the number of texture coordinates–your application uses and, indirectly, which parts of the rendering pipeline you want Direct3D to apply to them. In addition, the presence or absence of a particular vertex format flag communicates to the system which vertex component fields are present in memory, and which you've omitted. By using only the needed vertex components, your application can conserve memory and minimize the processing bandwidth required to render models.
D3DFVF_XYZ includes the position of an untransformed vertex. You have to specify a vertex normal, a vertex color component (D3DFVF_DIFFUSE or D3DFVF_SPECULAR), or include at least one set of texture coordinates (D3DFVF_TEX1 through D3DFVF_TEX8). D3DFVF_NORMAL shows that the vertex format includes a vertex normal vector and D3DFVF_TEX1 shows us the number of texture coordinate sets for this vertex. Here it's one texture coordinate set.
The unlit and untransformed vertex format is equivalent to the older pre DirectX 6 structure D3DVERTEX:
typedef struct _D3DVERTEX {
  union {
    D3DVALUE     x;     /* Homogeneous coordinates */
    D3DVALUE     dvX;
  };
  union {
    D3DVALUE     y;
    D3DVALUE     dvY;
  };
  union {
    D3DVALUE     z;
    D3DVALUE     dvZ;
  };
  union {
    D3DVALUE     nx;    /* Normal */
    D3DVALUE     dvNX;
  };
  union {
    D3DVALUE     ny;
    D3DVALUE     dvNY;
  };
  union {
    D3DVALUE     nz;
    D3DVALUE     dvNZ;
  };
  union {
    D3DVALUE     tu;    /* Texture coordinates */
    D3DVALUE     dvTU;
  };
  union {
    D3DVALUE     tv;
    D3DVALUE     dvTV;
  };
DeleteDeviceObjects()
This method is not used here. It's empty.
FinalCleanup()
We're destroying the DirectInput device here. You should use this method in DeleteDeviceObjects(), because if you switch, for example, from windowed to fullscreen mode, the device would be destroyed every time.
HRESULT CMyD3DApplication::FinalCleanup()
{
  // release keyboard stuff
  DestroyInputDevice();

  return S_OK;
}
Finale
I hope you enjoyed our small trip into the world of the Direct3D 7 IM Framework and transformation. This will be a work in progress in the future. If you find any mistakes or if you have any good ideas to improve this tutorial or if you dislike or like it, give me a sign at wolf@direct3d.net.
© 1999-2000 Wolfgang Engel, Mainz, Germany
Discuss this article in the forums
Date this article was posted to GameDev.net: 1/10/2000
(Note that this date does not necessarily correspond to the date the article was written)
See Also:
Direct3D
© 1999-2011 Gamedev.net. All rights reserved. Terms of Use Privacy Policy
Comments? Questions? Feedback? Click here!