 The Multitexturing Demo
 |
Preface
One of the most interesting features introduced to Direct3D in DirectX 6 was multiple texturing.
In previous versions of DirectX, the texture mapping phase of the Direct3D pixel pipeline had only involved fetching texels from a single texture. DirectX 6 introduced the concept of a texture operation unit.
Get the source here. To compile the source, take a look at "The Basics" Tutorial. To switch between the examples use the #defines at the beginning of the source:
...
// Multitexturing using Colour operations
#define DARKMAPPING  1
#define ADARKMAPPING 2
#define DIFFUSECOLOR 3
#define DARKDIFFUSE  4

// Multitexturing using Alpha operations
#define MODULATEALPHA 5
#define BLENDWFRAME 6

// The switch
#define TM 5
...
Texture Replaces Light
Most effects that modify the appearance of a surface are calculated on what's called a "per-vertex" basis. This means that the actual calculations are done for each vertex of a triangle, as opposed to each pixel that gets rendered. Sometimes with this technique you get noticeable artifacts. Think of a large triangle with a light source close to the surface. As long as the light is close to one of the vertices of the triangle, you can see the lighting effects on the triangle. When it moves towards the center of the triangle, then the triangle gradually loses the lighting effect. In the worst case, the light is directly in the middle of the triangle and you see a triangle with very little light shining on it, instead of a triangle with a bright spot in the middle. If no light shines on the vertices, the surface properties are not calculated as properly.
The best way to generate the illusion of pixel-based lighting is to use a texture map of the desired type of light shining on a dark surface.
Multipass Rendering/Multitexturing/Bump mapping
The three main texture-blending techniques are multipass rendering, multiple-texture blending or multitexturing and bump mapping. Multipass texturing is the process of applying more than one texture to a primitive in several passes.
Brian Hook tells us in his course 29 notes at SIGGRAPH '98, that Quake III uses 10 passes:
- (passes 1 - 4: accumulate bump map)
- pass 5: diffuse lighting
- pass 6: base texture (with specular component)
- (pass 7: specular lighting)
- (pass 8: emissive lighting)
- (pass 9: volumetric/atmospheric effects)
- (pass 10: screen flashes)
Only on the fastest machines can up to 10 passes be done to render a single frame. If the graphics accelerator cannot maintain a reasonable framerate, various passes (those in parantheses) can be eleminated.
It's obvious that the more passes a renderer must take, the lower its overall performance will be. To reduce the number of passes, some graphics accelerators support multitexturing, in which two or more textures are accessed during the same pass. Bump mapping is a texture-blending method that models a realistic rough surface on primitives. The bump map contains depth information in the form of values indicating high and low spots on the surface. Watch out for a tutorial on bump mapping, coming soon.
The Texture Operation Unit
Before Direct3D 6 the pipeline stages determined the texel color and blended this color with the color of the primitive interpolated from the vertices (multipass texturing). From Direct3D 6 up to 8 texture operation units can be cascaded together to apply multiple textures to a common primitive in a single pass (multitexturing). The results of each stage carry over to the next one, and the result of the final stage is rasterized on the polygon. This process is called "texture blending cascade".
Each texture operation unit has six associated render states, which control the flow of pixels through the unit, as well as additional render states associated with filtering, clamping and so on.
Most 3D hardware will only support applying two textures at the same time to a common primitive. Newer hardware handles three texture operations at once, but a lot of existing 3D hardware won't support multitexturing at all. The demo for this tutorial won't run on these cards (you'll see an informative message box :-) ).
Three of the render states in each texture operation unit are associated with RGB (color), and another three are associated with alpha.
You can find the best article on multitexturing in DirectX in Game Developer September 1998, page 33 ff. from Mitchell, Tatro and Bullard. The online version can be found at Gamasutra. They have developed a tool to visualize the texture operations ... try it. NVIDIA has also developed a tool to visualize the texture operations. Another intersting article is "Multipass Rendering and the Magic of Alpha Rendering" by Brian Hook. You can find it in Game Developer August 1997, page 12 ff. The book Real-time Rendering from Thomas M�ller and Eric Haines gives you an overview on texturing methods. You will find a perfect explanation of the Direct3D IM texturing methods in 3D Game Programming with C++ from John De Goes. Another good book comes from Peter Kovach: Inside Direct3D from Microsoft Press. In addition, I've found the examples from ATI very interesting. They're using the Direct3D 7 framework to show a few nice effects.
Multitexturing Support
First, you have to check your 3D hardware's multitexturing support in the framework call ConfirmDevice():
...
HRESULT CMyD3DApplication::ConfirmDevice(DDCAPS* pddDriverCaps, D3DDEVICEDESC7* d3dDeviceDesc )
{
  // Accept devices that really support multiple textures.
  if( pd3dDeviceDesc->wMaxTextureBlendStages > 1 )
    if( pd3dDeviceDesc->wMaxSimultaneousTextures > 1 )
      if( pd3dDeviceDesc->dwTextureOpCaps & D3DTEXOPCAPS_MODULATE )
        return S_OK;

  return E_FAIL;
}
...
The following examples are not optimized in any way. They are for instructional purposes only.
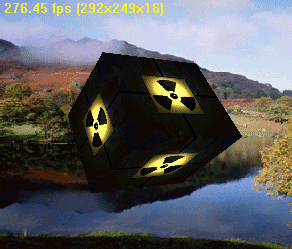
Dark Mapping
The D3DTSS_COLORx render states control the flow of an RGB vector, while the D3DTSS_ALPHAx render states govern the flow of the scalar alpha through parallel segments of the pixel pipeline. In Render() we use:
...
// Set texture for the cube
m_pd3dDevice->SetTexture(0, D3DTextr_GetSurface("wall.bmp"));
m_pd3dDevice->SetTextureStageState(0, D3DTSS_COLORARG1, D3DTA_TEXTURE);
m_pd3dDevice->SetTextureStageState(0, D3DTSS_COLOROP, D3DTOP_SELECTARG1);

// Set darkmap
m_pd3dDevice->SetTexture(1, D3DTextr_GetSurface("env0.bmp"));
m_pd3dDevice->SetTextureStageState(1, D3DTSS_COLORARG1, D3DTA_TEXTURE);
m_pd3dDevice->SetTextureStageState(1, D3DTSS_COLORARG2, D3DTA_CURRENT);
...
In Detail:
...
// first texture operation unit
// Associate texture with the first texture stage
m_pd3dDevice->SetTexture(0, D3DTextr_GetSurface("wall.bmp"));

// Set the first color argument to the texture associated with this stage
m_pd3dDevice->SetTextureStageState(0, D3DTSS_COLORARG1, D3DTA_TEXTURE);

// Use this texture stage's first color unmodified, as the output.
m_pd3dDevice->SetTextureStageState(0, D3DTSS_COLOROP, D3DTOP_SELECTARG1);

// second texture operation unit
// Associate texture with the second texture stage
m_pd3dDevice->SetTexture(1, D3DTextr_GetSurface("env0.bmp"));

// Set the first color argument to the texture associated with this stage
m_pd3dDevice->SetTextureStageState(1, D3DTSS_COLORARG1, D3DTA_TEXTURE );

// Set the second color argument to the output of the last texture stage
m_pd3dDevice->SetTextureStageState(1, D3DTSS_COLORARG2, D3DTA_CURRENT);

// Set the color operation to the multiplication operation
m_pd3dDevice->SetTextureStageState(1, D3DTSS_COLOROP, D3DTOP_MODULATE);
...
This code combines the following textures:
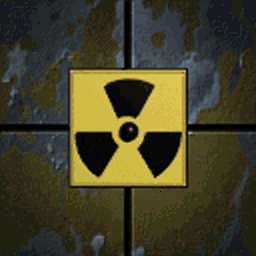 x
x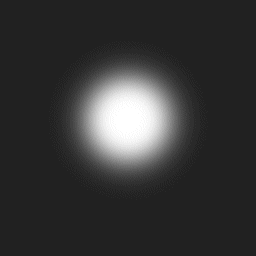 =
=
This kind of multitexturing is called dark mapping, because the resulting texel is a darker version of the unlit texel of the primary map. This technique is used a lot in 3D shooters. You can see it in GLQuake1.
Nothing interesting is being done with the alpha channel of the pipeline in this case. There are no D3DTSS_ALPHAx render state calls. For RGB color, the render states D3DTSS_COLORARG1 and D3DTSS_COLORARG2 control arguments, while D3DTSS_COLORUP controls the operation on the arguments.
The first texture operation unit passes the data from texture 0 to the next stage. The control argument D3DTA_TEXTURE means: The texture argument is the texture color for this texture stage. The second texture operation unit receives these texels via Arg2. It modulates (D3DTOP_MODULATE) the texels from texture 0 with the texels from texture 1, which were received via Arg1. There are two other modulation operations:
| D3DTOP_MODULATE | Multiply the components of the arguments together. |
| D3DTOP_MODULATE2X | Multiply the components of the arguments, and shift the products to the left 1 bit (effectively multiplying them by 2) for brightening. |
| D3DTOP_MODULATE4X | Multiply the components of the arguments, and shift the products to the left 2 bits (effectively multiplying them by 4) for brightening. |
The D3DTEXTUREOP structure shows the possible per-stage texture-blending operations. Just take a look at your DirectX 7 documentation. The default value for the first texture stage (stage 0) is D3DTOP_MODULATE, and for all other stages the default is D3DTOP_DISABLE.
The IDirect3DDevice7::SetTexture method assigns a texture to a given stage for a device. The first parameter must be a number in the range of 0-7 inclusive. Pass the texture interface pointer as the second parameter. This method increments the reference count of the texture surface being assigned. When the texture is no longer needed, you should set the texture at the appropriate stage to NULL. If you fail to do this, the surface will not be released, resulting in a memory leak. Since version 6, Direct3D maintains a list of up to eight current textures. So Direct3D supports the blending of up to eight textures onto a primitive at once. It blends these textures onto all of the primitives it renders. Only textures created as texture interface pointers can be used in the set of current textures.
Note: Textures under the IDirect3D2 interface were manipulated using texture handles. With the IDirect3D7 interface (and the legacy IDirect3D3 interface), you create and use textures through interface pointers to the texture surfaces. You obtain a texture surface interface pointer when you create the texture surface by calling IDirectDraw7::CreateSurface which is called in the framework by D3Dtextr_CreateTextureFromFile() method.
When your application selects a texture as the current texture, it instructs the Direct3D device to apply the texture to all primitives that are rendered from that time until the current texture is changed again. If each primitive in a 3-D scene has its own texture, the texture must be set before each primitive is rendered.
Software devices do not support assigning a texture to more than one texture stage at a time.
I've made an animated sample with the three modulation types:
...
// animate darkmap
if (i < 40)
{
  m_pd3dDevice->SetTextureStageState(1, D3DTSS_COLOROP, D3DTOP_MODULATE);
}
else if (i < 80)
{
  m_pd3dDevice->SetTextureStageState(1, D3DTSS_COLOROP, D3DTOP_MODULATE2X);
}
else if (i < 120)
{
  m_pd3dDevice->SetTextureStageState(1, D3DTSS_COLOROP, D3DTOP_MODULATE4X);
}
else if (i = 120)
{
  i = 0;
}
i++;
...
Blending a texture with diffuse color lighting
Sometimes the sun shines so bright that the colors on things get brighter. You can immitate that effect by blending the texture with diffuse color lighting:
...
// Set texture for the cube
m_pd3dDevice->SetTexture(0, D3DTextr_GetSurface("wall.bmp"));
m_pd3dDevice->SetTextureStageState(0, D3DTSS_COLORARG1, D3DTA_TEXTURE );
m_pd3dDevice->SetTextureStageState(0, D3DTSS_COLORARG2, D3DTA_DIFFUSE);
m_pd3dDevice->SetTextureStageState(0, D3DTSS_COLOROP, D3DTOP_ADD);
...
In Detail:
...
// Associate texture with the first texture stage
m_pd3dDevice->SetTexture(0, D3DTextr_GetSurface("wall.bmp"));

// Set the first color argument to the texture associated with this stage
m_pd3dDevice->SetTextureStageState(0, D3DTSS_COLORARG1, D3DTA_TEXTURE);

// Set the second color argument to diffuse lighting information
m_pd3dDevice->SetTextureStageState(0, D3DTSS_COLORARG2, D3DTA_DIFFUSE);

// Set the color operation to the addition mode
m_pd3dDevice->SetTextureStageState(0, D3DTSS_COLOROP, D3DTOP_ADD);
...
Darkmap blended with diffuse color lighting
Now we're combining the two effects:
...
m_pd3dDevice->SetTexture(0, D3DTextr_GetSurface("wall.bmp"));
m_pd3dDevice->SetTextureStageState(0, D3DTSS_COLORARG1, D3DTA_TEXTURE);
m_pd3dDevice->SetTextureStageState(0, D3DTSS_COLORARG2, D3DTA_DIFFUSE);
m_pd3dDevice->SetTextureStageState(0, D3DTSS_COLOROP, D3DTOP_ADDSIGNED);

// Set darkmap
m_pd3dDevice->SetTexture(1, D3DTextr_GetSurface("env0.bmp"));
m_pd3dDevice->SetTextureStageState(1, D3DTSS_COLORARG1, D3DTA_TEXTURE);
m_pd3dDevice->SetTextureStageState(1, D3DTSS_COLORARG2, D3DTA_CURRENT);
m_pd3dDevice->SetTextureStageState(1, D3DTSS_COLOROP, D3DTOP_MODULATE);
...
I think this is self-explaining for an old multitexturing freak like you. You should play around with D3DTOP_ADDSIGNED, D3DTOP_SUBTRACT and D3DTOP_ADDSIGNED2X as the color operation of the first texture stage. My favorites are D3DTOP_ADDSIGNED and D3DTOP_SUBTRACT. The latter is really cool.
The Alpha operations
As Direct3D renders a scene, it can integrate color information from several sources: vertex color, the current material, texture map and the color previously written to the render target. It can blend several of these colors. A factor called alpha, which could be stored in vertices, materials and texture maps, can be used to indicate how blending should be weighted.
An alpha value of 0 means full transparency, an alpha value of 1 means some level of semitransparency.
Modulate Alpha
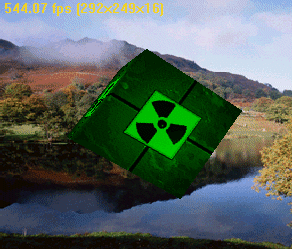 In 1992 I played Comanche from Novalogic the first time. I wondered about making the night flight feature in some missions. The whole terrain, the clouds and the horizon were green.
They looked like modulating a green ambient light with the textures by alpha.
For this example, I switched from a directional light to a green ambient light. This light is modulated with the texture colour:
#if TM != MODULATEALPHA

// Set up the light
if (m_pDeviceInfo->ddDeviceDesc.dwVertexProcessingCaps & D3DVTXPCAPS_DIRECTIONALLIGHTS)
{
  D3DLIGHT7 light;
  D3DUtil_InitLight(light, D3DLIGHT_DIRECTIONAL, 0.0f, -0.4f, 1.0f );
  m_pd3dDevice->SetLight(0, &light );
  m_pd3dDevice->LightEnable(0, TRUE );
  m_pd3dDevice->SetRenderState(D3DRENDERSTATE_LIGHTING, TRUE );
}
#else
// Set the ambient light.
D3DCOLOR d3dclrAmbientLightColor = D3DRGBA(0.0f,1.0f,0.0f,1.0f);
m_pd3dDevice->SetRenderState(D3DRENDERSTATE_AMBIENT, d3dclrAmbientLightColor);
#endif
To modulate the ambient color with the texture:
#elif TM == MODULATEALPHA
m_pd3dDevice->SetTexture(0, D3DTextr_GetSurface("wall.bmp"));
m_pd3dDevice->SetTextureStageState(0, D3DTSS_COLORARG1, D3DTA_TEXTURE);
m_pd3dDevice->SetTextureStageState(0, D3DTSS_COLORARG2, D3DTA_DIFFUSE);
m_pd3dDevice->SetTextureStageState(0, D3DTSS_COLOROP, D3DTOP_MODULATE);

m_pd3dDevice->SetTextureStageState(0, D3DTSS_ALPHAARG1, D3DTA_TEXTURE);
m_pd3dDevice->SetTextureStageState(0, D3DTSS_ALPHAARG2, D3DTA_DIFFUSE);
m_pd3dDevice->SetTextureStageState(0, D3DTSS_ALPHAOP, D3DTOP_MODULATE);
...
Alpha blending with the Frame Buffer
![]() You can use alpha blending to combine the primitive's color with the color previously stored in that pixel of the frame buffer. That's called blending with the frame buffer. Using this form of alpha blending, you can simulate semitransparent objects, combine two images, and add special effects such as force fields, flames, plasma beams and light mapping.
You can use alpha blending to combine the primitive's color with the color previously stored in that pixel of the frame buffer. That's called blending with the frame buffer. Using this form of alpha blending, you can simulate semitransparent objects, combine two images, and add special effects such as force fields, flames, plasma beams and light mapping.
Direct3D uses the following formula to compute the final color for each pixel in the rendered primitive:
FinalColor = SourcePixelColor * SourceBlendFactor + DestPixelColor * DestBlendFactor
It lets you change the SourceBlendFactor and DestBlendFactor flags to generate the effect you want.
I set the following RenderStates in InitDeviceObjects():
...
#if TM == BLENDWFRAME
m_pd3dDevice->SetRenderState (D3DRENDERSTATE_ALPHABLENDENABLE, TRUE);

// Set the source blend state.
m_pd3dDevice->SetRenderState(D3DRENDERSTATE_SRCBLEND, D3DBLEND_SRCCOLOR);

// Set the destination blend state.
m_pd3dDevice->SetRenderState(D3DRENDERSTATE_DESTBLEND, D3DBLEND_INVSRCCOLOR);
#endif
...
As a result of the calls in the preceding code fragment, Direct3D performs a linear blend between the source color (the color of the primitive being rendered at the current location) and the destination color (the color at the current location in the frame buffer). This gives an appearance similar to tinted glass. Some of the color of the destination object seems to be transmitted through the source object. The rest of it appears to be absorbed.
Alpha blending requires a fair bit of extra math and memory access, so turning it on and off with ALPHABLENDENABLE is worth the effort.
In the Render() method, there's only a call to set the texture:
...
#elif TM == BLENDWFRAME
m_pd3dDevice->SetTexture(0, D3DTextr_GetSurface("wall.bmp"));
#endif
...
I hope you enjoyed our small trip into the word of the Direct3D 7 IM Framework. If you disliked or liked it, give me a sign at wolf@direct3d.net.
Discuss this article in the forums
Date this article was posted to GameDev.net: 5/29/2000
(Note that this date does not necessarily correspond to the date the article was written)
See Also:
Direct3D
© 1999-2011 Gamedev.net. All rights reserved. Terms of Use Privacy Policy
Comments? Questions? Feedback? Click here!