Introduction
This is the second in the series of articles introducing windowed mode game concepts with DirectX. I will attempt to show you how to improve the functions we created earlier, as well as improve the responsiveness and look of your game in both modes. I will be referring to the functions and variables we created earlier, so you might want to read up on the previous article first.
We will cover: Windows’ window coordinate systems, changing the physical appearance of the main window to match the mode, and multi-threading theory and performance issues. By the time you are done with this article, you should know enough to move your exclusive mode-only game to windowed mode.
Windows’ window coordinate systems
I spent a little time earlier just getting the code up and running, but here we will go more in-depth! (and I mean REALLY in-depth :) )
Screen coordinates start with 0, 0 at the upper left hand corner of the screen, and increase as you move toward the lower right corner of the screen. The width and height of the screen are the maximum values for x and y. As a visual aid, I just copied my desktop, shrunk it, and placed the area covered by screen coordinates inside the black rectangle with an X to make it more visible.
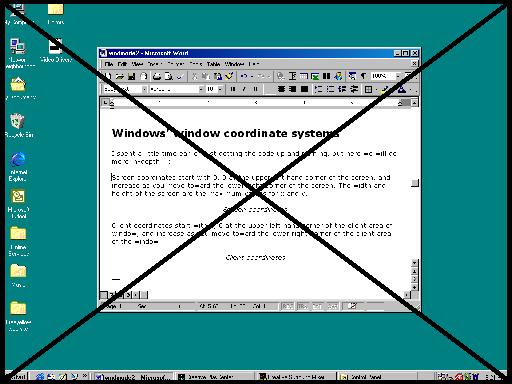
Screen coordinates
Client coordinates start with 0, 0 at the upper left hand corner of the client area of window, and increase as you move toward the lower right corner of the client area of the window. I took the same copy, but this time the client coordinates for the open window are enclosed by the black box.
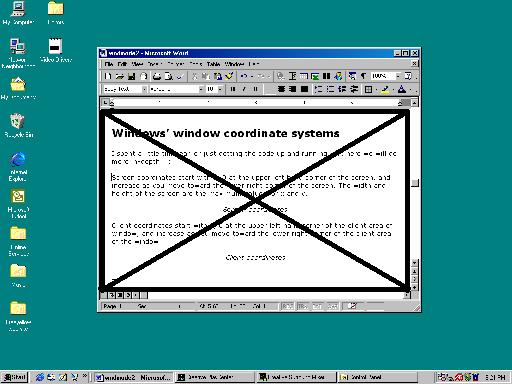
Client coordinates
As you can see, the screen coordinates can address the whole screen, while the client coordinates can only access a certain area of a window. Therefore, when you set the position of your window with CreateWindow()’s parameters, you are setting them in screen coordinates. When you draw from a WM_PAINT message, you draw in client coordinates, because you only want to draw inside your window, and don’t need to be concerned with calculating its position on the screen. In other words, screen coordinates are absolute coordinates, while client coordinates are relative to the position of the window, the size of the title bar, etc.
There are times when you need to convert from screen coordinates to client coordinates, and vice versa. Windows provides two very helpful little functions to do just that: ScreenToClient() and ClientToScreen(). Both take any point in either coordinate system and find the same physical position on the screen in the other coordinate system. DirectDraw always uses the screen coordinate system (or absolute coordinate system), because it allows you to draw on the entire screen.
Finally, the window’s client area is not always the same size, either. When you call CreateWindow(), you specify an x,y coordinate on the screen, plus a width and height for the window. However, things like title bars, borders, menus, toolbars, status bars, etc. take up some of that room, too. So the client area of the window may be different on computers with different Windows settings, like a different font size for the title bar. It is impossible to calculate all the different variations; fortunately, it isn’t too hard to get an exact client area size on any Windows machine.
To do this, we simply create the window with the CW_USEDEFAULT constant for the x,y and width and height parameters. Then, we subtract the default client rect from the one we want, and increase/decrease the size of the window by the difference. Simple, huh? To make it easier to use, we’ll put the whole thing into a function, and call it:
RECT CalculateWindowRect(HWND hWndToAdjust, SIZE szDesiredClient);
That function takes the handle of the window we want to adjust, and the desired size of the client area. Then it calculates the new window rect and returns it. Now we have to add some code to that function to make it work properly. (Don’t be afraid if you can’t understand this code right away; for now just skim over it and you can go back to it as we discuss it in detail.) Add this code:
RECT CalculateWindowRect(HWND hWndToAdjust, SIZE szDesiredClient)
{
  // declare a RECT to hold the results of our calculations
  RECT rcDesiredWindowRect;
  ZeroMemory(&rcDesiredWindowRect, sizeof( rcDesiredWindowRect ));

  // get the current window rect and its client rect
  RECT rcCurrentWindowRect;
  RECT rcCurrentClientRect;

  GetWindowRect(hWindow, &rcCurrentWindowRect);
  GetClientRect(hWindow, &rcCurrentClientRect);

  // get the difference between the current and desired client areas
  SIZE szClientDifference;

  szClientDifference.cx = (rcCurrentClientRect.right  - szDesiredClient.cx);
  szClientDifference.cy = (rcCurrentClientRect.bottom - szDesiredClient.cy);

  // get the difference between the current window rect and the desired
  // desired window rect
  rcDesiredWindowRect.left   = rcCurrentWindowRect.left;
  rcDesiredWindowRect.top    = rcCurrentWindowRect.top;
  rcDesiredWindowRect.right  = (rcCurrentWindowRect.right  - szClientDifference.cx);
  rcDesiredWindowRect.bottom = (rcCurrentWindowRect.bottom - szClientDifference.cy);

  return rcDesiredWindowRect;
}
Whew! That’s a lot of code! The best way to learn it is to step through it in the debugger, to see which values change and what the calculations really mean. Now that we have a function that’s relatively easy to use, where do we use it? In our trusty SwitchMode function, of course! :) We’ll need to change the size of the window primarily when switching modes, so it makes sense to use it there. We’ll also need a function that can adjust the main window’s size; that way, the SwitchMode function is more readable. We’ll call that function:
void AdjustMainWindow(bool bExclusive, int nScreenWidth, int nScreenHeight);
It may look and act similar to a Windows API function, but we’ll add some rather unique things to that function later on... ;) Let’s take a look at the code for now:
void AdjustMainWindow(bool bExclusive, int nScreenWidth, int nScreenHeight)
{
  // hide the window while we're working...
  ShowWindow(hMainWnd, SW_HIDE);

  if( bExclusive )
  {
    // exclusive mode code
  }
  else
  {
    // windowed mode code

    // calculate the new window rect
    SIZE szDesiredClient;

    szDesiredClient.cx = nScreenWidth;
    szDesiredClient.cy = nScreenHeight;

    RECT rcNewWindowRect = CalculateWindowRect(hMainWnd, szDesiredClient);

    // resize the window according to the new rect
    MoveWindow(hMainWnd, rcNewWindowRect.left, rcNewWindowRect.top,
      (rcNewWindowRect.right – rcNewWindowRect.left),
      (rcNewWindowRect.bottom – rcNewWindowRect.top), true);
  }

  // unhide the window now that we're done with it
  ShowWindow(hMainWnd, SW_SHOW);
}
First off, we hide the window to keep from repainting everything and making a general mess until we’re finished. (This is completely optional – you can remove the ShowWindow calls if you want.) That if() statement just executes the code based on the new mode. For exclusive mode, there is no need to adjust the size. For windowed mode, we must change the size of the window. First, we create a temporary size structure to hold the width and height of the new client area, then we pass that with the main window handle to CalculateWindowRect to get the new window rect. Then we just pass that to MoveWindow, which resizes the window, and re-show the window now that we’re done. (Showing the window here allows for repainting of the title bar and other windows stuff.)
Now, to test it all out! Add this code to the SwitchMode function, in between the call to DestroySurfaces and CreateSurfaces:
// resize the main window’s client area
AdjustMainWindow(bool bExclusive, nWidth, nHeight);
The nWidth and nHeight variables are the second and third parameters from SwitchMode, so you can do this:
// DX changes the window size to 640x480 automatically here
SwitchMode(true, 640, 480, 16);

// and this adjusts the windows’ client area (where we’ll draw!) to 640x480, also
SwitchMode(false, 640, 480, 16);
The width and height we pass to SwitchMode is really only specifying the size of the drawing surface we want – we don’t care whether it’s running fullscreen or windowed. It all works the same now! (Well, except for the bit-depth, which you can’t (shouldn’t) change in windowed mode...)
Making the Main Window Shine
Remember when I said we’d add some neat tricks to the AdjustMainWindow function? Now we’re going to do just that. You can see with the Step 1 version of the Mode Switch Demo app that it doesn’t own the whole screen, even in exclusive mode – it still has a title bar, a close button, and other things that will mess up your game (however, the whole screen can still be drawn to – it would be very frustrating for the user to start clicking on a monster near the top of the screen and the game closes... well, you get my point!). You can try to override those things with some messaging tricks, but it’s always better (and far easier ;-) ) to do it by the books. To make a window with absolutely no title bar, border, or system menu, you just set its style to WS_POPUP in the CreateWindow function. But wait, do I have to destroy and re-create the window every time I switch modes? No, there is a way to change the window style while the app is running – we’ll look at it now.
Here are the Windows API functions:
LONG GetWindowLong(HWND hWnd, int nIndex);
LONG SetWindowLong(HWND hWnd, int nIndex, LONG dwNewLong);
Kind of unassuming, aren’t they? Who would’ve guessed the names? (don’t lie – you wouldn’t have guessed them! ;-) ) Basically, with these functions, hWnd indicates the window you want to set or retrieve information about, and nIndex indicates the type of information you want to specify. If you are setting new information about the window, you put it in dwNewLong. You can do a lot of neat things with this function, but we’ll just look at GWL_STYLE for nIndex.
So, to get the window style for the main window, you do this:
LONG nMainWindowStyle = GetWindowLong(hMainWnd, GWL_STYLE);
Remember though, this is directly accessing the window style, whereas CreateWindow supplies the proper defaults or just quits when you don’t specify something properly. We’ll need to take a little extra care to make it work. Here’s how the AdjustWindow function looks now:
void AdjustMainWindow(bool bExclusive, int nScreenWidth, int nScreenHeight)
{
  static HMENU hOldMenu = NULL;

  // hide the window while we're working...
  ShowWindow(hMainWnd, SW_HIDE);

  if( bExclusive )
  {
    // exclusive mode code

    if( !g_bExclusive )
    {
      // change the style of the window
      SetWindowLong(hMainWnd, GWL_STYLE, WS_POPUP);

      // remove the menu and save the old menu
      hOldMenu = GetMenu(hMainWnd);
      SetMenu(hMainWnd, NULL);
    }
  }
  else
  {
    // windowed mode code

    if( g_bExclusive )
    {
      // change the style of the window
      SetWindowLong(hMainWnd, GWL_STYLE, /* windowed mode style */);

      // re-attach the old menu
      if( hOldMenu )
        SetMenu(hMainWnd, hOldMenu);
    }

    // calculate the new window rect
    SIZE szDesiredClient;

    szDesiredClient.cx = nScreenWidth;
    szDesiredClient.cy = nScreenHeight;

    RECT rcNewWindowRect = CalculateWindowRect(hMainWnd, szDesiredClient);

    // resize the window according to the new rect
    MoveWindow(hMainWnd, rcNewWindowRect.left, rcNewWindowRect.top,
      (rcNewWindowRect.right – rcNewWindowRect.left),
      (rcNewWindowRect.bottom – rcNewWindowRect.top), true);
  }

  // unhide the window now that we're done with it
  ShowWindow(hMainWnd, SW_SHOW);
}
Just specify the window style you normally use for a windowed mode app for the /* windowed mode style */, and the WS_POPUP style for the exclusive mode style. Also, we have to remove the menu when in exclusive mode and restore it when we switch to windowed mode. Note, however, that simply changing the window style will not take care of status bars, toolbar, and other additions to the window – it only takes care of the things that can be created with the window style alone. You must hide any toolbars, status bars, etc. yourself.
Now for the bad news – DirectDraw apparently hooks the WndProc of fullscreen mode programs and makes it so the window is topmost, even when we’re in windowed mode. So, we must destroy the window and re-create it in our SwitchMode function to make sure the window works as planned. Just move your own CreateWindow code into the SwitchMode function, just before the call to AdjustWindow. Then, add this code directly before the CreateWindow code you just added, and after the DestroySurfaces call:
if( IsWindow(hMainWnd) )
  DestroyWindow(hMainWnd);
That code just destroys the window if it exists, so we can create it again without losing resources. The IsWindow and DestroyWindow are just Windows API functions. Note that DestroyWindow sends a WM_DESTROY message to the WndProc, so you’ll have to move your PostQuitMessage(0) call to WM_CLOSE or something else. Otherwise, your program will exit every time you try to switch modes! ;-)
What, exactly, has this accomplished? Well, we’ve managed to create a system that changes between exclusive and windowed mode. It works transparently to your actual drawing code (blitting sprites, rendering 3D, etc.), so anything you can draw on the back buffer will show up on the screen. As mentioned before, you can even do 3D with this system – just make the appropriate changes to CreateSurfaces and DestroySurfaces.
What is this good for? Well, I hate to say this, but trends indicate more powerful computers in the future. If Moore’s law is true, CPU speed will double in a few months, 3D cards will look nearly 5% better (ok, that’s a little bit of cynicism), and many other improvements will be made. I have many older DX games that I find enjoyable, which someone took the time to write so that they can do windowed mode almost as fast as exclusive mode. Now, I can look up game codes on the Internet, draw, or whatever with those games running, because my computer’s been upgraded since they came out. Upgrading your computer should allow new features for old games – it adds to the replay value.
Windowed mode also has excellent uses in the present for the developer. Not everyone is a performance nut (nut, meaning craving an extra fps when already doing 83 fps ;-) ), and your game will almost certainly be out-of-date three months after it was released. Besides, now that you know what things are involved, you can write editors for your games as easily as copying and pasting your drawing code (think map editors). Read on for performance tips in Windows!
Multi-threading Theory and Performance Issues
Well, we finally get to the performance stuff. How do we make the game run more efficiently in Windows? There are still a few things to improve on with the code I gave you in Part 1.
First off, you may have noticed that it takes about 1/3 or 1/2 of a second to stop the game when you change to another window. We must talk a little about multi-threading topics to understand how we can correct this problem.
A thread, in Windows, is almost like another program. It uses the same data space, but the scheduler treats it just like another program. What is the scheduler? It’s a very important part of Windows that determines how programs run. Let me explain how the scheduler works now.
Just for example, say you have a 600 MHz processor. Say you’ve got your web browser open, Windows Explorer, and maybe Control Panel. Those 3 programs are running at the same time, but they can’t run at the exact same time. It just isn’t possible. Each program has to have exclusive access to the CPU and cache, etc. while it is running (otherwise, your programs would slow to a crawl). So, how does Windows do it? It gives each of those programs 200 MHz (a time-slice) to run. So, what it does is it divides the amount of time available (600 MHz, here) into equal slices, and allows each program to run for that time-slice, then it switches to the next program, and on and on... All the while, Windows is keeping track of the amount of programs open, so when you start a new program up (let’s say my Mode Switch Demo), that makes 4 programs that are running. Windows sees this and re-divides that 600 MHz of processor time into 4 equal portions, coming up with 150 MHz for each program. So, each program now gets to execute for 150 MHz, before Windows pauses it and lets the next program run for 150 MHz, and so on... This is a little simplistic, but you get the idea. ;-) Anyway, the part of Windows that does all this juggling of programs is called the scheduler.
However, the scheduler can easily be misused. Windows can’t tell when your program must execute and when it’s okay for your program to be paused. All of your program code is just bytes to Windows – it can’t possibly tell what you are trying to do. The only feasible solution is for Windows to let your program run until your program decides it is okay to pause for a little while. After all, you are sharing the processor. If you don’t relinquish your time-slice to Windows for use by another program, other programs don’t get enough time to execute, and that means they slow down considerably. You can hog the CPU if you want, but that will cause problems with Windows, and make it extremely frustrating for the user. I’ll never forget when I was reading a strategy guide online for Diablo and went to try something complicated. I had to keep looking at the web page and going back to Diablo. It took forever to browse the web page with Diablo open, even though Diablo was minimized. My 450 MHz computer ran like an old 386 I once had. I could measure the time it took to redraw just the desktop wallpaper in seconds. Programmers typically feel that they can treat Windows like DOS when they’re in DX exclusive mode. Unfortunately, the users suffer. And porting to windowed mode introduces many problems into that way of thinking.
Enough negativism and lectures; let’s talk about all the neat solutions to these problems! Okay, instead of the typical game loop, which looks like this:
void GameLoop()
{
  ProcessInput();
  ProcessLogic();
  ProcessGraphics();
  ProcessSound();
}
...we can do something a bit more elegant. For example, if one part of the engine is incredibly slow, the whole game slows down, including sound, input, etc. We may lose the network or Internet connection because we spend too much time processing graphics that we don’t check the network connection often enough. Other machines could slow down because of the "lag", or gameplay will suffer because of improper handling of data/poor programming.
There is an easy solution to this, however. We already know that certain things must run in real-time, or the game is useless. ProcessInput() handles keyboard/mouse/multiplayer input, but it is tied down to all the other functions. How do we separate it? Well, we put it in another thread! What’s a thread? Well, it’s kind of like spawning a separate program at run-time, which Windows will proceed to schedule in the same manner, but the thread runs independently of the process. However, the thread does have access to the data in the program! In other words, the thread runs in the background while the game loop is running. How do I make a thread? Well, there is another article on these same topics, called Separating Input from the Game Loop, which explains this rather thoroughly. Suffice it to say that you can assign priorities to the threads you create.
Priorities introduce a few more complications to the matter, but in my opinion, the benefits far outweigh the complications. First, there is not only a general time-slice, but also a priority for each program (and each thread). Different programs can have different priorities. Device drivers, for example, might create a high-priority thread that spends most of its time relinquishing its time to other threads. When something needs done, however, that device driver thread now has complete freedom to hog the system. Usually, this is for a few milliseconds or an even smaller time, so it’s almost unnoticeable. But it’s imperative that the task be done in real-time, so, when it executes, it must hog the system. A program, like Microsoft Word, might create a low-priority thread to do background printing. That way, that background printing thread gets to run when nothing else in the system is going on, which makes it unnoticeable to you because it yields whenever a normal- or high-priority thread needs to do something. So, thread priority is a kind of negotiation of how to use the CPU. You tell Windows what you have to do, and Windows schedules everything accordingly.
How do you tell Windows when it’s okay to yield to another program? You call the Sleep(0) function. But, how come we don’t have a sleep statement in the main message loop? Or at least in the game loop? Remember, GetMessage() is like SleepUntilIHaveAMessage(). ;-)
But, if you’re going to do games in windowed mode, you have to know about threads. If you understood at least some of the preceding babble, you’ll be asking "How can I create threads?" Well, the first thing you do is code the ThreadProcedure, which is kind of like a WinMain. A typical ThreadProcedure looks like this:
#define WM_THREADSTOP (WM_USER+1)

DWORD WINAPI ThreadProcedure(LPVOID lpStartupParam)
{
  // get the data we passed to the thread. Note that we don't have to use this
  // at all if we don't want
  MYDATA* pMyData = (MYDATA*) lpStartupParam;

  // access some imaginary members of MYDATA, which you can define on
  // your own later
  pMyData->nTime = GetCurrentTime(); // imaginary function I created
  pMyData->nNumber = 5;


  // here's the thread's main loop – kind of like the main loop in WinMain
  MSG msg;

  for( ;; )
  {
    if( PeekMessage(&msg, NULL, 0, 0, PM_NOREMOVE)
    {
      GetMessage(&msg, NULL, 0, 0);

      if( msg.message == WM_THREADSTOP )
        break; // only way out of the for( ;; ) loop

      TranslateMessage(&msg);
      DispatchMessage(&msg);
    }
    else
    {
      // do the task – add in your own stuff here

      // yield to other threads, because we almost never get messages
      // (note that we may be yielding to WinMain too)
      Sleep(0);
    }
  }
}
There are two important things to remember. 1) Threads almost never get messages, unless they create their own windows. Yes, threads can create and process their own windows. (Look at Microsoft Word 2000 for an example of how this can be used effectively) But, if a thread does not have a window, it will most likely never get messages, so we use the Sleep(0); statement to tell Windows when it is okay to yield to other threads and programs. If we do not do this, our program and its main window become sluggish, which is unnecessary. 2) Since it almost never gets to execute the PeekMessage()-GetMessage()-DispatchMessage() stuff, the message code stuff doesn’t slow us down.
Why did I add in the message loop at all? Isn’t that just extra baggage if I don’t create a window for my thread? No, I added that so that we can send our own messages to the thread. We must tell the thread to stop executing and finish up before the main program (WinMain) quits. That’s why I defined a custom message – you can send it to the thread with PostThreadMessage(). Note that you also have to wait for the thread to shut itself down – so you need some way of knowing when it has shut down. Just create a global variable, called:
int g_nThreadExitCount = 0;
Just before the thread exits from its message loop, have it increment that variable and return 0;. When the variable reaches the number of threads you have running, all threads have stopped and you can safely exit from WinMain. Never, ever, use the TerminateThread function!
If you noticed by now, I never told you how to actually spawn another thread. You do it with the CreateThread function:
HANDLE CreateThread(LPSECURITY_ATTRIBUTES lpThreadAttributes,
    DWORD dwStackSize, LPTHREAD_START_ROUTINE lpStartAddress,
    LPVOID lpParameter, DWORD dwCreationFlags, LPDWORD lpThreadId);
Whew! Luckily, most of those parameters have defaults that are fine for almost any program or game. lpThreadAttributes should be NULL, as should dwStackSize, and dwCreationFlags. (Windows will assign the defaults, which are usually great – like Windows auto-configures the stack size ;-) ). lpStartAddress is the address of the ThreadProcedure, lpParameter is any pointer you’d like pass to your ThreadProcedure, and lpThreadId is the address of a DWORD that Windows will set to the ID of the thread (think DX functions, here). Here’s an example of how to use it, with our previous ThreadProcedure function:
// define a data structure to hold our data – optional
struct MYDATA {
  int nTime;
  int nNumber;
};

// declare a variable of our data structure to pass to the ThreadProcedure
MYDATA MyThreadData;
MyThreadData.nTime = 7509843;
MyThreadData.nNumber = 39;

// declare a DWORD to hold our thread's new generated ID
DWORD dwThreadID = 0;

// actually create and start the thread now!
// the thread will run until we send it our own WM_THREADSTOP message
CreateThread(NULL, NULL, (LPTHREAD_START_ROUTINE) ThreadProcedure,
  (LPVOID) &MyThreadData, NULL, &dwThreadID);
How do I design a thread function? Threads are best for simple tasks that are repeated often (and then the thread Sleep(0)s ;-) ), or for complex tasks that run in the background but aren’t time critical (that is, you don’t care when they get run, as long as they get enough time. Think of it this way: if a thread just does a simple function call (like lpDIKeyboard->GetData()) and then Sleep(0)s, it’s a simple thread. But, if the thread does a lot of tasks – like printing a document each time before it Sleep(0)s, then you know it’s a complex thread.
What’s the big difference? Complex threads tend to run sporatically, spending most of their time yielding to other threads, while simple threads run very consistently. The difference lies in the ratio of the time they spend executing their task to the ratio of their time-slice they give away with the Sleep(0) statement. Sporatic threads do best with lower priority, while simple threads do best with higher priority. You can change the priority of the thread with SetThreadPriority(), which also returns the previous priority for that thread.
Note that you have to be very knowledgeable about threads and the scheduler to adjust thread priorities without a performance decrease. Also, ALWAYS, ALWAYS, ALWAYS put a Sleep(0) statement in each ThreadProcedure that you make! Otherwise, lower priority threads will never get a chance to execute. This can actually stall or even crash Windows if used incorrectly, but used correctly, it can increase the efficiency of your game. This is much too big of a topic to cover here, so I would suggest you get a book or find some good tutorials on multi-threading. :-)
If you are feeling particularly brave with threads, I want you to try to move the game loop in my Switch Mode Demo – Part 2 program into a separate thread of its own. That’s right, the whole game loop! Just for kicks, and to get a feel for how multi-threading operates. Once you have it working, play around with the priority a little, or change the message loop. :-)
Windows is just like communism – if everyone’s sharing, there’s plenty of resources to go around. Unfortunately, one poorly written program will ruin the whole thing (which is why, IMHO, communism never works ;-) ). However, the sharing motif is the only way to go with software in a multi-process multi-threading environment like Windows (or MAC or Linux or ...insert your favorite OS here). Just remember to release resources when you are done, and Windows will treat you kindly, too. Good luck with your Windows game programming!
Contact me with any questions, comments, and corrections at:
Ratt96963@aol.com
My web site is:
http://www.freeyellow.com/members8/nullpointer
I enjoyed writing this article, and I hope it encourages you to explore the world of Windows game programming for yourself.
Discuss this article in the forums
Date this article was posted to GameDev.net: 6/6/2000
(Note that this date does not necessarily correspond to the date the article was written)
See Also:
General
© 1999-2011 Gamedev.net. All rights reserved. Terms of Use Privacy Policy
Comments? Questions? Feedback? Click here!