Integrating Direct3D 8.1 With MFC Using Visual Studio 6.0
Introduction
There is often some difficulty integrating the DirectX APIs with the Microsoft Foundation Classes (MFC). The DirectX SDK samples provide several samples using DirectX with MFC but none of them use the desired document/view architecture nor the application and class wizards. This paper takes the reader step by step setting up a simple DirectX application in the MFC framework using the wizards and the document/view architecture. It is assumed that the reader has some experience with both Direct3D and MFC but not both of them together.
The project we will build is simple; we will load a teapot into a mesh data structure and rotate it about the y-axis. The final rendering will look something like the picture below but will be animated.

Creating the Project and Linking the Libraries
This paper will move at a slow pace and attempt to walk through the contents one step at a time. We will start by creating a new project in Visual Studio. Select MFC AppWizard (exe) as shown in figure (1). Enter a project name such as "Direct3DMFC". Then press the OK button.
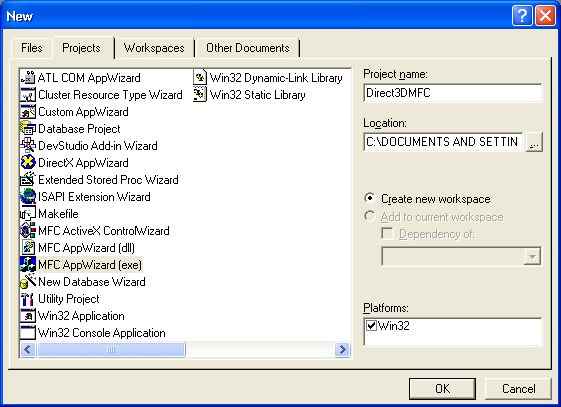
Figure 1
On the next screen, select the radio button specifying Single document and make sure the Document/View architecture support check box is checked. See figure (2).
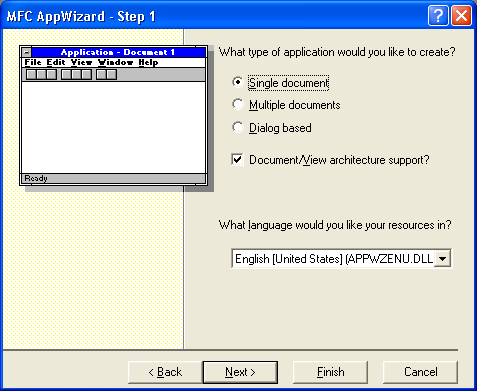
Figure 2
At this point we can simply select the Finish button. This, of course, is all basic knowledge to anyone who uses Visual Studio but is included for completeness.
The next task we need to do is link the DirectX library files with out project. This is done in the same way as a regular (non-MFC) win32 application. Select Project from the menu, then Settings. Once the settings dialog is displayed, select the Link tab. Next, enter the DirectX library files you wish to add to the linker in the edit box labeled Object/library modules. See figure (3).
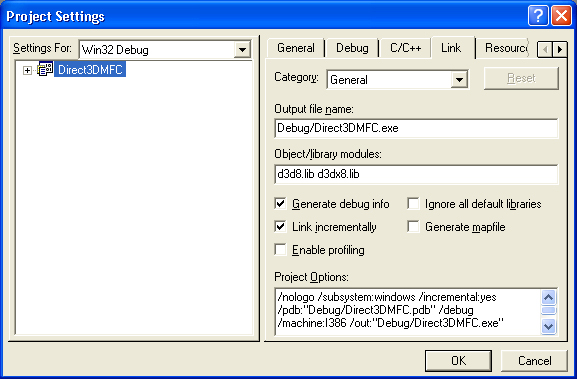
Figure 3
Note that we also include the multimedia library for some timer functions we use as part of the animation. Also remember that you need to have Visual Studio configured to search the directories where the DirectX library files are.
Defining the Direct3D Base Class
In an attempt to hide or encapsulate the Direct3D code from the MFC code we are going to create a simply base class. The implementation of this base class is up to you. The class Graphics is defined as follows:
class Graphics
{
public:
 Graphics();
 virtual ~Graphics();

  bool create(
       HWND hwnd,
       int width,
       int height,
       bool windowed);

  IDirect3DDevice8* getDevice();

  virtual bool init()                        = 0;
  virtual bool resize(int width, int height) = 0;
  virtual bool update(float timeDelta)       = 0;
  virtual bool render()                      = 0;

protected:
  IDirect3D8*       _d3d8;
  IDirect3DDevice8* _device;
};
The constructor simply sets the data to zero values and the destructor releases the DirectX interfaces. The create method is responsible for creating the IDirect3D8 object and the IDirect3Ddevice8 object. How you wish to do this is largely up to you. For simplicity, in the included sample application, I have left out device enumeration and device capability checks.
The init method is for you to fill out your custom set up, depending on the specifics of your application. Most likely you will do preprocessing here and set up your starting out matrices and other various states that don't need to be set on a frame-by-frame basis.
The resize method is called whenever the window, associated with the Direct3D device, is changed. Again what goes on here depends on the specifics of your application, but generally you will simply rebuild your projection matrix.
In the update method you will perform operations that need to by done on a frame-by-frame basis. This includes updating the camera position, animation, and collision detection.
Finally, in the render method you perform all your draw calls.
Integrating Direct3D With MFC
To integrate Direct3D with MFC we have our CView class inherit from Graphics. This makes sense because the CView class is responsible for drawing our data and we will be using Direct3D to do that drawing, so putting them together is a good idea.
class CDirect3DMFCView : public CView, public Graphics
Next, we need to create our Direct3D interfaces. Where should we do this? It doesn't really matter where, except that we need to do it after we have a valid window handle and that we need to do it before we attempt to use the interfaces. I have elected to do it by overriding the CView::OnInitialUpdate() method. To override this method, right click on the projects view class (e.g. CDirect3DMFCView) as depicted in figure (4). Then select Add Virtual Function.
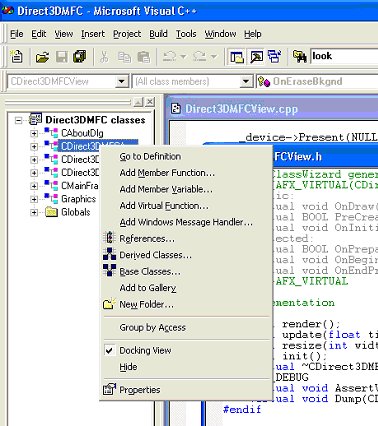
Figure 4
A dialog box will be displayed as shown in figure 5. From the list box entitled New Virtual Functions select the method OnInitialUpdate and then press the Add and Edit button.
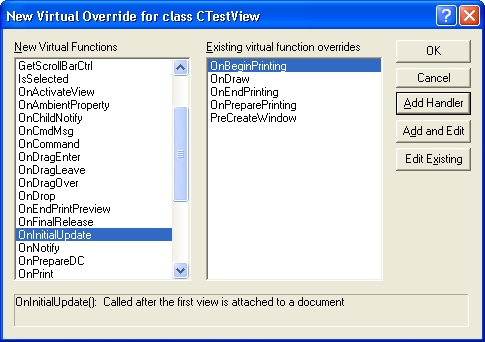
Figure 5
In the sample program I implement it as follows:
void CDirect3DMFCView::OnInitialUpdate()
{
  CView::OnInitialUpdate();

  CRect rect;

  GetClientRect(&rect);

  if( !create(
    GetSafeHwnd(),
    rect.right,
    rect.bottom,
    true) )
  {
    MessageBox("create() - Failed", "CView");
    return;
  }

  if( !init() )
  {
    MessageBox("init() - Failed", "CView");
    return;
  }

  if( !resize(rect.right, rect.bottom) )
  {
    MessageBox("resize() - Failed", "CView");
    return;
  }
}
Note that in the above implementation I have not done any real error handling. Also note that after the creation of the Direct3D interfaces we call the init and resize methods. Let's take a look at the sample implementation of these methods now.
bool CDirect3DMFCView::init()
{
  D3DXMATRIX m;

  D3DXMatrixIdentity( &m );

  _device->SetTransform(D3DTS_WORLD, &m);

  D3DXVECTOR3  eye(0.0f, 0.0f, -10.0f);
  D3DXVECTOR3   at(0.0f, 0.0f,   1.0f);
  D3DXVECTOR3 look(0.0f, 1.0f,   0.0f);

  D3DXMatrixLookAtLH(&m, &eye, &at, &look);

  _device->SetTransform(D3DTS_VIEW, &m);

  D3DXCreateTeapot(_device, &_teapot, 0);

  _device->SetVertexShader(D3DFVF_XYZ);

  _device->SetRenderState(
      D3DRS_FILLMODE,
      D3DFILL_WIREFRAME);

  return true;
}

bool CDirect3DMFCView::resize(int width, int height)
{
  D3DXMATRIX m;

  float aspect = (float)width / (float)height;

  float fov = 3.14f / 2.0f;

  D3DXMatrixPerspectiveFovLH(
      &m,
      fov,
      aspect,
      1.0f,
      100.0f);

  if( _device )
    _device->SetTransform(D3DTS_PROJECTION, &m);

  return true;
}
There is nothing particularly special about these methods to those who have used Direct3D before. The init method simply sets up the default world and view matrices, generates the vertices of a teapot and sets the fill mode to wire frames. The resize method sets up the projection matrix based on the size of the window.
I'll mention now that I added the following variable to the CDirect3DMFCView class, ID3DXMesh* _teapot. This provides the data structure for the geometry we are going to be rendering in this sample. In the constructor of CDirect3DMFCView I initialized this variable to zero and in the destructor I release it.
CDirect3DMFCView::CDirect3DMFCView()
{
  _teapot = 0;
}

CDirect3DMFCView::~CDirect3DMFCView()
{
  if( _teapot )
    _teapot->Release();
}
Now we will add some code to the CView class that calls resize whenever the window is resized. We start by launching the Class Wizard. See figure (6).
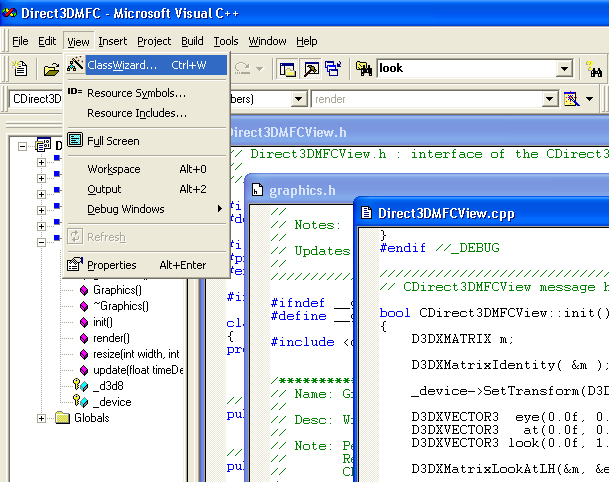
Figure 6
In the Class Wizard dialog box, make sure that you are on the Message Maps tab. Also make sure that for the Class name edit field you have your projects view class selected (e.g. CDirect3DMFCView). Under the Messages list box, scroll down until you find the WM_SIZE ID. Select it and press the Add Function button, then press the Edit Code function. See figure (7).
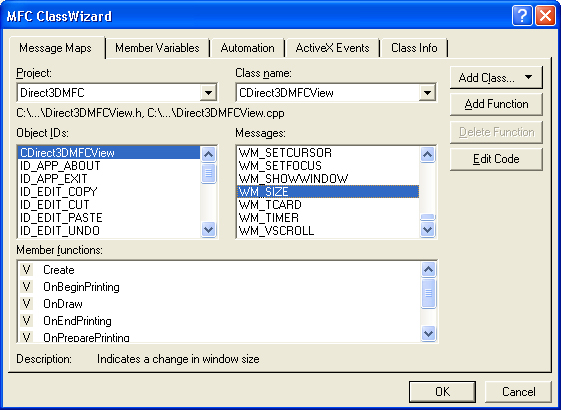
Figure 7
Visual Studio should launch you to the method in the code editor. Add to it as follows: void CDirect3DMFCView::OnSize(UINT nType, int cx, int cy) { CView::OnSize(nType, cx, cy); resize(cx, cy); }
Not much here, when a resize message occurs we simply call our resize method, which in turn recalculates our projection matrix to match the current size of the window.
Before we get to the details of the update and render methods, let's first figure out how we should integrate them into the MFC framework. We have several options available to us, here are a few: 1) Send timer messages to our rendering window at regular intervals that force a paint message. Then put our update and render methods in the OnDraw method. 2) Create a separate rendering thread that runs continuously in the background of our primary thread. 3) Modify the primary thread so that rendering and updating will occur when the message queue is empty.
Please keep in mind I have not exhausted the possibilities but this should give you some ideas of how you want to do it. In the sample program I have chosen a form of option one and three. What we'll do is override CWinApp::OnIdle and there we will invalidate the rendering window forcing it to redraw itself. It would be more efficient to put the rendering and updating code directly into the idle method; this would allow us to bypass the lag of going through the message pump for rendering. However, it was cleaner for me to just invalidate the main rendering window and since this paper is for learning purposes I thought it best to keep it clean and simple.
Now we will get to the specifics of overriding CWinApp::OnIdle. Right click on your application class (e.g. CDirect3DMFCApp ) from the workspace pane. Select Add Virtual Function from the given list, see figure (8).
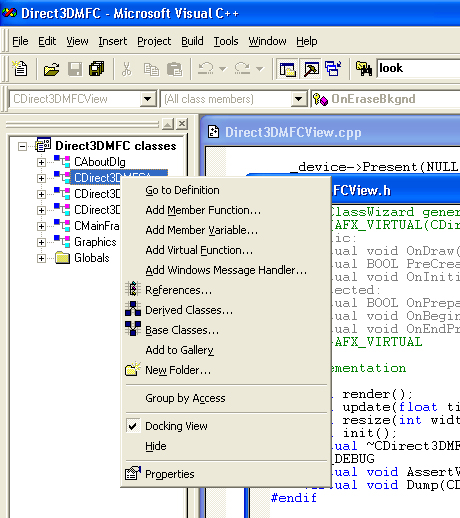
Figure 8
A dialog box will launch as seen in figure (9).

Figure 9
From the list box entitled New Virtual Functions select the OnIdle method. Then press the Add and Edit button. Implement OnIdle as shown below:
BOOL CDirect3DMFCApp::OnIdle(LONG lCount)
{
  CWinApp::OnIdle(lCount);

  AfxGetMainWnd()->Invalidate(false);

  return TRUE;
}
First we call the frameworks idle function so that MFC will take care of what it does with idle time, like updating user interface components. Next we get a pointer to our main window and invalidate it, thus forcing a paint message. Notice that we don't erase the background (Invalidate(false)), this is because we have Direct3D do it for us. Finally, we return a non-zero value because we want MFC to keep on running our idle function as long as the message queue is empty. If we did return zero, it would indicate to MFC that we don't want to do any more idle processing until the next message is processed.
Finally, we insert our update, rendering, and some time calculations into the CView::OnDraw method. Note that I have linked winmm.lib into the project and included the header file "mmsystem.h". These are needed to use the multimedia timer functions.
void CDirect3DMFCView::OnDraw(CDC* pDC)
{
  CDirect3DMFCDoc* pDoc = GetDocument();
  ASSERT_VALID(pDoc);

  static float lastTime = (float)timeGetTime();

  float currentTime = (float)timeGetTime();

  float deltaTime = (currentTime - lastTime) * 0.001f;

  update(deltaTime);
  render();

  lastTime = currentTime;
}

bool CDirect3DMFCView::update(float timeDelta)
{
  static float angle = 0.0f;

  D3DXMATRIX yRotationMatrix;

  D3DXMatrixRotationY( &yRotationMatrix, angle );

  D3DXMATRIX scalingMatrix;

  D3DXMatrixScaling( &scalingMatrix, 4.0f, 4.0f, 4.0f );

  D3DXMATRIX productMatrix;

  D3DXMatrixMultiply(
      &productMatrix,
      &yRotationMatrix,
      &scalingMatrix);

  if( _device )
    _device->SetTransform(
        D3DTS_WORLD,
        &productMatrix);

  angle += (3.14f / 12.0f) * timeDelta;

  if(angle > 6.28f)
    angle = 0.0f;

  return true;
}

bool CDirect3DMFCView::render()
{
  if( _device )
  {
    _device->Clear(
        0,
        0,
        D3DCLEAR_TARGET|D3DCLEAR_ZBUFFER,
        0xffffffff, 1.0f, 0);

    _device->BeginScene();

    _teapot->DrawSubset(0);

    _device->EndScene();

    _device->Present(NULL, NULL, NULL, NULL);
  }

  return true;
}
If you compile and run the application now, you should see a wire frame mesh of a teapot spinning along the standard y-axis. You may notice a sort of flicker; this is because MFC is erasing the background of the window every time we redraw it. Since we are using Direct3D for graphics, we don't need MFC to do this. To disable the erasing we can override CView::OnEraseBkgnd(CDC* pDC) to do nothing. You can override this method the same way we overrode the WM_SIZE method, this time look for WM_ERASEBKGND.
BOOL CDirect3DMFCView::OnEraseBkgnd(CDC* pDC)
{
  return FALSE;
}
After rebuilding the application, the flickering should be gone.
Conclusion
I hope you have enjoyed this article and found it useful. I wrote this because I see many messages on newsgroups and forums requesting information on how to set up DirectX with MFC. Hopefully, this article has helped you out and in the future when someone is requesting DX/MFC information they will be pointed to this article. As we have learned, integrating the two APIs is not difficult, it's simply a matter of knowing where DirectX fits in the MFC framework. For comments and suggestions I can be reached at eckiller@home.com. And remember to look out for my DirectX 9 (Mostly Direct3D) book coming out in late 2002.
Discuss this article in the forums
Date this article was posted to GameDev.net: 3/2/2002
(Note that this date does not necessarily correspond to the date the article was written)
See Also:
General
Sweet Snippets
© 1999-2011 Gamedev.net. All rights reserved. Terms of Use Privacy Policy
Comments? Questions? Feedback? Click here!