Designing The System
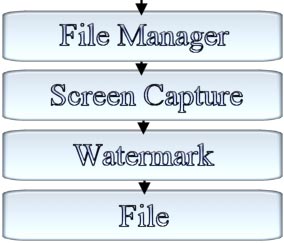
Screen Shot System Flow
The flow structure is straight forward, but so we are on the same page I’ll describe what is going on and what it means. There’s nothing different about the file manager that I didn’t described above. After the filename gets validated then the actual screen capture happens. The screen capture can be the low-resolution screen capture, high-resolution screen capture, or the video capture. All three of these systems will fall into this spot. After the screen capture, the watermark gets applied to the screen capture. If no watermark is setup, then this part would be skipped. Then finally it can be written to the file. The file is obviously the image file or avi video. With that said, I’ll go through the systems now.
Screen Shot/Video File Manager
The file manager is broke up into 3 steps. First the manager will take the passed in filename and strip any directory or path off of it. Since all screen shots are being stored in the ‘screen shot’ directory, there can be no path on the filename. The second step strips the extension off of the filename. This is another important part to the system. Since the only supported file type is a bitmap, the system needs to make sure the bitmap extension is used. Finally the filename gets passed into a function called GetValidFilename(*). This function will search the ‘screen shots’ directory and see if any other screen shots with that name exists. If it does, it will rename the file title and do another search. It will keep searching until a valid filename is found. Once a valid filename is found, it will return the modified filename. Like I stated earlier, pretty simple, but powerful, system. This is the only system I will show source code for. The rest can be viewed in the provided source. There are too many lines of code to show it all.
Step 1 – Strip the directory off of the filename:
void StripDirectoryFromFilename(char* Filename)
{
  char Buffer[256];

  //--Make sure a valid filename is passed in
  if(Filename == NULL)
  {
    return;
  }
  else
  {
     //--Copy the filename to the buffer
     sprintf(Buffer, "%s", Filename);
  }

  //--See if the filename contains a directory separator
  char* InString = strrchr(Buffer, '\\');

  //--It does
  if(InString)
  {
     //--Copy the file title to the filename
     strcpy(Filename, (InString + 1));
     return;
  }

  //--See if the filename contains this kind
  //--of directory seperator
  InString = strrchr(Buffer, '/');

  //--It does
  if(InString)
  {
     //--Copy the file title to the filename
     strcpy(Filename, (InString + 1));
  }
}
Step 2 – Strip the extension off of the filename:
void StripExtensionFromFilename(char* Filename)
{
  int  Position = 0;
  char Extension[5];
  char Buffer[256];

  //--If the filename is valid and it length is >= 4
  if(Filename && strlen(Filename) >= 4)
  {
    //--Copy the last 4 characters the the extension
    strcpy(Extension, &Filename[strlen(Filename) - 4]);

    //--Add the null terminator
    Extension[strlen(Extension)] = '\0';
  }
  else
  {
    return;
  }

  //--If it has a valid extension on it
  if(Extension[0] == '.')
  {
    //--Loop through every character except the extension
    for(unsigned int ID = 0; ID < strlen(Filename) - 4; ID++)
    {
      //--Copy the current character to the buffer
      Buffer[Position] = Filename[ID];

      //--Accumulate the buffer position
      Position++;
    }

    //--Add the null terminator
    Buffer[Position] = '\0';

    //--Copy the modified character array to the filename
    strcpy(Filename, Buffer);
  }
}
Step 3 – Validate filename:
bool ScreenShotExists(const char* Filename)
{
  WIN32_FIND_DATA FindData;

  //--Make sure a valid filename is passed in
  if(Filename == NULL)
  {
    //--Not valid, return false
    return false;
  }

  //--Try to find the file
  HANDLE FileHandle = FindFirstFile(Filename, &FindData);

  //--If the file handle turned out to be INVALID_HANDLE_VALUE,
  //--then the screen shot does not exist
  bool Exists = (FileHandle != INVALID_HANDLE_VALUE ? true : false);

  //--Close the file
  FindClose(FileHandle);

  //--Return the result
  return Exists;
}


void GetValidFilename(char* ValidFilename, char* Filename,
                      bool InMovieMode)
{
  int NewIndex = 1;

  //--Make sure the filenames are valid
  if(ValidFilename == NULL || Filename == NULL)
  {
    return;
  }

  if(InMovieMode == true)
  {
    //--Try this filename to see if it exists
    sprintf(ValidFilename, "Screen Shots\\%s.avi", Filename);
  }
  else
  {
    //--Try this filename to see if it exists
    sprintf(ValidFilename, "Screen Shots\\%s.bmp", Filename);
  }

  //--See if this screen shot already exists
  if(ScreenShotExists(ValidFilename) == true)
  {
    //--Keep looping until we get a valid filename
    while(ScreenShotExists(ValidFilename) == true)
    {
      if(InMovieMode == true)
      {
        //--Create the new filename as discussed
        //--in the article _[###]
         sprintf(ValidFilename, "Screen Shots\\%s_%0003d.avi",
                 Filename, NewIndex);
      }
      else
      {
         //--Create the new filename as discussed
         //--in the article _[###]
         sprintf(ValidFilename, "Screen Shots\\%s_%0003d.bmp",
                 Filename, NewIndex);
      }

      //--Accumulate the index
      NewIndex++;
    }
  }
}
Low-Resolution Screen Capture
The low-resolution screen shot system is pretty easy to implement. Instead of using the Direct3D or OpenGL specific functions, this system will simply grab the windows pixel data. This avoids any API specific functions making it more compatible with more graphic libraries. This will even work with software rendering systems. Here are the steps it takes to capture a low-resolution screen shot.
Low-Resolution Screen Capture Steps
- Create a source device context by getting the game windows handle to the device context (HDC)
- Create a compatible device context to work with
- Create a compatible bitmap using the source device context
- Select the bitmap to the compatible device context
- BitBlt the window image to the compatible device context
- Get a handle to the bitmap
- Allocate global memory to store the bitmap data
- Get the bitmap data
It sounds like a lot of steps, but it’s actually pretty easy. Once you have the bitmap data, you can do whatever you want to do with it like any normal image data. You can add the watermark, save it, apply an image filter, etc.
High-Resolution Screen Capture
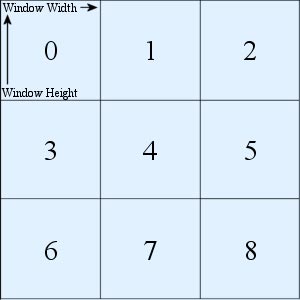
The high-resolution screen shot system is a little harder to implement than the low-resolution screen shot system because you have to use a specialized perspective projection matrix [R1]. The multiplication of this matrix is what become API specific. To get a high-resolution screen shot, the window gets divided up into 9 quadrants using the perspective projection. Then the system will take a snap shot of every quadrant. So the current frame gets rendered 9 time for it to work. Each quadrant is the same size as the window.
Here is a picture to help describe what I’m talking about:
When the current quadrant is setup, you take a normal screen shot like the low-resolution system. One problem I didn’t like is that it will produce 9 different screen shots, one for each quadrant. In the article [R1] it says, “Since current graphics hardware cannot render the resolutions required for print, the desired final image must be divided into a grid of sub images and pasted together.” Since the article only explains about the perspective projection and what not, I had to find ways to accomplish this. There are 2 ways of doing this, taking all 9 screen shots into paint shop pro and pasting them together, or do it automatically. The first method is good if you have a lot of free time, but it’s still a hassle that can be avoided. So I came up with a solution to get around this. I tried a couple of different way, and this seems to work the best.
Pasting High Resolution Sub Images Together
- Allocate enough memory to hold all 9 screen shots (Remember this is only temporary)
- Take a screen shot of the current quadrant
- Compute the position to where that screen shot should be placed on the final image
- Copy the pixels from the current screen shot to the correct position on the final screen shot
- Check if the current quadrant is 8 (As in the picture)
- If it is, save the final screen shot and then free the memory used to hold the final screen shot
- If it is not, continue to the next quadrant
Of course there are a couple steps I have left out because I have not discussed the watermarking system yet. I will fill in the extra steps when I discuss that.
Video System
Designing the video system is pretty easy but very frustrating. I will not go into great detail about this here. Look at the source code, it is fully commented so you should be on the right track after reading the comments.
Watermark System
After a screen shot is taken, you can add the option to add a watermark to the final image. The system will compute the correct position on the screen shot to put the watermark after specifying where you want it. There are 4 choices you can choose from, Top Left, Top Right, Bottom Left, and Bottom Right. After it computes that, it loops through every pixel in the watermark. If the transparent color was set, it will see if the current pixel needs excluded. If it does, it will make the current pixel color the screen shots color. After the transparency is checked, it does the blending as described above. It uses linear interpolation to do the blending. In a high-resolution screen shot, you have to check if the current quadrant is right to add the watermark to. If the watermark is suppose to be in the top left corner, you have to make sure it is quadrant 0 (See above picture). If the position is Top Right, you have to make sure only to apply it to quadrant 2. Bottom left would be quadrant 6 and bottom right would be quadrant 8. If the quadrant is not correct, just skip adding the watermark. For a video, just add the watermark before you append the frame to the file. It’s not that hard to implement, just a little confusing if you have never done something like this before.
References
| [R1]: |
Rendering Print Resolution Screen Shots by Alex Vlachos and Evan Hart
Page 406 in the book: Game Programming Gems 2 |
Conclusion
Designing a good screen shot system is something a lot of programmers do not think about. Most of the screen shot systems found on the web just show you how to use Direct3D’s GetFrontBuffer(*) function or OpenGL’s glReadPixels(*) function and that’s it. This system moves beyond that and adds a little more advanced features to a standard screen shot system. Not only can you create standard low-resolution screen shots now, you can create high-resolution screen shots and videos with watermarks. Also, you never have to worry about your screen shots being over written, due to the file manager. I hope you will find this useful and I hope it will save you a lot of time and headaches. Best of luck to you and your future products. This system could use a lot of optimizing and organizing. Feel free to make that a personal exercise :)
Some of the systems were hard to explain, so if you have any question try reading the source code. If you still have any questions, feel free to sent me an e-mail with a specific question and I will help you out.
Don’t forget to leave a message in the forum to let me know what you think of it! I’m open to suggestions also, let me know if there is something I can change or add to this.
-James
|
|