Depth-Pass or Depth-Fail
We had run through most of the method and implementation issues of both the depth-pass and depth-fail techniques for doing stencil shadow volumes. So which method should we use in our games? Lets take stock of the pros and cons of both techniques.
Depth-pass
- Advantages
- Does not require capping for shadow volumes
- Less geometry to render
- Faster of the two techniques
- Easier to implement if we ignore the near plane clipping problem
- Does not require an infinite perspective projection
- Disadvantages
- Not robust due to unsolvable near plane clipping problem
Depth-fail
- Advantages
- Robust solution since far plane clipping problem can be solved elegantly
- Disadvantages
- Requires capping to form closed shadow volumes
- More geometry to render due to capping
- Slower of the two techniques
- Slightly more difficult to implement
- Requires an infinite perspective projection
It seems that depth-pass is the better technique of the two, but we must remember that it will totally fail when our camera enters a shadow volume. Until there is a feasible solution for the near plane clipping problem, the depth-fail technique is still required if a robust implementation is desired. The selection between the two techniques depends heavily on the constraints of the games that we are developing. If shadow casting is required for a top down or isometric view game such as Diablo, the depth-pass technique will suffice. On the other hand, for FPS games, it would be almost impossible to avoid the situation of camera entering a shadow volume. In this case, depth-fail technique is the only feasible solution. Of course, we must also not forget about other shadowing techniques such as shadow mapping. In certain situations where the shadow casters in a scene are too small for any self-shadowing to be visible, it would be wiser to just use projective shadow mapping. For realistic soft shadows, it may also be done more cheaply using shadow maps.
On the whole, it is beneficial to combine other techniques with shadow volumes to achieve better quality shadows. One example of such hybrid implementation is the Power Render X [16] game engine that generates shadows using shadow volumes and then fade out the shadows with respect to distance from the occluder by using projective textures.
The Buzzwords: Robustness and Efficiency
Doing realistic and accurate shadows in games is no longer enough as the complexity of games had skyrocketed during the past 10 years. We need to provide robust and yet efficient implementations of stencil shadow volumes. In the case of robustness, using the depth-fail technique should suffice for almost any situations imaginable. However, hardware limitations and poor frame rates will sometimes push the depth-fail technique beyond our computation budget. There are many ways to optimize our shadow volume implementation so as to create nice looking shadows and yet hold the frame rate above that all-important 20fps benchmark.
The real bottlenecks in a stencil shadow volume implementation are silhouette determination and shadow volume rendering. The former requires a huge amount of CPU cycles and it worsens if the occluders had high polygon counts. The latter is a huge consumer of invisible fill rate. One obvious way to alleviate the CPU crunch during silhouette determination is to use a lower polygon model of the occluder. Another effective way is to determine a new silhouette only every 2-4 frames. This is based on the assumption that the light's position or the occluder's position does not change very drastically within 2-4 frames. This assumption turns out to be pretty good for most cases.
Remember that the extra capping geometries used to form a closed shadow volume in the depth-fail technique contributed to depth-fail being a more expensive method? We can drastically reduce the capping geometries for occluders that have relatively little detail on the surfaces that frequently face the light. Little detail here means fewer geometric details, which implies that the surface is rather flat and would usually produce near or fully convex silhouette hulls. If that is the case, we can often create a triangle strip to be used as the front cap to close the shadow volume. We should note that this is an approximation and hence would result in shadows that are not correct at certain angles. However this approximation should work very well for small objects.
For Direct3D implementations, it is also advisable to use "welded" meshes. A welded mesh simply means that there are no duplicated vertices representing the exact same point. To see an example of an "unwelded" mesh, open the mesh viewer tool and create a cube. Look at the vertices information of the cube and you will see that there are 24 instead of just 8 vertices. This is unavoidable since Direct3D's version of a vertex contains color and normal information that cannot be shared by different faces referring to the same point; hence extra vertices are generated for different faces. The extra vertices are redundant but could not be removed during the silhouette calculation without considerable amount of comparison work. It is therefore wiser to use welded meshes for silhouette determination. The Direct3D mesh viewer utility provides a nifty option to do just that. Click MeshOps then Weld Vertices, check Remove Back To Back Triangles, Regenerate Adjacency and Weld All Vertices before welding. Alternatively, we can also make use of the mesh function D3DXWeldVertices to weld the mesh ourselves.
For Direct3D implementations, it is also advisable to use "welded" meshes. A welded mesh simply means that there are no duplicated vertices representing the exact same point. To see an example of an "unwelded" mesh, open the mesh viewer tool and create a cube. Look at the vertex information for the cube and you will see that there are 24 instead of just 8 vertices. This is unavoidable since Direct3D's version of a vertex contains color and normal information that cannot be shared by different faces referring to the same point; hence extra vertices are generated for different faces. The extra vertices are redundant but could not be removed during the silhouette calculation without considerable amount of comparison work. It is therefore wiser to use welded meshes for silhouette determination. The Direct3D mesh viewer utility provides a nifty option to do just that. Click MeshOps then Weld Vertices, check Remove Back To Back Triangles, Regenerate Adjacency and Weld All Vertices before welding. Alternatively, we can also make use of the mesh function D3DXWeldVertices to weld the mesh ourselves.
Regarding the invisible fill rate, they are really unavoidable. However, we could probably lessen the impact by setting the D3DRS_COLORWRITEENABLE render state in Direct3D before rendering the shadow volume. We can use it to turn off the red, green, blue and alpha channel drawing since we are only interested in filling the stencil buffer.
Another area that we should take note of is the management of shadow casting lights in our 3D scene. Good management of light sources will invariantly benefit the shadow volume generation process. The rule of thumb is to keep the number of shadow casting light sources below a maximum of 4 at any one time. Future hardware or improved algorithms would nullify the previous statement, but for now it serves as a good guideline and would probably remain so for the next 2 years at least. The important aspect of light source management is the method used for selecting which light sources should be included in the shadow volume generation process. The main parameters that should be taken into considerations could be intensity, distance from viewer, relevance to current game play and lastly visual importance. Take a look at the excellent article [4] by Charles Bloom regarding the selection of light sources for shadow casting.
Let's discuss some high level optimization that we can employ to speed up our shadow volume enabled games further. We can actually make use of the depth-pass technique when we are sure that the camera is not within any shadow volumes. This can be done rather easily by forming a near-clip volume. The light source's position and the four sides of the near plane are used to define a pyramid. The near plane closes the pyramid and thus forms the near-clip volume. If an occluder lies completely outside this volume, we can safely employ the depth-pass technique since the occluder's shadow volume has no chance of intersecting the near plane. Eric Lengyel also described utilizing OpenGL scissor rectangle support to cut down the fill rate penalty for rendering the shadow volumes and the illuminated fragments. However, comprehensive high-level scissor rectangle support is not yet available in DirectX 8.1. For details of these two optimizations, please refer to [11].
Lastly, we should aggressively utilize any hardware supports that are available. Future GPUs would be expected to support two-sided stencil testing, which will allow us to render the front and back faces of shadow volumes together. This would provide great savings when rendering the shadow volume by halving the geometry setup cost, vertex transformation cost and geometry transfer cost since we would only need to push the shadow volume geometries through the pipeline once. The hardware will take care of the front face and back face culling automatically while doing 2 stenciling pass on the same set of geometries. Hardware depth-clamping support should also be used to clip the shadow volume geometries to the far plane at no extra costs. Finally, lets look at one of the most important modern graphics hardware capability that we should take full advantage of: Vertex Shaders.
Shadow Volumes Powered By Vertex Shaders
Among the whole host of improvements to commercial graphics hardware, the introduction of programmable vertex processing pipeline (vertex shaders) is perhaps the best thing that can happen to anyone implementing shadow volumes. The biggest advantage of doing shadow volumes in a vertex program is that we do not need to upload the shadow volume geometries whenever it is generated. The entire shadow volume could reside on hardware memory as static vertex buffers. The data bandwidth saved can be quite substantial. Furthermore, floating point operations done in programmable vertex hardware are incredibly fast. However, we need to note here that implementing shadow volume fully using vertex program may actually degrade performance in certain circumstances. We will go into this at the end of this section.
To leverage the power of vertex shaders, we need to preprocess our occluder's geometry first. Current vertex shader hardware does not have the capability of generating new vertices on the fly. It is strictly a 1 vertex in and 1 vertex out pipeline. This poses a problem since we need to create new vertices from the silhouette edges in order to form a shadow volume. The solution is to create all the additional vertices that are needed during preprocessing. Once in the vertex shader, we generate the shadow volume using these additional vertices. Lets look at how this is done.
We need to create a quad for every edge (2 vertices) that is shared by exactly 2 faces. The quad can be viewed as a "degenerate" quad formed by the original edge shared by 2 different faces. Both the faces contribute the same edge to the degenerate quad. Since the edges from both faces are similar, positional wise, the degenerate quad is "zero length". The only difference is that the edges hold the normal information of their respective face. Once in the vertex program, we dot the light vector and the vertex normal. If the result is positive, the vertices pass through the vertex program untouched. If the result is negative, we extrude it in the direction of the light vector. This technique would elegantly generate a closed shadow volume as light facing geometries are left untouched to form the front capping while geometries that faces away from the light are extruded to form the sides of the shadow volume and the back capping.
If you are unsure about how it works, try this example. Imagine a sphere mesh with a point light source to its left. The entire left hemisphere faces the light and hence all the geometries that define the left hemisphere are left untouched to form the front capping. The entire right hemisphere however faces away from the light. Hence, all the geometries that define the right hemisphere are extruded to form the back capping. The sides of the shadow volume are formed auto-magically by the degenerated quads residing along the silhouette edges. In this case, the silhouette edges forms exactly a vertical line down the middle of the sphere. This works because exactly 1 edge per degenerate quad from the silhouette edges is extruded. The previously degenerate quad now becomes a normal quad that defines the shadow volume's sides. Chris Brennan presented a short article in [15] on implementing the extrusion of shadow volume in a vertex program.
We should note that the preprocessing needed creates a lot of additional geometries. In fact, only the degenerate quads along the silhouette edges are useful. The rest are simply dormant but are still being pushed through the processing pipeline. However, shadow volume generation can now be done completely on the graphics hardware and performance is generally much better than non-shader implementation in most cases.
Recently Mark Kilgard pointed out that computing the silhouette edges within the vertex shader may be detrimental to performance if the occluders have high polygon counts or if there are a lot of shadows casting light sources. This assessment stern from the fact that we need to push more vertices into the pipeline and all of these have to passed through the silhouette edges testing within the vertex shader. Consequently, occluders with high polygon counts would generate large amount of wasted vertices (degenerate quads), and the cost of testing all these extra vertices may not cover the geometry upload savings we get by using vertex shaders! Having more light sources will obviously worsen such vertex shader implementation further. Hence, implementation of shadow volume on programmable vertex hardware should be thoroughly tested to ensure that we have a net performance gain over implementation utilizing the CPU. If the CPU is needed for heavy A.I. or game logic computation, a vertex shader implementation of shadow volumes may be more efficient. However, it might also be better in many cases to just use vertex shader as an assist instead of trying to do everything within the vertex shader. The moral of the story is: always remember to turn on everything (A.I., Physics, Sound, Input, Network, Renderer etc) in your game and benchmark, benchmark and benchmark again!
Lastly, a more extensive and in-depth article on the stencil shadow volume technique will be available in the upcoming book ShaderX2 (www.shaderx2.com). The article in the book delves deeper into the algorithms involved in stencil shadow volume with detailed discussions of optimizations, workflow, and scene management and ‘cheats' employed in commercial 3D engines to speed up robust shadow volume implementations. There will also be 6 extensive samples that cover normal CPU, GPU implementation in assembly and GPU implementation using the new High Level Shader Language (DirectX9.0). The book is a compilation of many advance shader techniques by professionals and engineers working in the field. It will be available possibly in August 2003 and the editor is Mr Wolfgang Engel.
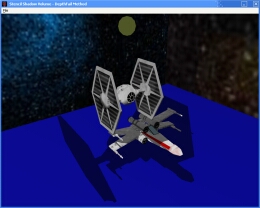
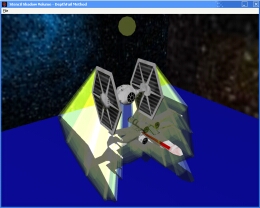
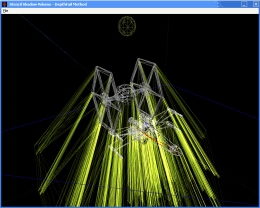
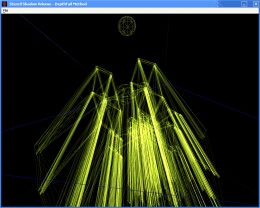
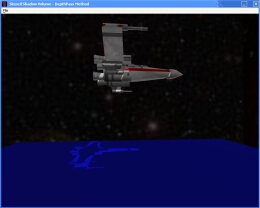
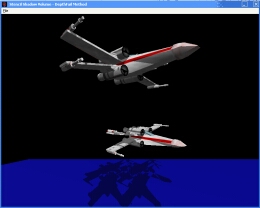
Shadow Volumes At Work
Reference
[1]: Mark Kilgard, http://developer.nvidia.com/docs/IO/1348/ATT/stencil.pdf
[2]: Mark Kilgard, http://developer.nvidia.com/docs/IO/1451/ATT/StencilShadows_CEDEC_E.pdf
[3]: http://developer.nvidia.com/view.asp?IO=inf_shadow_volumes
[4]: Charles Bloom, http://www.cbloom.com/3d/techdocs/shadow_issues.txt
[5]: Tim Heidmann, http://developer.nvidia.com/docs/IO/2585/ATT/RealShadowsRealTime.pdf
[6]: John Carmack, http://developer.nvidia.com/docs/IO/2585/ATT/CarmackOnShadowVolumes.txt
[7]: Bilodeau, Bill and Mike Songy. "Real Time Shadows", Creativity 1999, Creative Labs Inc. Sponsored game developer conferences, Los Angeles, California, and Surrey, England, May 1999.
[8]: Frank Crow. Shadows Algorithms for Computers Graphics. Computer Graphics, Vol. 11, No.3, Proceedings of SIGGRAPH 1977, July 1977.
[9]: Cass Everitt and Mark Kilgard, http://developer.nvidia.com/docs/IO/2585/ATT/RobustShadowVolumes.pdf
[10]: Cass Everitt and Mark Kilgard, http://developer.nvidia.com/docs/IO/2585/ATT/GDC2002_RobustShadowVolumes.pdf
[11]: Eric Lengyel, http://www.gamasutra.com/features/20021011/lengyel_01.htm
[12]: Eric Lengyel, "Mathematics for 3D Game Programming & Computer Graphics", Charles River Media, 2002
[13]: Tomas Moller, Eric Haines. "Realtime Rendering", 2nd Edition, A K Peters Ltd, 2002, ISBN: 1-56881-182-9.
[14]: Wolfgang F. Engel, Amir Geva and Andre LaMothe. "Beginning Direct3D Game Programming", Prima Publishing, 2001, ISBN: 0-7615-3191-2.
[15]: Wolfgang F. Engel. "Direct3D ShaderX Vertex and Pixel Shader Tips and Tricks", Wordware Publishing Inc, 2002.
[16]: Power Render X game engine. http://www.powerrender.com/prx/index.htm
[17]: Gamasutra website. http://www.gamasutra.com/
|
|