|
Vertex Shader Tools
As you will see in a few seconds, you are required to master a specific RISC-oriented assembly language to program vertex shaders, because the vertex shader allows you to program the geometry processor yourself. So it is important to get the right tools to begin as fast as possible to develop shaders in a productive way.
I would like to present you with the available tools that I'm aware of. If you know other interesting tools, give me a sign via e-mail and I will add it to upcoming versions of this text.
nVidia Effects Browser 2.0
nVidia provides their own DirectX 8 SDK, that encapsulates all their tools, demos and presentations on DirectX 8.0. All the demos use a consistent framework called Effects Browser.
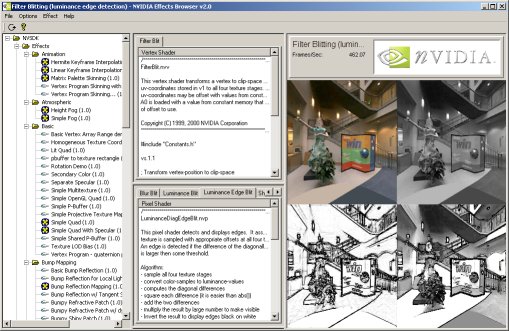
The effects in the Effects Browser can not be displayed by a wide variety of graphics hardware, as you might expect. For example my ATI RADEON doesn't support a lot of these, whereas the RADEON 8500 supports all the effects despite the ones that use RT patches.
The Effects Browser is a wonderful tool to test and develop vertex and pixel shaders. You can select the effect you would like to see in the left column. The middle column gives you the possibility to see the source of the vertex and/or pixel shader. The right column shows you the effect.
Independent of your current graphic card preferences, I recommend downloading the nVidia DirectX 8 SDK and trying it out. It provides and explains in detail a lot of examples which show you a variety of effects possible with vertex and pixel shaders.
nVidia Shader Debugger
Once you've used it, you won't want to live without it. The nVidia shader debugger provides you with information on the current state of the temporary registers, the input streams, the output streams, and the constant memory in the debugging windows. This data changes interactively while stepping through the shaders. It is also possible to set specific breakpoint events as well as instruction breakpoints.
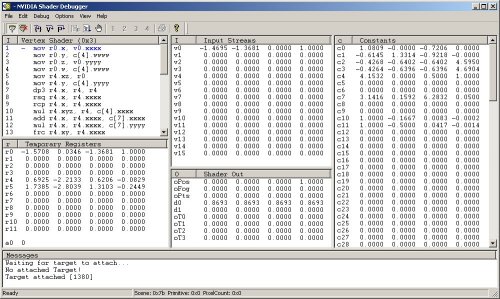
A user manual that explains all the possible features is provided. Philip Taylor explains the features in his first article on vertex shaders at MSDN too.
You need at least Windows 2000 with Service Pack 1 to run the Shader Debugger, because debug services in DX8 are only supplied in Windows 2000 and higher. It is important that your application uses software vertex processing (or you have to switch to the reference rasterizer) in the runtime for the debugging process.
Note: The shader debugger can be used for re-engineering. If you start an application with a vertex shader with the Reference Rasterizer, you might be able to see the vertex and pixel shader source in the Shader Debugger.
Note #2: You are also able to debug pixel shaders with this debugger, but due to a bug in DirectX 8.0 the contents of t0 are never displayed correctly and user-added pixel shader breakpoints will not trigger. DirectX 8.1 fixes these issues and you get a warning if the application finds an installation of DirectX 8.0.
Shader City
You can find another vertex and pixel shader tool with source code at http://www.palevich.com/3d/ShaderCity/. It is built by Jack Palevich (who by the way modified the Quake 1 source to use Direct3D 8). You are able to see any modification of the vertex and/or pixel shaders in the small client window in the left upper edge:
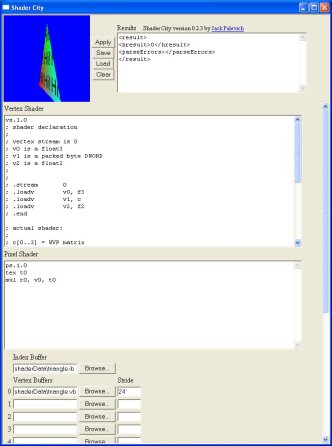
You can modify the vertex and pixel shaders, save them, and load them to see the results of your changes. In addition, you are able to load index and vertex buffers from a file. The source of this tool might help you to encapsulate Direct3D in an ActiveX control ... so try it.
Vertex Shader Assembler
To compile a vertex shader ASCII file - for example basic.vsh - into a binary file - for example basic.vso - you have to use a vertex shader assembler. As far as I know, there are two vertex shader assemblers: the Microsoft vertex shader assembler and the nVidia vertex and pixel shader macro assembler. The later provides all of the features of the Vertex Shader Assembler plus many other niceties, whereas the Vertex Shader Assembler gives you the possibility to use effect files (possible since the advent of DirectX 8.1).
nVidia NVASM - Vertex and Pixel Shader Macro Assembler
nVidia provides its Vertex and Pixel Shader Macro Assembler as part of their DirectX 8 SDK. NVASM has very robust error reporting built into it. It will not only tell you what line the error was on, it is also able to back track errors. Good documentation helps you getting started. We will learn how to use this tool in one of the upcoming examples in the next lesson.
Microsoft Vertex Shader Assembler
The Microsoft vertex shader assembler is included in the DirectX 8.x SDK in
C:\dxsdk\bin\DXUtils
BTW: The default path of the DirectX 8 SDK is c:\mssdk. The default path of DirectX 8.1 SDK is c:\dxsdk.
If you call vsa.exe from the command line, you will get the following options:
usage: vsa -hp012 <files>

-h : Generate .h files (instead of .vso files)
-p : Use C preprocessor (VisualC++ required)

-0 : Debug info omitted, no shader validation performed
-1 : Debug info inserted, no shader validation performed
-2 : Debug info inserted, shader validation performed. (default)
I haven't found any documentation for the Vertex Shader Assembler. It is used by the D3DXAssembleShader*() methods to compile the vertex shader file while the application starts up, or by the effect file method, that reads the effect files. If you want to be hardware-vendor independent you should use this one with the D3DX functions.
NVLink 2.1
NVLink is a very interesting tool. It allows you to do the following:
- Write vertex shaders that consists of "fragments" with the #beginfragment and #endfragment statements, for example:
#beginfragment world_transform
dp4 r_worldpos.x, v_position, c_world0
dp3 r_worldpos.y, v_position, c_world1
dp4 r_worldpos.z, v_position, c_world2
#endfragment
- Assemble vertex shader files with NVASM into "fragments"
- Link those fragments to produce a binary vertex shader at run-time
This way you are able to generate shaders on demand, that will fit into the end-users hardware limits (registers/instructions/constants). The best thing is about this tool is that it will cache and optimize your shaders on the fly. NVLink works in the NVEffects Browser:
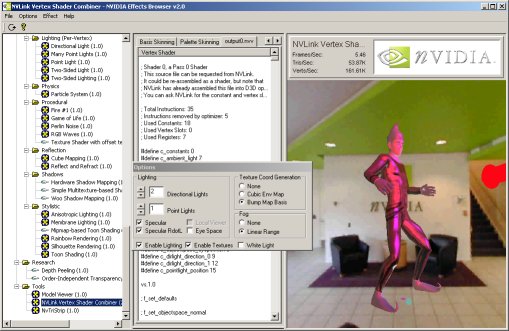
You can choose the vertex shader capabilities in the dialog box and the resulting vertex shader will be built in output0.nvv.
Note: the NVLink 2.x example shows the implementation of the fixed-function pipeline in a vertex shader.
ATILLA
Coming soon :-)
nVidia Photoshop PlugIns
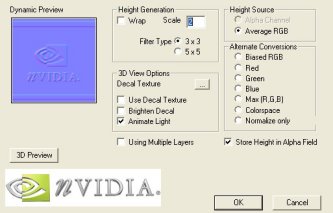
There are two very frequently updated plug-ins for Adobe Photoshop. nVidia's Normal Map Generator plugin and Photoshop compression plugin. You will need the normal map generator for creating normal maps (for example for bump mapping and per-pixel lighting):
The plugin requires that you have DirectX 8.0 or later installed. There is a readme.txt provided to explain its features.
CTRL + left-mouse-button moves the light in the small preview window, located in the upper left corner, around. It works with layers too. If you select or deselect Wrap, the texture borders are clamped or wrapped to the edge. The value for Scale is the height of the height posts.
There are different options for height generation:
- ALPHA - use alpha channel
- AVERAGE_RGB - average R, G, B
- BIASED_RGB - h = average (R, G, B) - average of whole image
- RED - use red channel
- GREEN - use green channel
- BLUE - use blue channel
- MAX - use max of R, G, B
- COLORSPACE, h = 1.0 - [(1.0 - r) * (1.0 - g) * (1.0 - b)]
To use the compression plugin, you have to choose <Save As> in Adobe Photoshop and then the <DDS> file format. This dialog will appear:
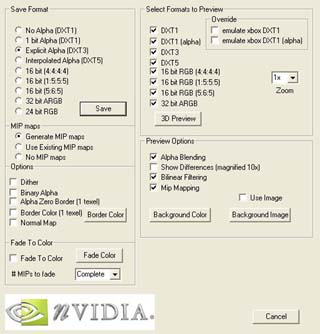
This texture compression plugin allows you to open and save *.dds files. It also provides a 3D preview and a lot of other possibilities. Perhaps you will be surprised by the compression ratio that is possible with the DXT* file formats. Take a look at the preview by clicking on the <3D Preview> button. Both tools support Adobe Photoshop 5.0 and higher. As far as I know these plugins are also supported in JASC Paintshop Pro.
3D Studio MAX 4.x
The new 3D Studio MAX 4.x gives a graphic artist the possibility to produce vertex shader and pixel shader code while producing the models and animations.
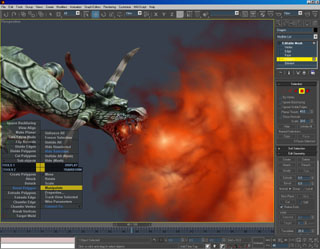
You can see in a WYSIWYG view how your work will appear by displaying multitextures, true transparency, opacity mapping, and the results of custom pixel and vertex shaders.
I can't comment on this tool, because I don't own it. As far as I know there will be a reduced but free version of this tool for game development activities. Read more at discreet.
Most of these tools are free to use and provided by Microsoft or different graphic hardware producers. If you have any experience with one of these tools and want to write a few paragraphs on your experience, I would be happy to expand my short descriptions. Just drop me an e-mail.
I am sure that there will be numerous new tools that help you even more in the future. But that shouldn't prevent us from getting deeper into vertex shader programming by looking at a graphical representation of the vertex shader architecture.

Next : Vertex Shader Architecture
| 