|
Windows window coordinate systems
I spent a little time earlier just getting the code up and running, but here we will go more in-depth! (and I mean REALLY in-depth :) )
Screen coordinates start with 0, 0 at the upper left hand corner of the screen, and increase as you move toward the lower right corner of the screen. The width and height of the screen are the maximum values for x and y. As a visual aid, I just copied my desktop, shrunk it, and placed the area covered by screen coordinates inside the black rectangle with an X to make it more visible.
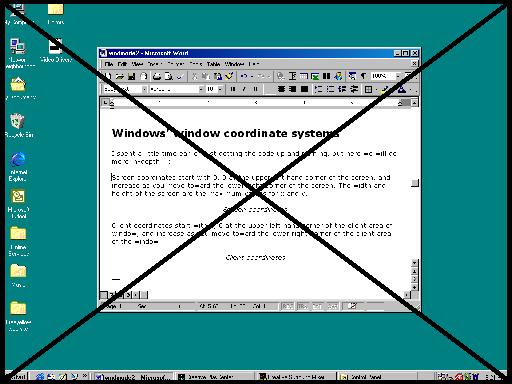
Screen coordinates
Client coordinates start with 0, 0 at the upper left hand corner of the client area of window, and increase as you move toward the lower right corner of the client area of the window. I took the same copy, but this time the client coordinates for the open window are enclosed by the black box.
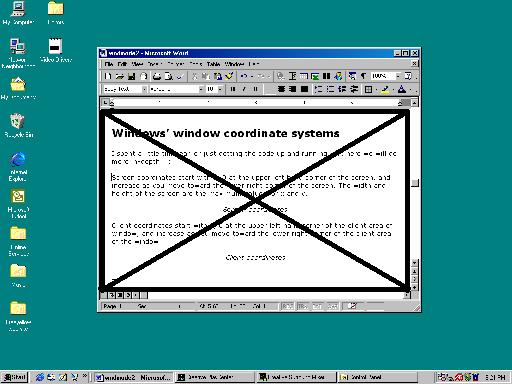
Client coordinates
As you can see, the screen coordinates can address the whole screen, while the client coordinates can only access a certain area of a window. Therefore, when you set the position of your window with CreateWindow()s parameters, you are setting them in screen coordinates. When you draw from a WM_PAINT message, you draw in client coordinates, because you only want to draw inside your window, and dont need to be concerned with calculating its position on the screen. In other words, screen coordinates are absolute coordinates, while client coordinates are relative to the position of the window, the size of the title bar, etc.
There are times when you need to convert from screen coordinates to client coordinates, and vice versa. Windows provides two very helpful little functions to do just that: ScreenToClient() and ClientToScreen(). Both take any point in either coordinate system and find the same physical position on the screen in the other coordinate system. DirectDraw always uses the screen coordinate system (or absolute coordinate system), because it allows you to draw on the entire screen.
Finally, the windows client area is not always the same size, either. When you call CreateWindow(), you specify an x,y coordinate on the screen, plus a width and height for the window. However, things like title bars, borders, menus, toolbars, status bars, etc. take up some of that room, too. So the client area of the window may be different on computers with different Windows settings, like a different font size for the title bar. It is impossible to calculate all the different variations; fortunately, it isnt too hard to get an exact client area size on any Windows machine.
To do this, we simply create the window with the CW_USEDEFAULT constant for the x,y and width and height parameters. Then, we subtract the default client rect from the one we want, and increase/decrease the size of the window by the difference. Simple, huh? To make it easier to use, well put the whole thing into a function, and call it:
RECT CalculateWindowRect(HWND hWndToAdjust, SIZE szDesiredClient);
That function takes the handle of the window we want to adjust, and the desired size of the client area. Then it calculates the new window rect and returns it. Now we have to add some code to that function to make it work properly. (Dont be afraid if you cant understand this code right away; for now just skim over it and you can go back to it as we discuss it in detail.) Add this code:
RECT CalculateWindowRect(HWND hWndToAdjust, SIZE szDesiredClient)
{
  // declare a RECT to hold the results of our calculations
  RECT rcDesiredWindowRect;
  ZeroMemory(&rcDesiredWindowRect, sizeof( rcDesiredWindowRect ));

  // get the current window rect and its client rect
  RECT rcCurrentWindowRect;
  RECT rcCurrentClientRect;

  GetWindowRect(hWindow, &rcCurrentWindowRect);
  GetClientRect(hWindow, &rcCurrentClientRect);

  // get the difference between the current and desired client areas
  SIZE szClientDifference;

  szClientDifference.cx = (rcCurrentClientRect.right  - szDesiredClient.cx);
  szClientDifference.cy = (rcCurrentClientRect.bottom - szDesiredClient.cy);

  // get the difference between the current window rect and the desired
  // desired window rect
  rcDesiredWindowRect.left   = rcCurrentWindowRect.left;
  rcDesiredWindowRect.top    = rcCurrentWindowRect.top;
  rcDesiredWindowRect.right  = (rcCurrentWindowRect.right  - szClientDifference.cx);
  rcDesiredWindowRect.bottom = (rcCurrentWindowRect.bottom - szClientDifference.cy);

  return rcDesiredWindowRect;
}
Whew! Thats a lot of code! The best way to learn it is to step through it in the debugger, to see which values change and what the calculations really mean. Now that we have a function thats relatively easy to use, where do we use it? In our trusty SwitchMode function, of course! :) Well need to change the size of the window primarily when switching modes, so it makes sense to use it there. Well also need a function that can adjust the main windows size; that way, the SwitchMode function is more readable. Well call that function:
void AdjustMainWindow(bool bExclusive, int nScreenWidth, int nScreenHeight);
It may look and act similar to a Windows API function, but well add some rather unique things to that function later on... ;) Lets take a look at the code for now:
void AdjustMainWindow(bool bExclusive, int nScreenWidth, int nScreenHeight)
{
// hide the window while we're working...
ShowWindow(hMainWnd, SW_HIDE);
if( bExclusive )
{
// exclusive mode code
}
else
{
// windowed mode code
// calculate the new window rect
SIZE szDesiredClient;
szDesiredClient.cx = nScreenWidth;
szDesiredClient.cy = nScreenHeight;
RECT rcNewWindowRect = CalculateWindowRect(hMainWnd, szDesiredClient);
// resize the window according to the new rect
MoveWindow(hMainWnd, rcNewWindowRect.left, rcNewWindowRect.top,
(rcNewWindowRect.right rcNewWindowRect.left),
(rcNewWindowRect.bottom rcNewWindowRect.top), true);
}
// unhide the window now that we're done with it
ShowWindow(hMainWnd, SW_SHOW);
}
First off, we hide the window to keep from repainting everything and making a general mess until were finished. (This is completely optional you can remove the ShowWindow calls if you want.) That if() statement just executes the code based on the new mode. For exclusive mode, there is no need to adjust the size. For windowed mode, we must change the size of the window. First, we create a temporary size structure to hold the width and height of the new client area, then we pass that with the main window handle to CalculateWindowRect to get the new window rect. Then we just pass that to MoveWindow, which resizes the window, and re-show the window now that were done. (Showing the window here allows for repainting of the title bar and other windows stuff.)
Now, to test it all out! Add this code to the SwitchMode function, in between the call to DestroySurfaces and CreateSurfaces:
// resize the main windows client area
AdjustMainWindow(bool bExclusive, nWidth, nHeight);
The nWidth and nHeight variables are the second and third parameters from SwitchMode, so you can do this:
// DX changes the window size to 640x480 automatically here
SwitchMode(true, 640, 480, 16);
// and this adjusts the windows client area (where well draw!) to 640x480, also
SwitchMode(false, 640, 480, 16);
The width and height we pass to SwitchMode is really only specifying the size of the drawing surface we want we dont care whether its running fullscreen or windowed. It all works the same now! (Well, except for the bit-depth, which you cant (shouldnt) change in windowed mode...)
|
